FordParts
My Garage
My Account
Cart
OEM 2002 Lincoln Continental A/C Condenser
Air Conditioning Condenser- Select Vehicle by Model
- Select Vehicle by VIN
Select Vehicle by Model
orMake
Model
Year
Select Vehicle by VIN
For the most accurate results, select vehicle by your VIN (Vehicle Identification Number).
1 A/C Condenser found

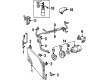
2002 Lincoln Continental Condenser Part Number: XF3Z-19712-AA
Product Specifications- Other Name: Condenser Assembly; A/C Condenser
- Base No.: 19712
- Item Weight: 10.80 Pounds
- Item Dimensions: 36.5 x 5.8 x 21.5 inches
- Condition: New
- Fitment Type: Direct Replacement
- SKU: XF3Z-19712-AA
- Warranty: This genuine part is guaranteed by Ford's factory warranty.
2002 Lincoln Continental A/C Condenser
If you're seeking quality and affordability, look no further than our extensive inventory of genuine 2002 Lincoln Continental A/C Condenser available at FordPartsDeal.com. You can confidently purchase our OEM 2002 Lincoln Continental A/C Condenser as they are supported by the manufacturer's warranty and our hassle-free return policy, alongside the benefit of our fast delivery service.
2002 Lincoln Continental A/C Condenser Parts Q&A
- Q: How to Service and Repair the A/C Condenser on 2002 Lincoln Continental?A: The process of repairing the HVAC condenser demands first removing the radiator upper sight shield and recovering refrigerant. The windshield washer fluid reservoir filler can be moved when its screws are removed followed by disconnecting the RH fender support brace through screw removal. The service requirements start with disconnection of the forward condenser to evaporator tube spring lock coupling from the aft condenser to evaporator tube before removing the two nuts that attach the A/C condenser core to the radiator. The radiator needs suspension from the upper radiator support to perform the procedure while the vehicle rests on a hoist. The radiator air deflector removal starts by unpining its retainers while unscrewing pins then continues with the removal of four bumper cover pin retainers. First unfasten the screws from the power steering/transmission fluid cooler while also removing the bolts on the LH side of the lower radiator support until the lower radiator support becomes detachable. Disengage the A/C compressor to condenser discharge line spring lock coupling from the A/C tube manifold and disconnect it before lifting off the A/C condenser core from radiator support brackets. Remove the A/C condenser core along with compressor to condenser discharge line and the forward condenser to evaporator tube. Install the new A/C condenser core by first lubricating it with PAG Refrigerant Compressor Oil (R134a is required) or equivalent oil followed by a proper installation of the A/C compressor to condenser discharge line and the forward condenser to evaporator tube to the A/C condenser core. Ensure the O-ring seal has same lubricated oil. The installation requires attaching the A/C condenser core to the radiator then coupling the A/C compressor to condenser discharge line spring lock coupling with the A/C manifold and tube. Reinstall both RH and LH lower radiator supports by installing their respective bolts followed by the power steering/transaxle oil cooler. Install the pin-type retainer screws on the bumper cover and the air deflector before lowering the vehicle and taking away all temporary support components attached to the radiator. Secure the alc condenser core to the radiator through the use of two nuts and join the forward condenser to evaporator tube spring lock coupling with the aft condenser to evaporator tube before placing back both the right fender support brace and windshield washer fluid reservoir filler. Evacuate then charge the refrigeration system before replacing the radiator sight shield at the top part.
Related 2002 Lincoln Continental Parts
 2002 Lincoln Continental Cabin Air Filter
 2002 Lincoln Continental A/C Accumulator
 2002 Lincoln Continental A/C Clutch
 2002 Lincoln Continental A/C Hose
 2002 Lincoln Continental A/C System Valve Core
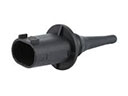 2002 Lincoln Continental Ambient Temperature Sensor
 2002 Lincoln Continental Blend Door Actuator
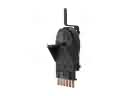 2002 Lincoln Continental Blower Control Switches
 2002 Lincoln Continental Blower Motor
 2002 Lincoln Continental Blower Motor Resistor
 2002 Lincoln Continental Heater Core
 2002 Lincoln Continental HVAC Pressure Switch