FordParts
My Garage
My Account
Cart
OEM 2006 Ford Mustang Clock Spring
Spiral Cable Clock Spring- Select Vehicle by Model
- Select Vehicle by VIN
Select Vehicle by Model
orMake
Model
Year
Select Vehicle by VIN
For the most accurate results, select vehicle by your VIN (Vehicle Identification Number).
1 Clock Spring found


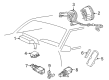
2006 Ford Mustang Clockspring Part Number: 6R3Z-14A664-AA
$111.11 MSRP: $161.73You Save: $50.62 (32%)Ships in 1-2 Business DaysProduct Specifications- Other Name: Cover And Contact Plate Assembly; Air Bag Clockspring
- Replaces: 4R3Z-14A664-AA
- Base No.: 14A664
- Item Weight: 1.10 Pounds
- Item Dimensions: 6.4 x 6.3 x 6.0 inches
- Condition: New
- Fitment Type: Direct Replacement
- SKU: 6R3Z-14A664-AA
- Warranty: This genuine part is guaranteed by Ford's factory warranty.
2006 Ford Mustang Clock Spring
If you're seeking quality and affordability, look no further than our extensive inventory of genuine 2006 Ford Mustang Clock Spring available at FordPartsDeal.com. You can confidently purchase our OEM 2006 Ford Mustang Clock Spring as they are supported by the manufacturer's warranty and our hassle-free return policy, alongside the benefit of our fast delivery service.
2006 Ford Mustang Clock Spring Parts Q&A
- Q: How to Safely Service the Clock Spring Assembly to Ensure Proper Functionality on 2006 Ford Mustang?A: Wear proper safety glasses when servicing the Clock Spring assembly since they assist in minimizing injury risks from accidentally deploying air bags while also excluding memory saver devices from use. The RCM fuse removal while the ignition switch is ON should cause the air bag warning lamp to illuminate but such illumination represents normal behavior with no SRS fault. The vehicle needs to have its SRS system operating faultlessly before being handed back to customers. The diagnostic procedures need to begin again after installing a new part because the repair issue does not resolve. The process starts with system depowering and setting all road wheels in a forward position. The process starts with downward tilt of the steering wheel while locking the tilt handle before removing the driver air bag module and steering wheel. The technician must remove two screws from the lower steering column shroud as well as from the upper steering column shroud. To prevent spinning of the rotor do a tape wrap along the outside housing when keeping the Clock Spring. You must carefully let go of the tilt handle before moving the spring-loaded steering column for lower steering column shroud installation with a downward orientation. To detach the Clock Spring connection remove its electric wires and unscrew the four retention screws which will allow you to extract the Clock Spring unit. The procedure for reworking a Clock Spring involves maintaining the outer housing stationary before turning the rotor counterclockwise until resistance occurs followed by clockwise rotation of approximately three turns to bring the ribbon wire into view across the window while the rotor arrow matches up with housing arrow position. Use the four screws to install the Clock Spring while reconnecting its electrical connector before positioning the lower steering column shroud in an upward direction. Use caution to lower the column then apply the lock to the tilt handle. To keep using the Clock Spring it should be unprotected from rotation. New Clock Spring installations must skip all steering wheel rotation while removing the sealing key because the process requires steering wheel installation or a centralizing procedure becomes necessary. Complete the installation process by placing the upper steering column shroud and inserting the two lower steering column shroud screws and installing the steering wheel and driver air bag module followed by system power-up.
Related 2006 Ford Mustang Parts
 2006 Ford Mustang Ignition Coil
 2006 Ford Mustang Crankshaft Position Sensor
 2006 Ford Mustang Speedometer
 2006 Ford Mustang Air Bag
 2006 Ford Mustang Air Bag Control Module
 2006 Ford Mustang Air Bag Sensor
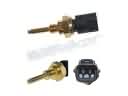 2006 Ford Mustang Cylinder Head Temperature Sensor
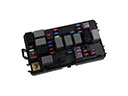 2006 Ford Mustang Fuse
 2006 Ford Mustang Ignition Coil Boot
 2006 Ford Mustang Temperature Sender
 2006 Ford Mustang Transmitter
 2006 Ford Mustang Vehicle Speed Sensor