FordParts
My Garage
My Account
Cart
OEM 2006 Lincoln LS Alternator
Generator- Select Vehicle by Model
- Select Vehicle by VIN
Select Vehicle by Model
orMake
Model
Year
Select Vehicle by VIN
For the most accurate results, select vehicle by your VIN (Vehicle Identification Number).
1 Alternator found

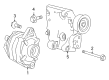
2006 Lincoln LS Alternator Part Number: 6W4Z-10346-AA
Product Specifications- Other Name: Alternator Assembly; Remanufactured Denso First Time Fit Alternator; Alternator Reman; Reman Alternator; Alternators
- Replaces: 4W4Z-10346-AA
- Base No.: 10346
- Item Weight: 14.10 Pounds
- Item Dimensions: 9.0 x 8.3 x 8.5 inches
- Condition: New
- Fitment Type: Direct Replacement
- SKU: 6W4Z-10346-AA
- Warranty: This genuine part is guaranteed by Ford's factory warranty.
2006 Lincoln LS Alternator
If you're seeking quality and affordability, look no further than our extensive inventory of genuine 2006 Lincoln LS Alternator available at FordPartsDeal.com. You can confidently purchase our OEM 2006 Lincoln LS Alternator as they are supported by the manufacturer's warranty and our hassle-free return policy, alongside the benefit of our fast delivery service.
2006 Lincoln LS Alternator Parts Q&A
- Q: How to service the alternator on 2006 Lincoln LS?A: To service the alternator one must first disconnect the battery before starting work. Start the procedure by turning the front end accessory drive (FEAD) belt tensioner counterclockwise then placing the FEAD belt to the side. Start by taking off both the front valance panel together with the air deflector. Detach the clip attached to the A/C suction line from the radiator core support then remove the left-hand A/C suction line lower bracket bolt by positioning the bracket rearward. Tighten this bracket to 10 Nm (89 lb-in) after reinstalling it. Disconnect the generator upper bolt first and secure it with 21 Nm (15 lb-ft) torque specification. The generator lower nut and bolt need to be installed with 45 Nm (33 lb-ft) torque. The generator B+ wire protective cover needs to be moved to one side before removing its nut and end point which becomes secure with a torque of 8 Nm (71 lb-in) when reinstalled. Remove the generator by first unscrewing its bracket bolts then fully tighten them to 48 Nm (35 lb-ft) before removing the bracket. The complete procedure ends by performing the steps in reverse order.