FordParts
My Garage
My Account
Cart
OEM 2009 Ford Focus Oil Pan
Oil Drain Pan- Select Vehicle by Model
- Select Vehicle by VIN
Select Vehicle by Model
orMake
Model
Year
Select Vehicle by VIN
For the most accurate results, select vehicle by your VIN (Vehicle Identification Number).
1 Oil Pan found


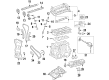
2009 Ford Focus Oil Pan Part Number: 1S7Z-6675-D
$101.48 MSRP: $156.17You Save: $54.69 (36%)Ships in 1-3 Business DaysProduct Specifications- Other Name: Pan Assembly - Engine Oil; Engine Oil Pan
- Replaces: 1S7Z-6675-AA, 1S7Z-6675-A
- Base No.: 6675
- Item Weight: 12.70 Pounds
- Item Dimensions: 7.7 x 21.2 x 14.1 inches
- Condition: New
- Fitment Type: Direct Replacement
- SKU: 1S7Z-6675-D
- Warranty: This genuine part is guaranteed by Ford's factory warranty.
2009 Ford Focus Oil Pan
If you're seeking quality and affordability, look no further than our extensive inventory of genuine 2009 Ford Focus Oil Pan available at FordPartsDeal.com. You can confidently purchase our OEM 2009 Ford Focus Oil Pan as they are supported by the manufacturer's warranty and our hassle-free return policy, alongside the benefit of our fast delivery service.
2009 Ford Focus Oil Pan Parts Q&A
- Q: How to service and repair the oil pan on 2009 Ford Focus?A: Service and repair operations for the oil pan begin when the vehicle sits on a hoist in neutral position without the battery tray. You should start by taking out the 2 nuts to keep the Heated Oxygen Sensor (HO2S) along with the Catalyst Monitor Sensor (CMS) wire connector bracket separate. You can safely service the transmission by loosening the upper bellhousing-to-engine bolt as well as the stud bolt by 5 mm (0.19 in) without going beyond this limit. Start by removing the oil level indicator and tube from the engine compartment before loosening the 3 bellhousing-to-engine bolts or 2 LH manual transaxle bolts and the RH engine-to-bellhousing bolt together with stud bolt by 5 mm (0.19 inch). To perform the operation slide the transaxle rearward by 5 mm (0.19 in) after you remove both bellhousing-to-oil pan bolts and the 2 oil pan-to-bellhousing bolts. Drain the engine oil and after that install the drain plug with a torque of 28 Nm (21 lb-ft). First remove all 13 oil pan securing bolts and then all 4 of the bolts that connect the engine front cover to the oil pan. The installation process requires cleaning mating surfaces without metal scrapers or abrasive tools. Also, follow up clean the sealing area with metal surface prep after 10 minutes have passed since the sealant application without securing the oil pan. Machine a 0.09 inch (2.5 millimeter) silicone bead for placement between the oil pan-to-engine block area and oil pan-to-engine front cover junctions. Insert the engine-facing side of the oil pan before tightening its 13 bolts only using finger strength. First tighten the 4 engine front cover-to-oil pan bolts to 10 Nm (89 lb-in) to align the oil pan with the engine block then apply a specified sequence to torque the oil pan bolts to 25 Nm (18 lb-ft). Fasten the accessory drive belt splash shield and its two bolts by applying torque of 9 Nm (80 lb-in). The process of sliding the transaxle and engine together starts with stepwise tightening of the 1 LH bellhousing-to-engine bolt and 1 RH engine-to-bellhousing bolt to 48 Nm (35 lb-ft). Secure all LH bellhousing-to-engine bolt(s) (for automatic transaxle) and rear engine-to-bellhousing stud bolt (both) with a torque of 48 Nm (35 lb-ft). The installation of 2 bellhousing-to-oil pan bolts along with 2 oil pan-to-bellhousing bolts requires torque settings of 48 Nm (35 lb-ft) for each bolt respectively. After replacing the oil level indicator and tube you must torqued the top bellhousing-to-engine fasteners and stud bolt to 48 Nm (35 lb-ft). Secure the HO2S and CMS wire connector bracket by tightening its two nuts to 25 Nm (18 lb-ft). Last of all you should return the battery tray to its position while adding clean engine oil to the power unit.
Related 2009 Ford Focus Parts
 2009 Ford Focus Camshaft
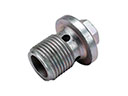 2009 Ford Focus Drain Plug
 2009 Ford Focus Cam Gear
 2009 Ford Focus Crankshaft Seal
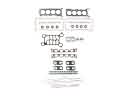 2009 Ford Focus Cylinder Head Gasket
 2009 Ford Focus Engine Mount Bracket
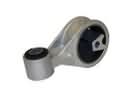 2009 Ford Focus Engine Torque Strut Mount
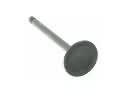 2009 Ford Focus Intake Valve
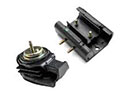 2009 Ford Focus Motor And Transmission Mount
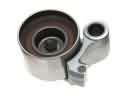 2009 Ford Focus Timing Belt Idler Pulley
 2009 Ford Focus Timing Chain Tensioner
 2009 Ford Focus Valve Stem Seal