FordParts
My Garage
My Account
Cart
OEM 2009 Ford Fusion Intake Manifold
Engine Intake Manifold- Select Vehicle by Model
- Select Vehicle by VIN
Select Vehicle by Model
orMake
Model
Year
Select Vehicle by VIN
For the most accurate results, select vehicle by your VIN (Vehicle Identification Number).
2 Intake Manifolds found


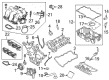
2009 Ford Fusion Intake Manifold Part Number: 3S4Z-9424-AM
Product Specifications- Other Name: Manifold Assembly - Inlet; Engine Intake Manifold
- Base No.: 9424
- Item Weight: 11.80 Pounds
- Item Dimensions: 9.3 x 21.1 x 14.6 inches
- Condition: New
- Fitment Type: Direct Replacement
- SKU: 3S4Z-9424-AM
- Warranty: This genuine part is guaranteed by Ford's factory warranty.


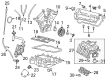
2009 Ford Fusion Intake Manifold, Lower Part Number: 3F1Z-9424-AC
Product Specifications- Other Name: Manifold Assembly - Inlet; Engine Intake Manifold, Lower
- Position: Lower
- Replaces: 3F1Z-9424-AA
- Base No.: 9424
- Item Weight: 1.40 Pounds
- Condition: New
- Fitment Type: Direct Replacement
- Require Quantity: 2
- SKU: 3F1Z-9424-AC
- Warranty: This genuine part is guaranteed by Ford's factory warranty.
2009 Ford Fusion Intake Manifold
If you're seeking quality and affordability, look no further than our extensive inventory of genuine 2009 Ford Fusion Intake Manifold available at FordPartsDeal.com. You can confidently purchase our OEM 2009 Ford Fusion Intake Manifold as they are supported by the manufacturer's warranty and our hassle-free return policy, alongside the benefit of our fast delivery service.
2009 Ford Fusion Intake Manifold Parts Q&A
- Q: How to service the intake manifold on 2009 Ford Fusion?A: Service the intake manifold operation starts by positioning the vehicle on a hoist with neutral gear while removing the battery ground cable. First remove the air cleaner outlet pipe while disconnecting its generator air inlet duct bolt and two nuts before installing them back with 6 Nm (53 lb-in) torque. Use a tool to push down the locking ring in order to unplug the vacuum supply from the brake booster tube and the evap tube from the intake manifold. Mutual separation of the swirl control valve electrical connectors enables you to remove the two pin-type wiring harness retainers alongside the fuel rail insulator. First disconnect the pin-type electrical connector retainer before removing any possible underbody cover screws and seven corresponding screws. To remove the clutch slave cylinder from manual transaxle vehicles you should detach the two bolts followed by placing the cylinder aside before securing them at 22 Nm (16 lb-ft) torque when reattaching. Remove and place the secondary air injection (air) pump in position after disconnecting its power connector and taking out the three bolts while tightening them to 30 Nm (22 lb-ft). The vacuum hose needs disconnection from the intake manifold while removing the radiator hose retaining clip followed by removing the intake manifold lower bolt which should be tightened to 18 Nm (159 lb-in) upon reinstall. Detach the pin-type harness retainer from the manifold absolute pressure (map) sensor and intake manifold runner control (imrc) actuator and engine oil pressure (eop) switch electrical connectors before placing the wiring harness to the side. When reinstalling the starter remove its nut and s-terminal wire then tighten it to 12 Nm (106 lb-in). First disconnect the tb electrical connector then discard the tb gasket before removing the four bolts to set the tb aside while torquing each bolt into position at 10 Nm (89 lb-in). The two pin-type retainers on the intake manifold need detachment to expose the seven different bolt locations for accurate reinstallation before removing these bolts for access to the crankcase vent hose clamp and egr tube. Reinstall these fasteners at 18 Nm (159 lb-in). Removing the clamp allows you to disconnect the crankcase vent hose while the electrical connector retainer for knock sensor (ks) should also be detached. During reinstallation, secure the egr tube with 55 Nm torque (41 lb-ft). After removing the intake manifold workers should discard its gaskets and put new tb and intake manifold gaskets in place during final reinstallation. An engine with an upper engine failure history requires a new intake manifold installation because doctors should check if metal debris exists since it puts the engine at risk. Return the intake manifold to its original position through the opposite steps of removal.
Related 2009 Ford Fusion Parts
 2009 Ford Fusion Fuel Pump
 2009 Ford Fusion Throttle Body
 2009 Ford Fusion Gas Cap
 2009 Ford Fusion Fuel Filler Neck
 2009 Ford Fusion Mass Air Flow Sensor
 2009 Ford Fusion Air Duct
 2009 Ford Fusion Air Intake Coupling
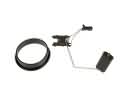 2009 Ford Fusion Fuel Level Sensor
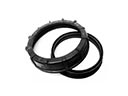 2009 Ford Fusion Fuel Pump Seal
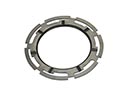 2009 Ford Fusion Fuel Tank Lock Ring
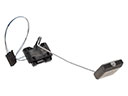 2009 Ford Fusion Fuel Tank Sending Unit
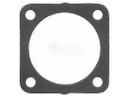 2009 Ford Fusion Throttle Body Gasket