FordParts
My Garage
My Account
Cart
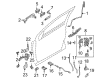
OEM 2009 Ford Taurus X Door Latch Assembly
Door Latch- Select Vehicle by Model
- Select Vehicle by VIN
Select Vehicle by Model
orMake
Model
Year
Select Vehicle by VIN
For the most accurate results, select vehicle by your VIN (Vehicle Identification Number).
6 Door Latch Assemblys found

2009 Ford Taurus X Lock Actuator, Rear Passenger Side Part Number: 6L2Z-78218A42-B
$9.53 MSRP: $15.38You Save: $5.85 (39%)Ships in 1-3 Business DaysProduct Specifications- Other Name: Actuator Assembly; Door Lock Actuator Motor, Front Right, Rear Right; Door Latch Assembly.; Actuator
- Position: Rear Passenger Side
- Replaces: 4L2Z-78218A42-AB, 6L2Z-78218A42-A, 6L2Z-78218A42-AA, 6L2Z-78218A42-AB
- Condition: New
- Fitment Type: Direct Replacement
- SKU: 6L2Z-78218A42-B
- Warranty: This genuine part is guaranteed by Ford's factory warranty.
2009 Ford Taurus X Lock Actuator, Front Driver Side Part Number: 6L2Z-78218A43-B
$11.61 MSRP: $18.73You Save: $7.12 (39%)Ships in 1-2 Business DaysProduct Specifications- Other Name: Actuator Assembly; Door Lock Actuator Motor, Front Left, Rear Left; Door Latch Assembly.; Actuator
- Position: Front Driver Side
- Replaces: 4L2Z-78218A43-AA, 6L2Z-78218A43-AB, 6L2Z-78218A43-A, 6L2Z-78218A43-AA
- Condition: New
- Fitment Type: Direct Replacement
- SKU: 6L2Z-78218A43-B
- Warranty: This genuine part is guaranteed by Ford's factory warranty.

2009 Ford Taurus X Lock Assembly, Front Driver Side Part Number: 8F9Z-5421813-A
$41.39 MSRP: $59.22You Save: $17.83 (31%)Product Specifications- Other Name: Latch; Door Latch Assembly, Front Left; Door Lock; Lock; Door Latch Assembly
- Position: Front Driver Side
- Base No.: <21812
- Item Weight: 1.20 Pounds
- Item Dimensions: 6.2 x 4.6 x 4.5 inches
- Condition: New
- Fitment Type: Direct Replacement
- SKU: 8F9Z-5421813-A
- Warranty: This genuine part is guaranteed by Ford's factory warranty.
- Product Specifications
- Other Name: Latch; Door Latch Assembly, Front Right; Door Lock; Lock; Door Latch Assembly
- Manufacturer Note: Includes Door Ajar Switch
- Position: Front Passenger Side
- Replaces: 7F9Z-5421812-A, 6F9Z-5421812-A, 6F9Z-5421812-B
- Base No.: <21812
- Item Weight: 1.20 Pounds
- Item Dimensions: 6.4 x 4.5 x 4.5 inches
- Condition: New
- Fitment Type: Direct Replacement
- SKU: 8F9Z-5421812-A
- Warranty: This genuine part is guaranteed by Ford's factory warranty.
 Product Specifications
- Other Name: Control; Door Latch Assembly, Front Left; Door Lock; Lock Module; Door Latch Assembly
- Position: Front Driver Side
- Base No.: <219A64
- Item Weight: 1.40 Pounds
- Condition: New
- Fitment Type: Direct Replacement
- SKU: 8F9Z-74219A65-A
- Warranty: This genuine part is guaranteed by Ford's factory warranty.
- Product Specifications
- Other Name: Control; Door Latch Assembly, Front Right; Door Lock; Lock Module; Door Latch Assembly
- Position: Front Passenger Side
- Base No.: <219A64
- Item Weight: 1.40 Pounds
- Condition: New
- Fitment Type: Direct Replacement
- SKU: 8F9Z-74219A64-A
- Warranty: This genuine part is guaranteed by Ford's factory warranty.
2009 Ford Taurus X Door Latch Assembly
If you're seeking quality and affordability, look no further than our extensive inventory of genuine 2009 Ford Taurus X Door Latch Assembly available at FordPartsDeal.com. You can confidently purchase our OEM 2009 Ford Taurus X Door Latch Assembly as they are supported by the manufacturer's warranty and our hassle-free return policy, alongside the benefit of our fast delivery service.
2009 Ford Taurus X Door Latch Assembly Parts Q&A
- Q: How to Remove and Replace the Rear Door Latch Assembly on 2009 Ford Taurus X?A: Begin the rear door latch replacement or removal by taking away the rear door trim panel and access hole watershield. You must reconnect the window regulator with the window switch electric connectors before you position the rear door window to unfasten the glass clamp bolt. Detach the electrical connections of both the regulator and switch before loosening the clamp bolt while taping the window in its highest position. After the window regulator reaches its bottom position in the track you should remove the interior door handle bolt along with disconnecting the rear door latch assembly electrical connector. Lower the push button rod downward to disengage it from the rear door latch assembly before removing the three bolts which fasten the assembly to the rear door module. Begin the procedure by first removing the eight bolts from the rear door module then place it aside making sure to protect the interior door handle from damage. Taurus and Sable owners should detach the tape and lower the window glass before removing the pin-type retainer, the rear door glass run top bolt, and the rear door glass run seal. Move the glass carefully aside and take out the rear door glass top run. The actuating rod of the exterior door handle must disconnect from the rear door latch while removing the three bolts holding the rear door latch assembly. Cut the remote cable cover from the latch before unhooking the interior door handle functioning wire from the rear door latch. The first step of installation involves mounting the rear door latch on the bracket then linking the interior door handle actuating cable. After mounting the remote cable cover to the latch you can set the rear door latch assembly in place while tightening its three bolts to 12 Nm (106 lb-in). The installation of exterior door handle and door latch must be performed according to specifications before connecting the exterior door handle actuating rod to its yellow clip to maintain correct alignment. When working on Taurus and Sable vehicles the technician must install rear door glass top run before carefully placing glass and then installing rear door glass run seal and its top bolt followed by pin-type retainer installation. Raise the window glass before taping it at the maximum upward position. The procedure requires installing eight bolts that need to be tightened to 8 Nm (71 lb-in) while the three bolts connecting the rear door latch assembly to the rear door module must reach 12 Nm (106 lb-in). The push button rod should be installed on the rear door latch assembly followed by connecting the rear door latch assembly electrical connector along with the interior door handle position before loosely installing the bolt. Take off the window glass tape then lower the glass down to install the clamp bolt while keeping the window fully forward before tightening the bolt to 8 Nm torque values (71 lb-in force). Install the access hole watershield followed by the rear door trim panel which requires centering inside door handle alignment pins on the panel before securing the interior door handle bolt at 7 Nm (62 lb-in).
Related 2009 Ford Taurus X Parts
 2009 Ford Taurus X Door Check
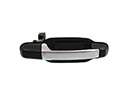 2009 Ford Taurus X Door Handle
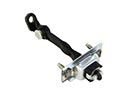
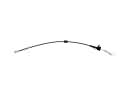 2009 Ford Taurus X Door Latch Cable
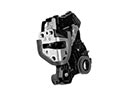 2009 Ford Taurus X Door Lock
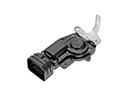 2009 Ford Taurus X Door Lock Actuator Motor
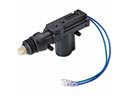 2009 Ford Taurus X Door Lock Actuators
 2009 Ford Taurus X Door Seal
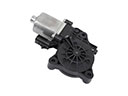 2009 Ford Taurus X Power Window Motor
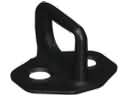 2009 Ford Taurus X Rear Door Striker
 2009 Ford Taurus X Weather Strip
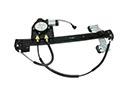 2009 Ford Taurus X Window Regulator
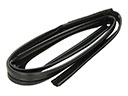 2009 Ford Taurus X Window Run