FordParts
My Garage
My Account
Cart
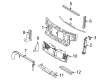
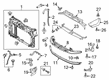
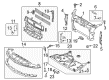
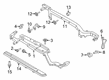
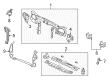
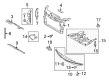
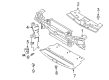
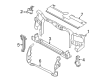
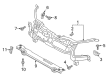
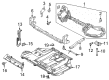
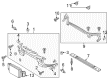
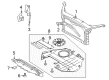
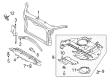
OEM Ford Radiator Support
Center Radiator Support- Select Vehicle by Model
- Select Vehicle by VIN
Select Vehicle by Model
orMake
Model
Year
Select Vehicle by VIN
For the most accurate results, select vehicle by your VIN (Vehicle Identification Number).
246 Radiator Supports found


Ford Radiator Support, Front Part Number: 6L2Z-16138-A
$185.17 MSRP: $269.53You Save: $84.36 (32%)Ships in 1-3 Business DaysProduct Specifications- Other Name: Support - Radiator; Radiator Support Panel, Front
- Position: Front
- Replaces: 6L2Z-16138-AA


Ford Radiator Support Bracket, Passenger Side Part Number: 4L2Z-8A193-AA
$13.78 MSRP: $18.75You Save: $4.97 (27%)Product Specifications- Other Name: Bracket; Radiator Support Bracket, Right; Upper Bracket
- Position: Passenger Side


Ford Radiator Support, Front Part Number: CE8Z-16138-C
$134.74 MSRP: $196.13You Save: $61.39 (32%)Ships in 1-2 Business DaysProduct Specifications- Other Name: Front End Assembly; Radiator Support Panel, Front
- Position: Front


Ford Radiator Support, Front Part Number: DG1Z-16138-A
$174.61 MSRP: $254.17You Save: $79.56 (32%)Ships in 1-3 Business DaysProduct Specifications- Other Name: Front End Assembly; Radiator Support Panel, Front
- Position: Front
- Replaces: AG1Z-16138-A


Ford Radiator Support, Front Part Number: CE8Z-16138-D
$164.19 MSRP: $253.38You Save: $89.19 (36%)Ships in 1-2 Business DaysProduct Specifications- Other Name: Front End Assembly; Radiator Support Panel, Front
- Position: Front
- Replaces: CE8Z-16138-A


Ford Upper Tie Bar, Front Part Number: FT4Z-16138-C
$240.71 MSRP: $374.93You Save: $134.22 (36%)Ships in 1 Business DayProduct Specifications- Other Name: Front End Assembly; Radiator Support Tie Bar, Front Upper
- Position: Front Upper
- Replaces: FT4Z-16138-A


Ford Upper Tie Bar Support, Passenger Side Part Number: 5L8Z-8B068-AA
$25.67 MSRP: $38.20You Save: $12.53 (33%)Product Specifications- Other Name: Support - Radiator; Radiator Support Tie Bar Bracket, Right; Radiator Support Bracket, Right; Support
- Position: Passenger Side


Ford Radiator Support, Front Part Number: DA8Z-16138-A
$606.45 MSRP: $898.45You Save: $292.00 (33%)Product Specifications- Other Name: Front End Assembly; Radiator Support Panel, Front
- Position: Front
- Replaces: AA8Z-16138-A


Ford Radiator Support, Front Part Number: 5R3Z-16138-AA
$901.16 MSRP: $1335.05You Save: $433.89 (33%)Ships in 1-2 Business DaysProduct Specifications- Other Name: Support - Radiator; Radiator Support Panel, Front
- Position: Front


Ford Upper Tie Bar Support, Driver Side Part Number: 9L8Z-8B068-B
$23.78 MSRP: $33.73You Save: $9.95 (30%)Ships in 1-2 Business DaysProduct Specifications- Other Name: Support - Radiator; Left Upper Tie Bar Bracket; Left Upper Support Bracket.
- Position: Driver Side


Ford Radiator Support Bracket, Upper Driver Side Part Number: BC3Z-8A193-B
$31.37 MSRP: $45.67You Save: $14.30 (32%)Ships in 1-2 Business DaysProduct Specifications- Other Name: Bracket - Radiator Upper; Radiator Mount Bracket, Left
- Position: Driver Side


Ford Lower Tie Bar, Front Part Number: CK4Z-8125-A
$60.33 MSRP: $87.82You Save: $27.49 (32%)Ships in 1-3 Business DaysProduct Specifications- Other Name: Support - Radiator; Radiator Support Tie Bar, Front
- Position: Front Lower


Ford Side Support, Front Passenger Side Part Number: 6L2Z-16152-AA
$89.86 MSRP: $130.80You Save: $40.94 (32%)Ships in 1-2 Business DaysProduct Specifications- Other Name: Support - Radiator; Radiator Support Side Panel, Front Right
- Position: Passenger Side


Ford Lower Tie Bar, Front Part Number: AV6Z-5810812-E
$84.49 MSRP: $122.98You Save: $38.49 (32%)Ships in 1-2 Business DaysProduct Specifications- Other Name: Cross Member Assembly - Front/Lower; Radiator Support Tie Bar, Front
- Position: Front Lower
- Replaces: AV6Z-5810812-C, AV6Z-5810812-A, AV6Z-5810812-B


Ford Lower Tie Bar, Front Part Number: GP5Z-16138-A
$88.56 MSRP: $136.28You Save: $47.72 (36%)Ships in 1-3 Business DaysProduct Specifications- Other Name: Support - Radiator; Radiator Support Tie Bar, Front Lower
- Manufacturer Note: Radiator Support
- Position: Front Lower
- Replaces: DP5Z-16138-A


Ford Lower Tie Bar, Front Part Number: FT4Z-16138-D
$137.61 MSRP: $200.30You Save: $62.69 (32%)Product Specifications- Other Name: Support - Radiator; Radiator Support Tie Bar, Front Lower
- Position: Front Lower
- Replaced by: JT4Z-16138-A


Ford Lower Tie Bar, Front Part Number: G1FZ-16138-A
$132.53 MSRP: $192.92You Save: $60.39 (32%)Ships in 1-3 Business DaysProduct Specifications- Other Name: Support - Radiator; Radiator Support Tie Bar, Front
- Position: Front Lower


Ford Radiator Support, Front Part Number: 6E5Z-16138-A
$133.00 MSRP: $193.60You Save: $60.60 (32%)Ships in 1-3 Business DaysProduct Specifications- Other Name: Support; Radiator Support Panel, Front
- Position: Front


Ford Radiator Support, Front Part Number: AE5Z-16138-B
$198.21 MSRP: $288.52You Save: $90.31 (32%)Product Specifications- Other Name: Front End Assembly; Radiator Support Panel, Front
- Position: Front


Ford Side Support, Front Driver Side Part Number: 6L2Z-16153-AA
$125.74 MSRP: $183.03You Save: $57.29 (32%)Product Specifications- Other Name: Support - Radiator; Radiator Support Side Panel, Front Left
- Manufacturer Note: (CP) Designates Crash Part - When Ordering Please Refer To Crash Part Truckload Program Guidelines
- Position: Driver Side
| Page 1 of 13 |Next >
1-20 of 246 Results
Ford Radiator Support
If you own Ford and want to keep it in top shape, choosing OEM Radiator Support is a smart move. They are precisely engineered and follow strict factory standards. They are made in advanced facilities that use cutting edge technology. Each part goes through thorough testing to confirm strength and safety, so you can trust it. FordPartsDeal.com gives you genuine Ford Radiator Support at some of the affordable online prices without cutting quality. Every OEM Ford part includes the manufacturer's warranty, easy returns, and super-fast delivery. So why wait? Shop now and get your vehicle back to peak condition.
Ford Radiator Support holds the cooling hardware in their position and ensures that temperatures remain controlled at all times during a drive. Ford started out with the offer of cheap mobility by Henry and continues to pursue that objective with a production volume that resembles tenacity. Ford is now matching that manufacturing DNA to punchy EcoBoost engines that sporadically fuel wise but push drivers back in their seats. SYNC provides occupants with the ability to request a playlist or new routes orally without any fuss with knobs or screens. Ford cooks Co-Pilot360 into normal trims to make lane nudges and sudden stops not luxurious but normal. Ford demonstrates that it has electric swing with the F-150 Lightning pickups towering campers without any puff of exhaust. The use of rugged frames, honest steering, and mud-friendly cabins continue to make the lineup approachable by commuters and off-road adventurers alike. It supports the radiator and condenser, and in some cases the headlamp brackets, are fastened to upper and lower rails, preventing shaking which cracks the hoses or rattles the bulbs on rough roads. Radiator Support extends the front between the aprons to aprons, spreading crash energy laterally to ensure cooling components do not buckle disastrously. Radiator Support determines hood and fender geometry, eliminating wind howl and avoiding metal fatigue which begins when panels oppose one another. Radiator Support is based on solid steel or reinforced plastic ribs and a single bend causes increases in temperatures and lines to the body.
Ford Radiator Support Parts and Q&A
- Q: How to service and repair the front radiator support lower body support on Ford Excursion?A:Service repairs on the front radiator support lower body support start with the removal and discarding of the nut followed by new nut installation for reassembly. When performing this task both the bolt and fastener should be removed before the installation of new replacement bolts. Remove the lower mount as the next step. Installation of the body insulator must proceed without using any lubricating substances. The service procedure finishes by performing backward actions that were done during initial removal. New fasteners should replace every fastener that needed removal or tightening.
- Q: How to service and repair the body/frame mount bushing for the front radiator support upper on Ford F-350 Super Duty?A:Service and repair of the body/frame mount bushing on the front radiator support upper begins with removing the lower front radiator support mount from the defective upper front radiator support mount. Maintain the opposite front radiator lower mount bolts and nuts in their place before proceeding further. All fasteners that were removed from body support mountings require immediate discarding and replacement with new fasteners. Instead of removing body mount bolts on Regular Cab vehicles, personnel should loosen the four remaining bolts; installation requires new fasteners for replacement. The procedure for body mount bolt loosening should follow the same process with SuperCab vehicles for their remaining four bolts. The six body mount bolts on Crew Cab vehicles should be loosened only and left in position before being discarded for new replacement bolts. The vehicle needs to be raised only after other body mount support bolts have been made loose enough to avoid structural damage. The vehicle body needs enough elevation to remove the unserviceable upper mount before removing the insulator. The body insulator receives no lubricants during its installation process and must follow the same steps of removal to reach completion.


Related Ford Parts
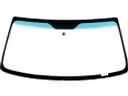 Ford Windshield
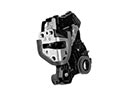 Ford Door Lock
 Ford Air Deflector
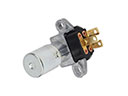 Ford Dimmer Switch
 Ford Door Latch Assembly
 Ford Wiper Motor
 Ford Brake Booster Vacuum Hose
 Ford Front Cross-Member
 Ford Seat Heater
 Ford Trunk Lid Latch
 Ford Weather Strip
 Ford Wheelhouse
Browse Ford Radiator Support by Models
Ranger Bronco Mustang Explorer Focus Fusion F-150 Maverick Escape Edge Excursion Expedition Fiesta Taurus Thunderbird Flex Transit Connect Bronco Sport Explorer Sport Trac Crown Victoria Probe Bronco II EcoSport Escort F-250 Aspire C-Max Contour E-150 Econoline Explorer Sport F-350 Five Hundred Freestar Freestyle Mustang Mach-E Police Interceptor Utility Taurus X Tempo Windstar F-350 Super Duty Police Interceptor Sedan E-150 E-150 Club Wagon E-150 Econoline Club Wagon E-250 E-250 Econoline E-250 Econoline Club Wagon E-350 Club Wagon E-350 Econoline E-350 Econoline Club Wagon E-350 Super Duty E-Transit F-150 Heritage F-150 Lightning F-250 HD F-250 Super Duty Police Responder Hybrid Special Service Police Sedan SSV Plug-In Hybrid Transit-150 Transit-250 Transit-350 Transit-350 HD