FordParts
My Garage
My Account
Cart
OEM Ford Taurus Evaporator
A/C Evaporator Core- Select Vehicle by Model
- Select Vehicle by VIN
Select Vehicle by Model
orMake
Model
Year
Select Vehicle by VIN
For the most accurate results, select vehicle by your VIN (Vehicle Identification Number).
10 Evaporators found

Ford Taurus Evaporator Core, Front Part Number: DG1Z-19850-D
$250.39 MSRP: $407.27You Save: $156.88 (39%)Ships in 1-3 Business Days
Ford Taurus Evaporator Core, Front Part Number: AE9Z-19850-C
$387.21 MSRP: $535.67You Save: $148.46 (28%)Ships in 1-2 Business Days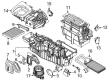
Ford Taurus Evaporator Core, Front Part Number: CG1Z-19850-C
$402.23 MSRP: $556.44You Save: $154.21 (28%)Ships in 1-2 Business Days
Ford Taurus Evaporator Core Part Number: AG1Z-19850-B

Ford Taurus Evaporator Core Part Number: AG1Z-19850-A

Ford Taurus Evaporator Core, Rear Part Number: AA8Z-19850-C

Ford Taurus Evaporator Core Part Number: 2F1Z-19850-DA
Ford Taurus Evaporator Core Part Number: 2F1Z-19850-A

Ford Taurus Evaporator Core Part Number: 1F1Z-19850-B
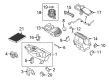
Ford Taurus Lower Case Part Number: 1F1Z-19850-A
Ford Taurus Evaporator
OEM Evaporator boasts unmatched quality. Each part goes through full quality checks. They adhere to Ford's official factory standards. These steps remove flaws and inconsistencies. So you can get Evaporator with long life and a perfect fit. Come to our website and find genuine Ford Taurus parts. We keep a wide inventory of OEM Taurus parts at the highly affordable prices. It's easy to search, compare, and pick what you need. You'll love the clear info and simple checkout. We offer top-rated customer service, and we reply fast. We also ship promptly to ensure your order arrives on time.
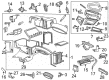
The Evaporator is one of the parts of the Ford Taurus series which is popular for its efficiency in controlling the climate of the car's interior compartment. This part, accommodated beneath the dashboard, effectively gets rid of heat in the air, making certain that there is proper air conditioning and elimination of moisture. The Evaporator is sturdy-based aluminum tubes and fins for increasing heat transfer rates that leaves this product distinguished in the automotive industry. The compatibility of Taurus ghosts is across different models to give the drivers the feeling of consistency in the different generations of the Taurus. The Evaporator not only optimizes the amount of fuel consumption and rate of Refridgerant by providing the premier Climate Control inside the Vehicle it also contributes to the safety of the vehicle by avoiding fatal formation of water fog which hindered the visibility of the driver. Through time, the Ford Taurus has undergone transformations under its new generations; the same thing applies to parts such as the Evaporator. Problems such as leakage and corrosion may be attributed to age or environmental factors, but the Evaporator holds up well against such qualities thus offering long durability. That is why Evaporator is still regarded as one of the most important and valuable parts of Ford Taurus which provide dependable cooling and moisture management to the car owners and thus the positive driving sensations, which are characteristic of all Ford cars.
Ford Taurus Evaporator Parts and Q&A
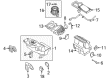
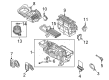
- Q: How is the evaporator core serviced and what steps are involved in its replacement on Ford Taurus?A:The evaporator core service includes the entire core assembly as well as instruments such as internal doors seals and door linkage. The housing replacement process needs the transfer of Blower Motor with wheel assembly and Heater Core and cover along with dash panel seals and vacuum actuators. An entirely new suction accumulator is required only after a failed A/C compressor causes contamination or when the suction accumulator itself becomes damaged. The first step to remove the heater core and evaporator core housing requires the removal of the heater-to-dash panel seal together with the air conditioner tubes-to-dash panel seal and the air conditioner evaporator drain tube seal. The process to accomplish removal starts with electric automatic temperature control modules by first unhooking electrical connectors then removing nuts before vacuum harness detachment and lastly undoing two screws. Start by disconnecting the electrical connector of the temperature Blend Door Actuator followed by its screw removal and subsequent shield removal then action. The procedure requires detachment of the A/C evaporator case damper door assist spring and a careful remover of the damper door lever without causing any damage to it. The vacuum harness of manual climate control vehicles should be detached from its mounting bracket. The process begins with cover removal while unscrewing the temperature blend door then twisting the blend door and removing the heater core. Manual climate control vehicles require the removal of both the blower motor along with the Blower Motor Resistor. To replace the blower motor speed control in vehicles with electronic automatic temperature control you must disconnect the vacuum hose and remove three screws before taking out the assembly of blower motor and blower motor speed control. Separate the in-vehicle temperature sensor hose with bracket from the air inlet duct while you disconnect the vacuum hose and remove three screws. The vacuum control motor requires removal by first detaching both vacuum hoses and then disconnecting the screw before lifting and rotating the motor to extract it. Recording the current vacuum system and powering components' positions should be done prior to their removal. The installation process should follow the opposite sequence of removal by first installing the vacuum components and wiring harnesses according to their locations then the vacuum control motor, shield, and air inlet duct followed by the bracket. When installing automatic temperature control vehicles you must put the in-vehicle temperature sensor hose and the blower motor in combination with the blower motor speed control system unit. The installation sequence for manual climate control vehicles demands replacement of both the blower motor and blower motor resistor. The installation of heater core requires you to rotate the temperature blend door while fitting the cover completely. Manual climate control vehicles should have the vacuum harness installed onto their mounting bracket. Proceed to attach the metal link and A/C evaporator case damper door lever while maintaining its shape and then install the A/C evaporator case damper door assist spring and temperature blend door actuator. Complete the vehicle installation by connecting electrical components and vacuum harnesses of the RCC module for electronic automatic temperature control while applying seals for the heater-to-dash panel and air conditioner tubes-to-dash panel and air conditioner evaporator drain tube.
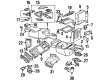
- Q: Is the evaporator core available only as part of the evaporator core housing assembly on Ford Taurus?A:Customers must acquire the evaporator core through its housing assembly. The first step for servicing this unit requires removing both Heater Core and evaporator core housing. The process requires moving components between the existing housing to the fresh housing. The next step involves installing both heater core and evaporator core housing.


Related Ford Taurus Parts
 Ford Taurus Blower Motor
 Ford Taurus Blower Motor Resistor
 Ford Taurus Heater Core
 Ford Taurus A/C Accumulator
 Ford Taurus A/C Compressor
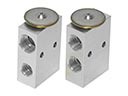 Ford Taurus A/C Expansion Valve
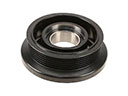 Ford Taurus A/C Idler Pulley
 Ford Taurus A/C Orifice Tube
 Ford Taurus A/C Service Cap
 Ford Taurus Ambient Temperature Sensor
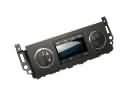 Ford Taurus HVAC Control Module
 Ford Taurus HVAC Pressure Switch
Browse Ford Taurus Evaporator by Years
2019
2018
2017
2016
2015
2014
2013
2012
2011
2010
2009
2008
2007
2006
2005
2004
2003
2002
2001
2000
1999
1998
1997
1996