FordParts
My Garage
My Account
Cart
OEM Ford Taurus X Coil Springs
Strut Spring- Select Vehicle by Model
- Select Vehicle by VIN
Select Vehicle by Model
orMake
Model
Year
Select Vehicle by VIN
For the most accurate results, select vehicle by your VIN (Vehicle Identification Number).
3 Coil Springs found


Ford Taurus X Coil Spring, Rear Part Number: 8A4Z-5560-F
$90.34 MSRP: $131.50You Save: $41.16 (32%)


Ford Taurus X Coil Spring, Rear Part Number: 8A4Z-5560-E

Ford Taurus X Coil Spring, Front Part Number: 9F9Z-5310-A
Ford Taurus X Coil Springs
OEM Coil Springs boasts unmatched quality. Each part goes through full quality checks. They adhere to Ford's official factory standards. These steps remove flaws and inconsistencies. So you can get Coil Springs with long life and a perfect fit. Come to our website and find genuine Ford Taurus X parts. We keep a wide inventory of OEM Taurus X parts at the highly affordable prices. It's easy to search, compare, and pick what you need. You'll love the clear info and simple checkout. We offer top-rated customer service, and we reply fast. We also ship promptly to ensure your order arrives on time.
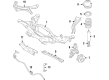
These are some of the significant parts of this automobile which guarantees the suspension systems known as Ford Taurus X Coil Springs. These Coil Springs are manufactured exclusively for the Ford Taurus X and play a pivotal role in holding the car's total mass besides cushioning the car against ill-favored roads. Some of these functions include the provision of optimum ride height and alignment of wheels to diminish problems like sags, shock stroke exhaustion and abnormal tire wear that leads to increased efficiency and safety of the vehicle. For the suspension, the Ford Taurus X has benefited from different variations of Coil springs known as: Linear rate, progressive and the Dual rate springs where the spring's compressive characteristic vary depending on the need applied while on the road. Furthermore, Coil Springs that are adjustable afford options of adjusting the ride height in the process to fit the driver's preference. This of course implies that these Coil Springs has flexibility with regards to compatibility of the different Taurus X models therefore they stand out from the rest as far as automotive parts are concerned. The Ford Taurus X from 2008 to 2009 was a posh car that was a blend of a sport utility vehicle and a crossover with state-of-the-art engineering and practical use with the powerful 3.5L Duratec 35 V6 engine. The use of superior quality Coil Springs in the Ford Taurus X improves vehicle stability and comfort besides providing that optimum feel of driving that has endeared this car brand to motorists in their quest for high performing and safe cars on the roads.
Ford Taurus X Coil Springs Parts and Q&A
- Q: How to Remove and Replace the Front Coil Springs in the Suspension Strut and Spring Assembly on Ford Taurus X?A:Initialization of coil spring replacement in front suspension strut and spring assembly requires the Steering Wheel to be first unlocked. Take off the upper strut mount nuts before removing the wheel-tire assembly without removing the wheel hub nut. Start by taking away the brake disc and discarding the tie-rod end nut before you manage to separate the Tie Rod from the wheel knuckle. Start by discarding the stabilizer bar link upper nut then remove the wheel speed sensor harness from the strut and detach the wheel speed sensor from the wheel knuckle before placing it aside. A crowfoot wrench should be used to remove the lower ball joint nut while also discarding it until the stud stops rotating. Lower the arm arm down with caution while clearing the ball joint from the wheel knuckle yet maintaining restraint to stop the halfshaft from moving outboard to prevent damage. To perform the removal use the Front Wheel Hub Remover to push the halfshaft from the wheel bearing and hub when the unit rests in level position. The four bolt upper strut mount nuts need replacement so technicians must remove the wheel knuckle combined with the strut as well as spring assembly. You should discard the strut-to-wheel knuckle nut and flagbolt while requiring separate parts between the strut and spring assembly from the wheel knuckle. Install the wheel knuckle onto the strut and spring by using a new strut-to-wheel knuckle nut and flagbolt which needs tightening to 175 Nm (129 lb-ft). Position the wheel knuckle and strut along with spring assembly then loosely place four new upper strut mount nuts. After halfshaft support, install it into wheel bearing and hub. The ball joint stud should be installed into the wheel knuckle while lowering the lower arm using a crowfoot wrench to install and tighten the new lower ball joint nut to 150 Nm (111 lb-ft). The wheel speed sensor requires its bolt to be tightened to 8 Nm (71 lb-in) and after this step the sensor harness must be attached to the strut. Begin by installing the new stabilizer bar link upper nut before torquing it to 55 Nm (41 lb-ft), proceed to insert the tie-rod end stud into the wheel knuckle then fasten a new tie-rod end nut using 115 Nm (85 lb-ft) torque. Install the brake disc then avoid tightening the front wheel hub nut while the vehicle remains grounded. Follow this step by providing a torque of 350 Nm (258 lb-ft) after engaging the brakes to stop halfshaft rotation. The first step is to install fresh wheel hub nut then apply torque to 350 Nm (258 lb-ft) before starting the wheel hub up to speed. Next, mount the tire and wheel followed by the tight torque of the four upper strut mount nuts to 35 Nm (26 lb-ft).
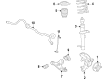
- Q: How to Remove and Replace Rear Coil Springs in All-Wheel Drive on Ford Taurus X?A:All-wheel drive vehicle rear suspension coil spring replacement requires first measuring the hub center-to-fender lip distance when the vehicle rests on flat ground. Sedans need their luggage compartment rear trim panel together with the correct side trim panels removed but wagon owners must remove the third row safety belt anchor-to-floor bolt trim cover. To proceed with the task remove first the Shock Absorber-to-upper mount nut followed by taking off the wheel together with the tire. To prevent brake hose damage the Brake Caliper and anchor plate assembly should not be supported through the brake hose. Instead, remove the brake caliper anchor plate bolts and secure the assembly with mechanic's wire. Index-mark the coil spring position on the shock absorber and upper spring isolator for reference during installation. Use jackstands to lower the vehicle after placing a suitable floor jack at the shock absorber mount on the lower arm to raise it while compressing the spring. Start by removing the Trailing Arm-to-wheel knuckle bolt which becomes waste material before you can loosen the trailing arm-to-subframe bolt and remove the bottom arm-to-wheel knuckle bolt as discarding waste material completes the procedure. Take the shock absorber lower bolt outside and discard it through removal of the floor jack. Pull the shock absorber along with its attached spring off the lower arm while being cautious before discarding the components. When installing the upper spring isolator you must place it onto the spring before securing it with duct tape. The coil spring must reach identical alignment by following the index marks from removal and the installation of new shock absorbers should replicate these marks. Fasten a new bolt to the lower arm before positioning the shock absorber and spring assembly while tightening this bolt to 105 Nm (77 lb-ft). Start by placing the floor jack beneath the lower arm near the shock absorber mount and raise the suspension gently until spring top reaches the upper shock absorber mount. Before moving on, receive help to elevate the lower arm portion while guiding the shock absorber combination until the absorber rod becomes centered inside the upper mount bushing. To secure the new upper shock absorber-to-mount nut you must tighten it to 52 Nm (38 lb-ft). The procedure requires raising the floor jack to reach correct curb height whereas you install the new lower arm-to-wheel knuckle bolt loosely before torquing it to 110 Nm (81 lb-ft). Raise the floor jack until the trailing arm/wheel knuckle is properly aligned with the new trailing arm-to-wheel knuckle bolt loosely installed. After the wheel hub reaches the proper curb height on the floor jack the trailing arm-to-wheel knuckle bolt requires 105 Nm (77 lb-ft) tension while concurrently tightening the trailing arm-to-subframe bolt to 110 Nm (81 lb-ft). The removal of the floor jack and jackstands allows for positioning the brake caliper before installing anchor plate bolts with tightening torque set at 110 Nm (81 lb-ft). As the last step install the wheel together with the tire then proceed to install the third row safety belt anchor-to-floor bolt trim cover for wagons and the luggage compartment rear and side trim panels for sedans.


Related Ford Taurus X Parts
 Ford Taurus X Axle Support Bushings
 Ford Taurus X Camber and Alignment Kit
 Ford Taurus X Coil Spring Insulator
 Ford Taurus X Control Arm
 Ford Taurus X Control Arm Bolt
 Ford Taurus X Crossmember Bushing
 Ford Taurus X Lateral Link
 Ford Taurus X Shock and Strut Boot
 Ford Taurus X Steering Knuckle
 Ford Taurus X Strut Mounts
 Ford Taurus X Sway Bars
 Ford Taurus X Trailing Arm Bushing
Browse Ford Taurus X Coil Springs by Years
2009
2008