FordParts
My Garage
My Account
Cart
OEM Ford Taurus X Shock Absorber
Suspension Shock Absorber- Select Vehicle by Model
- Select Vehicle by VIN
Select Vehicle by Model
orMake
Model
Year
Select Vehicle by VIN
For the most accurate results, select vehicle by your VIN (Vehicle Identification Number).
4 Shock Absorbers found


Ford Taurus X Shock Absorber, Rear Part Number: 8G1Z-18125-B
$106.88 MSRP: $195.67You Save: $88.79 (46%)Ships in 1-2 Business Days
Ford Taurus X Strut, Front Driver Side Part Number: 9F9Z-18124-B
$73.47 MSRP: $101.64You Save: $28.17 (28%)Ships in 1-2 Business Days
Ford Taurus X Shock Absorber, Rear Part Number: 5F9Z-18125-FA
Ford Taurus X Strut, Front Passenger Side Part Number: 9F9Z-18124-A
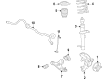
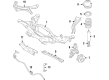
Ford Taurus X Shock Absorber
OEM Shock Absorber boasts unmatched quality. Each part goes through full quality checks. They adhere to Ford's official factory standards. These steps remove flaws and inconsistencies. So you can get Shock Absorber with long life and a perfect fit. Come to our website and find genuine Ford Taurus X parts. We keep a wide inventory of OEM Taurus X parts at the highly affordable prices. It's easy to search, compare, and pick what you need. You'll love the clear info and simple checkout. We offer top-rated customer service, and we reply fast. We also ship promptly to ensure your order arrives on time.
The features of the Ford Taurus Shock Absorber include that it is one of the suspension system parts and it is well known due to its good quality and reliability that influences the increasing of the performance while driving. Manufactured uniquely for the Ford Taurus X, this Shock Absorber helps reactive oscillatory force and transforms energy movements into heat by means of hydraulic cylinders. Small oscillations of the suspension are prevented whilst allowing the car to have a relative smooth ride over uneven surface. Basically, the manufacturers of the Ford Taurus X Shock Absorber have made it suitable for use in different models; hence, the owners of the car models should consider ordering or purchasing the Shock Absorber to enhance the performance and safety of their car. As for technical parameters, The Shock Absorber includes such innovations as position sensitive damping (PSD) and acceleration sensitive damping (ASD) which increase comfort and handling relevancy to the driving conditions. Also, twin-tube and mono-tube configurations or even gas-charged models further improve the suspension strength adn capabilities. Thus, the product novelty in the automotive market covers electrorheological and magnetorheological technologies for the Shock Absorber of Ford Taurus X which uses semi-active and adaptive systems. These features not only improve the fun factor of the Ford Taurus X but also add to its safety features making it a very important aspect of the Product for the Ford Taurus X Shock absorber is a reputable part that provides the needs of the CUV for it to have the longest lasting part that lasted for years that is why the Ford Taurus X Shock Absorber is an important part of this CUV.
Ford Taurus X Shock Absorber Parts and Q&A
- Q: How to service the shock absorber and spring assembly on all-wheel drive on Ford Taurus X?A:You need to measure the center wheel hub distance to fender lip location on level ground before servicing the shock absorber with spring assembly on all-wheel drive vehicles. Sedan owners need to remove the luggage compartment rear trim panel together with the appropriate side trim panels but wagon owners must remove the third row safety belt anchor-to-floor bolt trim cover. Start by removing the shock absorber-to-upper mount nut before discarding it and taking off the wheel together with the tire. Support Brake Caliper and anchor plate assembly with mechanic's wire to prevent breaking the brake hose before removing the brake caliper anchor plate bolts. Index-mark the coil spring position on the shock absorber and upper spring isolator for reference. Reduce the vehicle height while placing it on jackstands before using a floor jack to compress the shock absorber and spring. First remove the Trailing Arm-to-wheel knuckle bolt before discarding it while you can start to loosen the trailing arm-to-subframe bolt. Finally, eliminate the lower arm-to-wheel knuckle bolt and discard it too. After extracting the floor jack from underneath the vehicle remove the shock absorber lower bolt which becomes discarded. Cautiously push the shock absorber with the spring through the opening of the lower arm before removing the combined assembly. Begin spring isolator positioning at the top of the spring before securing it with duct tape. Check the coil spring alignment using the index marks before transferring any marks to new shock absorbers or springs. The shock absorber and spring assembly can be positioned onto the lower arm following installation of a new bolt and tightening it to 105 Nm (77 lb-ft). Raise the suspension with the floor jack until the spring top meets the upper shock absorber mount and guide the shock absorber rod through the upper mount bushing with help. Fitting a new shock absorber-to-upper mount nut requires a torque of 52 N.m until it reaches 38 lb-ft of torque. When the wheel hub reaches the correct height with a floor jack in position raise the lower arm-to-wheel knuckle bolt until it reaches 110 Nm (81 lb-ft) torque. Using the floor jack lift up the suspension while aligning the points before installing a new trailing arm-to-wheel knuckle bolt in a loose manner. Put the floor jack down to a position where the wheel hub reaches correct curb height before tightening the trailing arm-to-wheel knuckle bolt to 105 Nm (77 lb-ft) with the trailing arm-to-subframe bolt tightened to 110 Nm (81 lb-ft). In the final stage install the brake caliper followed by attaching the anchor plate bolts while torquing them to 100 Nm (74 lb-ft). Reinstall both the wheel along with the tire and return to the wagon model by replacing the third row safety belt anchor-to-floor bolt trim cover while sedan models require reinstalling luggage compartment rear and side trim panels.
- Q: How to Remove and Replace the Front Shock Absorber and Spring Assembly on Ford Taurus X?A:You must first position the steering wheel to its unlocked state when working on replacing or removing the front strut and spring assembly. First loosen the upper strut mount nuts before taking off the wheel together with the tire but keeping the wheel hub nut intact. The brake disc will be removed next while you discard the tie-rod end nut and proceed to separate the Tie Rod from the wheel knuckle. The operation begins with removing the stabilizer bar link upper nut then disconnecting the wheel speed sensor harness from the strut before removing the bolt and sensor from the wheel knuckle. The sensor should be set aside. You should use a crowfoot wrench to remove and discard the lower ball joint nut yet avoid any stud rotation. Lower the lower arm down while carefully adjusting its movement to extract the ball joint from the wheel knuckle while avoiding halfshaft movement toward the outside direction. Press the halfshaft from the wheel bearing and hub using the Front Wheel Hub Remover tool under a level support position. First remove all four upper strut mount nuts before taking out the wheel knuckle together with the strut and spring assembly. Separate the strut assembly by removing first its wheel knuckle nut and flagbolt then stripping it away from the wheel knuckle. Place the wheel knuckle onto the strut and spring before adding the new strut-to-wheel knuckle nut and flagbolt which needs tightening to 175 Nm (129 lb-ft). Install the wheel knuckle and strut and spring assembly before loosely applying the four new upper strut mount nuts while you support the halfshaft for wheel bearing and hub assembly. When installing the ball joint stud into the wheel knuckle, always lower the lower arm carefully while using a crowfoot wrench to tighten the new lower ball joint nut to 150 Nm (111 lb-ft). The wheel speed sensor should be placed at the correct position while being secured by a bolt that needs to be tightened to 8 Nm (71 lb-in). The wheel speed sensor harness must then connect to the strut. The stabilizer bar link upper nut requires a torque of 55 Nm (41 lb-ft) before the tie-rod end stud needs to be inserted into the wheel knuckle followed by installing a new tie-rod end nut which should be tightened to 115 Nm (85 lb-ft). Each brake disc installation should proceed without hub nut tightening while the vehicle remains on the ground surface. After seating the halfshaft with the removed hub nut use that handtool to apply torque of 350 Nm (258 lb-ft), then discard the original hub nut. When installing the wheel hub nut you should torque it to 350 Nm (258 lb-ft) within five minutes since applying torque. Complete the installation by adding the wheel followed by the tire and secure the four upper strut mount nuts to 35 Nm (26 lb-ft).


Related Ford Taurus X Parts
 Ford Taurus X Axle Beam
 Ford Taurus X Axle Support Bushings
 Ford Taurus X Bump Stop
 Ford Taurus X Camber and Alignment Kit
 Ford Taurus X Coil Springs
 Ford Taurus X Control Arm
 Ford Taurus X Control Arm Bushing
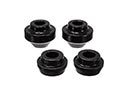 Ford Taurus X Radius Arm Bushing
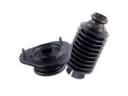 Ford Taurus X Shock and Strut Boot
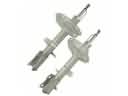 Ford Taurus X Strut Housing
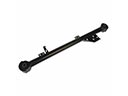 Ford Taurus X Trailing Arm
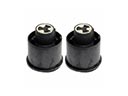 Ford Taurus X Trailing Arm Bushing
Browse Ford Taurus X Shock Absorber by Years
2009
2008