FordParts
My Garage
My Account
Cart
OEM Ford Thunderbird Control Arm
Suspension Arm- Select Vehicle by Model
- Select Vehicle by VIN
Select Vehicle by Model
orMake
Model
Year
Select Vehicle by VIN
For the most accurate results, select vehicle by your VIN (Vehicle Identification Number).
18 Control Arms found


Ford Thunderbird Upper Control Arm, Front Passenger Side Part Number: 6W4Z-3084-AA
$171.28 MSRP: $281.82You Save: $110.54 (40%)Ships in 1-2 Business Days
Ford Thunderbird Lower Control Arm, Front Driver Side Part Number: 2W6Z-3079-A
$318.94 MSRP: $468.33You Save: $149.39 (32%)Ford Thunderbird Lower Control Arm, Front Passenger Side Part Number: 2W6Z-3078-A
$324.61 MSRP: $476.67You Save: $152.06 (32%)


Ford Thunderbird Control Arm, Front Driver Side Part Number: F5SZ3079B

Ford Thunderbird Control Arm
OEM Control Arm boasts unmatched quality. Each part goes through full quality checks. They adhere to Ford's official factory standards. These steps remove flaws and inconsistencies. So you can get Control Arm with long life and a perfect fit. Come to our website and find genuine Ford Thunderbird parts. We keep a wide inventory of OEM Thunderbird parts at the highly affordable prices. It's easy to search, compare, and pick what you need. You'll love the clear info and simple checkout. We offer top-rated customer service, and we reply fast. We also ship promptly to ensure your order arrives on time.
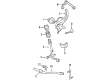
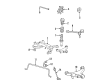
The Control Arm in Ford Thunderbird vehicles works as the connection between the frame and the wheels; the shocks and springs are also positioned on the Control Arm. These are arms that bend in relation to the road; they help in adjusting the wheels to either move up or down. Different designs of Control Arms may vary but they all have bushings at the point where they are connected to the frame, and ball joints at the point where connected to the knuckle or axle. The Control Arms of various newer Thunderbird models might be made of even more potent cast iron or aluminium. It is the main cause of poor wheel alignment, handling and even tire wear among vehicles mostly impacting on the steering system. There is also the Performance Control Arms for individuals looking for something that is more rigid and better suited for high speed use or any car modifications.
Ford Thunderbird Control Arm Parts and Q&A
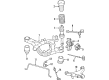
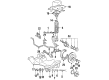
- Q: How to service and repair the front control arm on Ford Thunderbird?A:Service and repair of the front control arm should begin by positioning the vehicle in neutral mode on a hoist. A service or repair of the upper arm requires you to begin by extracting the Shock Absorber and spring assembly from the arm. The removal procedure follows the illustrations and tables while keeping the hex holding feature on to stop stud movement as you take away the nut from ball joints and stabilizer bar links. The caliper must not be suspended from the hose while removing pads and anchor plate and Brake Caliper because it could lead to damage. The first step for upper arm-to-body nut removal involves discarding the nut and moving the Power Steering Reservoir aside while you disconnect both the fluid level sensor connector and the Brake Master Cylinder main pressure transducer electrical connector if your vehicle is equipped with these components. The reservoir bolt needs backing out so the master cylinder bolt becomes accessible before removing the two master cylinder brake nuts to set the master cylinder off to the side. The procedure to remove lower arm-to-frame bolts includes three steps: first eliminating screws and pushpins along with destroying the protective shield, then unwinding the nuts and bolts followed by moving the steering gear outside the working area before loosening the lower arm bolt. The front end needs examination for alignment before ending the installation of the lower arm. Installation should finish before tightening either lower arm-to-frame nuts or upper arm-to-body nuts when the vehicle stands on its wheel and tire assemblies alone. A thin layer of lubricant should be applied to the bearing surface which joins with the knuckle for the wheel bearing installation.
- Q: How to service the upper control arm on the right side on Ford Thunderbird?A:To start servicing the upper arm on the right side remove the nut first before removing and discarding it. First disconnect wires from the bracket followed by removing its three mounting bolts. Then you must safely discard the second nut before removing the Shock Absorber with its spring assembly. Secure the wheel knuckle top with wires to keep it stationary against the body frame. The hex holding feature should be used for the stud nut removal to stop unwanted turning while the tapered ball joint washer must stay on the vehicle. Begin attachment removal of the suspension upper arm to knuckle by discarding the nut and afterwards discarding the bolt. Similar to the previous process remove the bolt and suspension upper arm while discarding the bolt. The suspension upper arm nut installation requires lower cruising height position for the vehicle beforehand because improper bushing maintenance causes ride degradation along with control issues. New suspension upper arm bolts and nuts must be installed as part of the torque prevailing design requirements. Prosperous assembly requires placing the tapered washer on top of the ball joint before connecting the control arm to the knuckle. Run the opposite process to conclude the installation.


Related Ford Thunderbird Parts
 Ford Thunderbird Axle Shaft
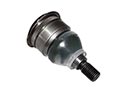 Ford Thunderbird Ball Joint
 Ford Thunderbird Camber and Alignment Kit
 Ford Thunderbird Coil Spring Insulator
 Ford Thunderbird Coil Springs
 Ford Thunderbird Control Arm Bracket
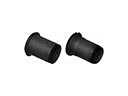 Ford Thunderbird Control Arm Bushing
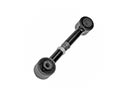 Ford Thunderbird Lateral Link
 Ford Thunderbird Shock Absorber
 Ford Thunderbird Suspension Strut Rod
 Ford Thunderbird Sway Bar Link
 Ford Thunderbird Wheel Seal
Browse Ford Thunderbird Control Arm by Years
2005
2004
2003
2002
1997
1996
1995
1994
1993
1992
1991
1990
1989