FordParts
My Garage
My Account
Cart
OEM Lincoln MKS Shock Absorber
Suspension Shock Absorber- Select Vehicle by Model
- Select Vehicle by VIN
Select Vehicle by Model
orMake
Model
Year
Select Vehicle by VIN
For the most accurate results, select vehicle by your VIN (Vehicle Identification Number).
13 Shock Absorbers found


Lincoln MKS Strut, Driver Side Part Number: DA5Z-18124-K
$254.92 MSRP: $423.27You Save: $168.35 (40%)Ships in 1-2 Business Days

Lincoln MKS Shock Absorber Part Number: CA5Z-18125-B
$108.73 MSRP: $178.91You Save: $70.18 (40%)Ships in 1-2 Business Days

Lincoln MKS Strut, Front Driver Side Part Number: 8A5Z-18124-H
$141.59 MSRP: $232.98You Save: $91.39 (40%)Ships in 1-2 Business Days
Lincoln MKS Shock Absorber, Rear Driver Side Part Number: DA5Z-18125-F
$227.38 MSRP: $377.55You Save: $150.17 (40%)Ships in 1-2 Business DaysLincoln MKS Shock Absorber, Rear Passenger Side Part Number: DA5Z-18125-E
$227.38 MSRP: $377.55You Save: $150.17 (40%)Ships in 1-2 Business DaysLincoln MKS Strut, Front Driver Side Part Number: 8A5Z-18124-F
$144.80 MSRP: $232.98You Save: $88.18 (38%)Ships in 1-2 Business DaysLincoln MKS Shock Absorber Part Number: BA5Z-18125-A
$108.73 MSRP: $178.91You Save: $70.18 (40%)Ships in 1-2 Business DaysLincoln MKS Shock Absorber Part Number: AA5Z-18125-B
$108.73 MSRP: $178.91You Save: $70.18 (40%)Ships in 1-2 Business DaysLincoln MKS Shock Absorber Part Number: AA5Z-18125-A
$108.73 MSRP: $178.91You Save: $70.18 (40%)Ships in 1-2 Business Days
Lincoln MKS Strut, Passenger Side Part Number: DA5Z-18124-J
$264.23 MSRP: $423.27You Save: $159.04 (38%)

Lincoln MKS Strut, Front Driver Side Part Number: AA5Z-18124-D

Lincoln MKS Strut, Passenger Side Part Number: AA5Z-18124-C
Lincoln MKS Strut, Passenger Side Part Number: 8A5Z-18124-G
Lincoln MKS Shock Absorber
OEM Shock Absorber boasts unmatched quality. Each part goes through full quality checks. They adhere to Lincoln's official factory standards. These steps remove flaws and inconsistencies. So you can get Shock Absorber with long life and a perfect fit. Come to our website and find genuine Lincoln MKS parts. We keep a wide inventory of OEM MKS parts at the highly affordable prices. It's easy to search, compare, and pick what you need. You'll love the clear info and simple checkout. We offer top-rated customer service, and we reply fast. We also ship promptly to ensure your order arrives on time.
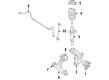
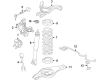
Shock Absorber is one of the vital and essential parts of the Lincoln suspension system and dependable and well-known for its performance. Now specifically developed to cater the needs of the car in terms of road balance and stability in terms of absorption of jerk from uneven roads, the Shock Absorber offers a much superior ride quality. Being able to dissipate the kinetic energy from road humps into heat these shock absorbers eliminate excessive bouncing that can compromise the stability of the vehicle, in this case the Lincoln MKS. Designed to fit the different models of MKS manufactured from 2008 to 2016, the Shock Absorber provides smooth and safe ride irrespective of the prevailing road conditions. Advancements in Shock Absorber: The twin tube as well as mono tube arrangements make it possible for the Lincoln MKS to features better heat sinking and performance. Some are twin-tube designs and these can be described as simple but functional while those that are mono-tube are much more versatile and efficient. Apart from enhancing the handling ability of the Lincoln MKS, these features are very vital in enhancing the safety of the driver and other passengers. The Shock Absorber can be considered one of the Automotive industry's top-shelf products because of its high engineering standards and dedication to quality that form an integral attraction of the Lincoln MKS package. Leveraging the technological progressive and reliability alongside the performance and safety, the Shock Absorber is the proof of Lincoln's commitment to luxury motoring.
Lincoln MKS Shock Absorber Parts and Q&A
- Q: How to Remove and Replace the Front Shock Absorber and Spring Assembly on Lincoln MKS?A:Everyone should start by unlocking the steering wheel before attempting to replace the front strut and spring assembly. First loosen the upper strut mount nuts before taking off the wheel with tire but keeping the wheel hub nut intact. Point your attention to the brake disc followed by tie-rod end nut removal so you can disconnect the Tie Rod from the wheel knuckle. First remove the upper nut from the stabilizer bar link while detaching the wheel speed sensor harness from the strut and then remove the bolt and wheel speed sensor which should be set aside. Apply the crowfoot wrench to dismount and throw away the lower ball joint nut but maintain the ball joint seal's well-being throughout the process of lowering the lower arm to remove the wheel knuckle. To stop internal component separation in the halfshaft avoid letting it move outside its normal position. Insert the Front Wheel Hub Remover to push out the halfshaft from the wheel bearing and hub after supporting the component in level standing position. The four upper strut mount nuts must be discarded before uninstalling the wheel knuckle and strut as well as spring assembly. The wheel knuckle assembly should be separated from the strut and spring assembly by removing both the strut-to-wheel knuckle nut and flagbolt components. When installing the wheel knuckle onto the strut and spring you must attach new strut-to-wheel knuckle nut and flagbolt then torque it to 175 Nm (129 lb-ft). Fit the 4 new upper strut mount nuts loosely while simultaneously supporting the halfshaft to install it into the wheel bearing and hub. After lowering the arm precisely install the ball joint stud into position inside the wheel knuckle while using a crowfoot wrench to fasten the new lower ball joint nut to 200 Nm (148 lb-ft). Install the wheel speed sensor by fixing its bolt at 15 Nm (133 lb-in) torque. The wheel speed sensor harness should be connected to the strut before installing the new stabilizer bar link upper nut where torque should be set to 55 Nm (41 lb-ft). Fasten the tie-rod end stud into the wheel knuckle followed by a new tie-rod end nut which requires tightening to 115 Nm (85 lb-ft). Brake disc installation requires immediate attention followed by avoidance of wheel bearing damage when tightening the front wheel hub nut while vehicle is still on the ground. The brake application blocks halfshaft rotation until you install the halfshaft using the discarded hub nut which requires a torque of 350 Nm (258 lb-ft). After placing a new wheel hub nut correctly you should tighten it to 350 Nm (258 lb-ft) within 5 minutes from its initial thread contact. Finish the installation by putting on the wheel and tire before torquing the four upper strut mount nuts to 35 Nm (26 lb-ft).
- Q: How to service the rear shock absorber on Lincoln MKS?A:You must start by taking out the luggage compartment side trim panel in order to get to the upper shock absorber nut. The upper mount nut should be removed before installing a new one and achieving 55 Nm (41 lb-ft) torque. The first step requires you to take off the wheel alongside the tire. You should use hex-holding to stop the stabilizer bar link stud from rotating as you get rid of the upper stabilizer bar link nut until you free the link from the wheel knuckle. The new nut should be tightened to 55 Nm (41 lb-ft). First remove the lower shock absorber bolt and dispose of it before extracting the shock absorber. The installation requires torquing the new bolt up to 175 Nm (129 lb-ft) before reversing removal steps for completion. The suspension fasteners need to be replaced with completely identical parts or with substitute quality components using designated torque values when reassembling to keep the suspension system stable.


Related Lincoln MKS Parts
 Lincoln MKS Axle Support Bushings
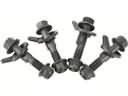 Lincoln MKS Camber and Alignment Kit
 Lincoln MKS Coil Springs
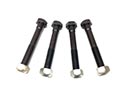 Lincoln MKS Control Arm Bolt
 Lincoln MKS Crossmember Bushing
 Lincoln MKS Lateral Link
 Lincoln MKS Strut Housing
 Lincoln MKS Strut Mounts
 Lincoln MKS Sway Bar Bracket
 Lincoln MKS Sway Bar Link
 Lincoln MKS Trailing Arm
 Lincoln MKS Trailing Arm Bushing
Browse Lincoln MKS Shock Absorber by Years
2016
2015
2014
2013
2012
2011
2010
2009