FordParts
My Garage
My Account
Cart
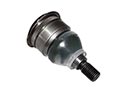
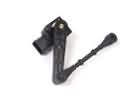
OEM Lincoln Steering Knuckle
Front Steering Knuckle- Select Vehicle by Model
- Select Vehicle by VIN
Select Vehicle by Model
orMake
Model
Year
Select Vehicle by VIN
For the most accurate results, select vehicle by your VIN (Vehicle Identification Number).
62 Steering Knuckles found


Lincoln Knuckle, Front Passenger Side Part Number: BT4Z-3K185-A
$142.56 MSRP: $240.00You Save: $97.44 (41%)Ships in 1-2 Business DaysProduct Specifications- Other Name: Knuckle - Front Wheel; Steering Knuckle, Front Right
- Position: Passenger Side
- Replaces: 7T4Z-3K185-A, 7T4Z-3K185-AR


Lincoln Knuckle, Front Driver Side Part Number: F2GZ-3K186-A
$166.86 MSRP: $274.55You Save: $107.69 (40%)Ships in 1-2 Business DaysProduct Specifications- Other Name: Knuckle - Front Wheel; Steering Knuckle, Front Left
- Position: Driver Side


Lincoln Knuckle, Front Driver Side Part Number: GL1Z-3K186-A
$179.01 MSRP: $294.55You Save: $115.54 (40%)Ships in 1-3 Business DaysProduct Specifications- Other Name: Knuckle - Front Wheel
- Position: Driver Side


Lincoln Knuckle, Front Passenger Side Part Number: AL3Z-3K185-C
$250.76 MSRP: $416.36You Save: $165.60 (40%)Product Specifications- Other Name: Knuckle - Front Wheel; Steering Knuckle, Front Right, Right
- Position: Passenger Side


Lincoln Knuckle, Front Driver Side Part Number: DG9Z-3K186-B
$128.18 MSRP: $210.91You Save: $82.73 (40%)Ships in 1-2 Business DaysProduct Specifications- Other Name: Knuckle - Front Wheel; Steering Knuckle, Front Left
- Position: Driver Side
- Replaces: DG9Z-3K186-A, MEF-243


Lincoln Knuckle, Front Passenger Side Part Number: DG9Z-3K185-B
$129.29 MSRP: $212.73You Save: $83.44 (40%)Ships in 1-2 Business DaysProduct Specifications- Other Name: Knuckle - Front Wheel; Steering Knuckle, Front Right
- Position: Passenger Side
- Replaces: DG9Z-3K185-A, MEF-242


Lincoln Knuckle, Front Passenger Side Part Number: 6L1Z-3K185-AA
$258.68 MSRP: $357.85You Save: $99.17 (28%)Ships in 1-2 Business DaysProduct Specifications- Other Name: Knuckle - Front Wheel; Steering Knuckle, Front Right
- Position: Passenger Side
- Replaces: 2L1Z-3K185-CA, 2L1Z-3K185-BA


Lincoln Knuckle, Front Passenger Side Part Number: 6W4Z-3K185-AA
$705.68 MSRP: $976.25You Save: $270.57 (28%)Ships in 1-2 Business DaysProduct Specifications- Other Name: Knuckle - Front Wheel; Knuckle Front Wheel; Steering Knuckle
- Position: Passenger Side
- Replaces: 4W4Z-3K185-AA

Lincoln Knuckle, Front Passenger Side Part Number: ML3Z-3K185-A
$299.77 MSRP: $512.73You Save: $212.96 (42%)Ships in 1-2 Business DaysProduct Specifications- Other Name: Knuckle - Front Wheel; Steering Knuckle, Front Right
- Position: Passenger Side

Lincoln Knuckle, Front Driver Side Part Number: BE5Z-3K186-A
$315.71 MSRP: $540.00You Save: $224.29 (42%)Ships in 1-2 Business DaysProduct Specifications- Other Name: Knuckle - Front Wheel; Steering Knuckle, Front Left
- Position: Driver Side
- Replaces: 7E5Z-3K186-L, 8E5Z-3K186-A
Lincoln Knuckle, Front Passenger Side Part Number: BE5Z-3K185-A
$336.97 MSRP: $576.36You Save: $239.39 (42%)Ships in 1-2 Business DaysProduct Specifications- Other Name: Knuckle - Front Wheel; Steering Knuckle, Front Right
- Position: Passenger Side
- Replaces: 7E5Z-3K185-R, 8E5Z-3K185-A


Lincoln Knuckle, Front Driver Side Part Number: XL3Z-3K186-AA
Product Specifications- Other Name: Knuckle - Front Wheel; Steering Knuckle, Front Left
- Position: Driver Side
- Replaces: F75Z-3K186-AA


Lincoln Knuckle, Front Passenger Side Part Number: AA5Z-3K185-A
Product Specifications- Other Name: Knuckle - Front Wheel; Steering Knuckle, Front Right
- Position: Passenger Side


Lincoln Knuckle, Front Driver Side Part Number: 7L3Z-3K186-A
Product Specifications- Other Name: Knuckle - Front Wheel; Steering Knuckle, Front Left
- Position: Driver Side
- Replaces: 6L3Z-3K186-A


Lincoln Knuckle, Front Passenger Side Part Number: 7L3Z-3K185-A
Product Specifications- Other Name: Knuckle - Front Wheel; Steering Knuckle, Front Right
- Position: Passenger Side
- Replaces: 6L3Z-3K185-A


Lincoln Knuckle, Front Driver Side Part Number: 5W1Z-3K186-A
$178.85 MSRP: $284.00You Save: $105.15 (38%)Product Specifications- Other Name: Knuckle - Front Wheel; Steering Knuckle, Front Left
- Position: Driver Side

Lincoln Knuckle, Front Passenger Side Part Number: 5W1Z-3K185-A
$178.85 MSRP: $284.00You Save: $105.15 (38%)Product Specifications- Other Name: Knuckle - Front Wheel; Steering Knuckle, Front Right
- Position: Passenger Side


Lincoln Knuckle, Front Driver Side Part Number: EJ7Z-3K186-A
$228.14 MSRP: $365.45You Save: $137.31 (38%)Product Specifications- Other Name: Knuckle - Front Wheel
- Position: Driver Side


Lincoln Knuckle, Front Passenger Side Part Number: XL3Z-3K185-AA
Product Specifications- Other Name: Knuckle - Front Wheel; Steering Knuckle, Front Right
- Position: Passenger Side
- Replaces: F75Z-3K185-AA

Lincoln Knuckle, Front Driver Side Part Number: 6L1Z-3K186-AA
Product Specifications- Other Name: Knuckle - Front Wheel; Steering Knuckle, Front Left
- Position: Driver Side
- Replaces: 2L1Z-3K186-CA, 2L1Z-3K186-BA
| Page 1 of 4 |Next >
1-20 of 62 Results
Lincoln Steering Knuckle
If you own Lincoln and want to keep it in top shape, choosing OEM Steering Knuckle is a smart move. They are precisely engineered and follow strict factory standards. They are made in advanced facilities that use cutting edge technology. Each part goes through thorough testing to confirm strength and safety, so you can trust it. FordPartsDeal.com gives you genuine Lincoln Steering Knuckle at some of the affordable online prices without cutting quality. Every OEM Lincoln part includes the manufacturer's warranty, easy returns, and super-fast delivery. So why wait? Shop now and get your vehicle back to peak condition.
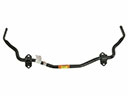
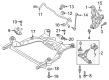
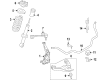
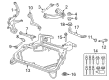
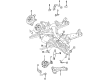
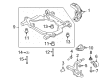
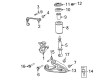
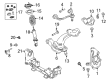
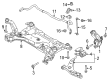
Lincoln Steering Knuckle connects the wheels to the suspension, providing precise turns and shock absorption without loss of motion. Lincoln prefers hushed cabins, and through its Quiet Flight tricks, hushes wind, tire blasts, and vibration so all conversations can be clear as the cabins cruise at leisure. Lincoln outfits all cars with Co-Pilot360, which includes lane keeping, blind-spot notices, automatic high beams, and tidy parking assists that relax both novice and experienced drivers. Lincoln continues with this cycle, releasing ActiveGlide to operate hands-free highway miles with dashboards remaining simple, glare-free, and simply wrapped in soft trims that beg to be driven on. Lincoln listens, taking feedback from the owners on the apps and dealerships, and replacing it with softer leather, sharper screens, faster software updates, and improved sound insulation every year. Steering Knuckle joins control arms, tie-rod ends, and hub or spindle to one firm pivot, allowing the wheel to rise up and over a bump vertically in addition to moving horizontally to the input of the driver on any drive layout (rear-wheel to all-wheel drive). To reduce friction and wear in daily stress, Steering Knuckle now prefers ball joints to the archaic kingpins. This load braking and cornering, therefore cracks or freedom in this joint will soon destroy the tires and the ride. When there is a serious suspension hit, Steering Knuckle should be checked as the bent arm will instantly change the camber and steering angle.
Lincoln Steering Knuckle Parts and Q&A
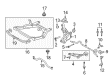
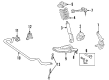
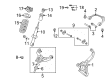
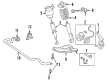
- Q: How to service and repair the steering knuckle on Lincoln Town Car?A:The repair and servicing process for a steering knuckle begins with turning off air suspension electrical power to avoid sudden air spring changes that would move the vehicle during hoisting or jacking or towing which might lead to personal injury. The user should operate the air suspension service switch to set it into off mode. Hoist the vehicle while it is in neutral gear position. First uninstall both the wheel bearing and wheel hub. You should activate the holding feature to stop the stud from rotating when removing the tie-rod nut before separating the tie-rod from the wheel knuckle. Install the new nut to 80 Nm (59 ft. lbs). First disconnect and throw away the upper stabilizer bar link nut through the holding feature while tightening the replacement nut to 63 Nm (46 ft. lbs) at installation. You should detach the lower stabilizer link nut followed by separating the stabilizer bar link. Toss the discarded nut and tightly install the new stabilizer bar link nut to 55 Nm (41 ft. lbs) specifications. The wheel speed sensor wiring harness retainer must be removed from the steering knuckle while the technician uses a holding feature to remove the existing upper ball joint nut and installs the new nut with torque at 150 Nm (111 ft. lbs). After removing the lower ball joint nut you should detach the wheel knuckle and discard the nut before installing the new nut with at least 150 Nm (111 ft. lbs) torque. The procedure should be reversed to install new components while checking the front end alignment followed by required adjustments.
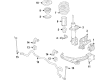
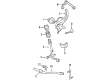
- Q: How to service and repair the steering knuckle on Lincoln Navigator?A:Service and repair operations on the steering knuckle begin by taking out the wheel hub. Use the hex holding feature to lock the stud during nut and tie-rod detachment from the wheel knuckle before discarding the nut. Put the brake hose to the side after removing the bolt. The hex holding feature should be applied to stop the stud from rotation during nut removal before discarding it. Continue by unfastening the nut and bolt then discard the nut. The ball joint separation from the wheel knuckle requires you to place the nut loosely and strike the ball joint stud end followed by the nut removal to separate the components while discarding the nut. The hex holding feature stops the stud from rotation so users can take away the nut and wheel knuckle before discarding the nut. To reinstall ball joints start with the opposite sequence of steps. Inspect front end alignment afterward and adjust it if needed.