FordParts
My Garage
My Account
Cart
OEM Lincoln Town Car Rear Crossmember
Rear Suspension Crossmember- Select Vehicle by Model
- Select Vehicle by VIN
Select Vehicle by Model
orMake
Model
Year
Select Vehicle by VIN
For the most accurate results, select vehicle by your VIN (Vehicle Identification Number).
1 Rear Crossmember found

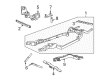
Lincoln Town Car Rear Crossmember Part Number: 9W1Z-5035-A
$86.34 MSRP: $119.44You Save: $33.10 (28%)Ships in 1-2 Business Days
Lincoln Town Car Rear Crossmember
OEM Rear Crossmember boasts unmatched quality. Each part goes through full quality checks. They adhere to Lincoln's official factory standards. These steps remove flaws and inconsistencies. So you can get Rear Crossmember with long life and a perfect fit. Come to our website and find genuine Lincoln Town Car parts. We keep a wide inventory of OEM Town Car parts at the highly affordable prices. It's easy to search, compare, and pick what you need. You'll love the clear info and simple checkout. We offer top-rated customer service, and we reply fast. We also ship promptly to ensure your order arrives on time.
Lincoln Town Car Rear Crossmember Parts and Q&A
- Q: How to Service and Repair the Rear Crossmember on Lincoln Town Car?A:The first step for transmission support crossmember repair and service requires placing the vehicle in neutral position while using a hoist system. The service process begins by first removing the connector from each HO2S sensor followed by removal of the catalyst monitor connectors before uninstalling bolts attaching the exhaust flange to the Catalytic Converter. The same process should then be performed on the LH side after disconnecting the LH HO2S sensor connector and the LH catalyst monitor connector then removing both bolts from the LH exhaust flange and the LH catalytic converter. Before working on the transmission you must remove its rear insulator nuts and then use an appropriate transmission jack to secure it. Clear away both bolts from the RH and LH crossmember before extracting the parking brake cable bracket. It is necessary to gently pry the crossmember from its pocket but avoid damaging the structure as you lower both sides to remove it. Install the crossmember by inserting the left-hand side first into its pocket where you should secure the bolts loosely then follow with the right-hand side bolts. Next install the parking brake cable bracket before torquing it to 55 Nm (41 ft. lbs). Place the transmission onto the crossmember then fasten its rear insulator nuts to 30 Nm (22 ft. lbs) torque. First install a new gasket to the RH catalytic converter assembly before placing it in position while loosely installing its bolts. First tighten the RH exhaust flange nuts to 48 Nm before tightening the RH exhaust bolts to 40 Nm. The technician will connect the RH HO2S sensor connector together with the RH catalyst monitor connector. Follow the same gasket installation process for the LH catalytic converter assembly before installing the bolts without torque then securing the LH exhaust flange nuts with 48 Nm (35 ft. lbs) before torquing LH exhaust bolts to 40 Nm (30 ft. lbs). Start by connecting the LH HO2S sensor connector as well as the LH catalyst monitor connector.

Related Lincoln Town Car Parts
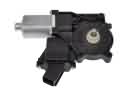 Lincoln Town Car Window Motor
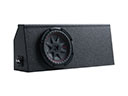 Lincoln Town Car Subwoofer
 Lincoln Town Car Air Deflector
 Lincoln Town Car Axle Beam
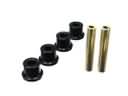 Lincoln Town Car Crossmember Bushing
 Lincoln Town Car Door Moldings
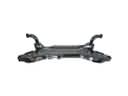 Lincoln Town Car Front Cross-Member
 Lincoln Town Car Hood Release Cable
 Lincoln Town Car Radiator Support
 Lincoln Town Car Shift Indicator
 Lincoln Town Car Windshield Washer Nozzle
 Lincoln Town Car Wiper Blade