FordParts
My Garage
My Account
Cart
OEM Mercury Cooling Fan Assembly
Engine Cooling Fan- Select Vehicle by Model
- Select Vehicle by VIN
Select Vehicle by Model
orMake
Model
Year
Select Vehicle by VIN
For the most accurate results, select vehicle by your VIN (Vehicle Identification Number).
Part Type
Select Part Type
60 Cooling Fan Assemblys found


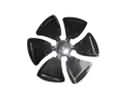
Mercury Fan Blade Part Number: 6L2Z-8600-BA
$72.60 MSRP: $119.45You Save: $46.85 (40%)Ships in 1-2 Business DaysProduct Specifications- Other Name: Fan Assembly; Engine Cooling Fan Clutch Blade; Engine Cooling Fan Blade; Radiator Fan Assembly


Mercury Fan Blade Part Number: F87Z-8600-FA
$76.25 MSRP: $125.45You Save: $49.20 (40%)Ships in 1-2 Business DaysProduct Specifications- Other Name: Fan Assembly; Radiator Fan Assembly


Mercury Fan & Motor Part Number: 8L8Z-8C607-B
$188.34 MSRP: $312.73You Save: $124.39 (40%)Ships in 1-2 Business DaysProduct Specifications- Other Name: Motor And Fan Assembly - Engine Cooling; Dual Radiator and Condenser Fan Assembly; Fan Blade; Fan Assembly; Cooling Fan Assembly


Mercury Fan & Motor Part Number: 8W1Z-8C607-C
$208.05 MSRP: $345.45You Save: $137.40 (40%)Ships in 1-2 Business DaysProduct Specifications- Other Name: Motor And Fan Assembly - Engine Cooling; Dual Radiator and Condenser Fan; Radiator Fan; Fan Blade; Fan Assembly; Fan Module
- Replaces: 7W1Z-8C607-B, 8W1Z-8C607-B, 8W1Z-8C607-A, RF-258

Mercury Fan Assembly Part Number: BE5Z-8C607-B
$578.16 MSRP: $960.00You Save: $381.84 (40%)Ships in 1-2 Business DaysProduct Specifications- Other Name: Motor And Fan Assembly - Engine Cooling; Dual Radiator and Condenser Fan; Radiator Fan; Fan Blade
- Replaces: BE5Z-8C607-A, 9E5Z-8C607-A, RF-246

Mercury Fan & Motor Part Number: BG1Z-8C607-A
$920.90 MSRP: $1529.09You Save: $608.19 (40%)Ships in 1-2 Business DaysProduct Specifications- Other Name: Motor And Fan Assembly - Engine Cooling; Dual Radiator and Condenser Fan; Radiator Fan; Fan Blade; Fan Assembly
- Replaces: 8G1Z-8B658-A, 8G1Z-8C607-A, 8G1Z-8C607-B, AG1Z-8C607-A, RF-232, RF-254, RF-249

Mercury Fan & Motor Part Number: 5M6Z-8C607-AH
$961.41 MSRP: $1596.36You Save: $634.95 (40%)Ships in 1-2 Business DaysProduct Specifications- Other Name: Motor And Fan Assembly - Engine Cooling; Dual Radiator and Condenser Fan Assembly; Fan Blade; Fan Assembly; Cooling Fan Assembly

Mercury Fan Blade Part Number: 4L2Z-8600-AA
$73.31 MSRP: $101.42You Save: $28.11 (28%)Ships in 1-2 Business DaysProduct Specifications- Other Name: Fan Assembly; Radiator Fan Assembly


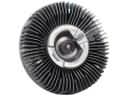
Mercury Fan & Motor, Passenger Side Part Number: 5F1Z-8C607-C
$92.11 MSRP: $127.43You Save: $35.32 (28%)Ships in 1-2 Business DaysProduct Specifications- Other Name: Motor And Fan Assembly - Engine Cooling; Right Engine Cooling Fan; A/C Condenser Fan; Radiator Fan; Fan Blade; Fan Assembly
- Position: Passenger Side
- Replaces: 3F1Z-8C607-HA, 5F1Z-8C607-D

Mercury Cooling Fan Part Number: 5F2Z-8C607-CB
$462.78 MSRP: $640.21You Save: $177.43 (28%)Ships in 1-2 Business DaysProduct Specifications- Other Name: Motor And Fan Assembly - Engine Cooling; Dual Radiator and Condenser Fan Assembly; Fan Blade; Fan Assembly; Cooling Fan Assembly

Mercury Fan & Motor Part Number: 5L8Z-8C607-HB
$331.38 MSRP: $458.43You Save: $127.05 (28%)Ships in 1-2 Business DaysProduct Specifications- Other Name: Motor And Fan Assembly - Engine Cooling; Dual Radiator and Condenser Fan; Radiator Fan; Fan Blade; Fan Assembly; Cooling Fan Assembly
- Manufacturer Note: RH/LH

Mercury Fan Blade Part Number: 2C5Z-8600-AA
Product Specifications- Other Name: Fan Assembly; Radiator Fan Assembly


Mercury Fan & Motor, Passenger Side Part Number: YF1Z-8C607-BD
Product Specifications- Other Name: Fan And Motor Assembly; A/C Condenser Fan Assembly; Radiator Fan Assembly; Cooling Fan Assembly; Fan Blade; Fan Assembly
- Position: Passenger Side


Mercury Fan Blade Part Number: F87Z-8600-EA
Product Specifications- Other Name: Fan Assembly; Engine Cooling Fan Clutch Blade; Radiator Fan Assembly


Mercury Fan & Motor Part Number: F5AZ-8C607-B
Product Specifications- Other Name: Fan And Motor Assembly; Engine Cooling Fan Assembly; Radiator Fan Assembly; Cooling Fan Assembly; Fan Assembly; Auxiliary Fan
- Manufacturer Note: This application does not have a separate shroud(8146) - this design is a two fan system set-up(mechanical and electrical)- 8C607 includes shroud, electric fan and motor, if belt driven fan, refer to 8600


Mercury Fan Blade Part Number: F2AZ-8600-C
Product Specifications- Other Name: Fan Assembly; Radiator Fan Assembly; Blade


Mercury Fan Blade Part Number: E6DZ8600A
Product Specifications- Other Name: Fan Assembly; Radiator Fan Assembly; Blade


Mercury Fan Assembly Part Number: 5L8Z-8C607-CB
Product Specifications- Other Name: Motor And Fan Assembly - Engine Cooling; Engine Cooling Fan Assembly; Radiator Fan Assembly; Fan Blade

Mercury Fan & Motor Part Number: 3W1Z-8C607-BD
Product Specifications- Other Name: Fan and Motor Assembly; Dual Radiator and Condenser Fan; Engine Cooling Fan; Radiator Fan; Cooling Fan; Fan Blade; Fan Assembly; Fan Module


Mercury Fan & Motor Part Number: 1W1Z-8C607-AA
Product Specifications- Other Name: Fan and Motor Assembly; Dual Radiator and Condenser Fan; Engine Cooling Fan; Radiator Fan; Cooling Fan; Fan Blade; Fan Assembly; Fan Module
- Replaces: YW1Z-8C607-AB
| Page 1 of 3 |Next >
1-20 of 60 Results
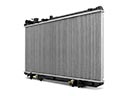
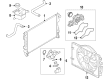
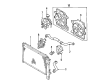
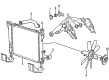
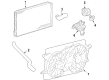
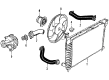
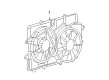
Mercury Cooling Fan Assembly
If you own Mercury and want to keep it in top shape, choosing OEM Cooling Fan Assembly is a smart move. They are precisely engineered and follow strict factory standards. They are made in advanced facilities that use cutting edge technology. Each part goes through thorough testing to confirm strength and safety, so you can trust it. FordPartsDeal.com gives you genuine Mercury Cooling Fan Assembly at some of the affordable online prices without cutting quality. Every OEM Mercury part includes the manufacturer's warranty, easy returns, and super-fast delivery. So why wait? Shop now and get your vehicle back to peak condition.
Mercury Cooling Fan Assembly is a fan/shroud that is an electric fan and takes in air across the radiator and condenser to maintain a constant engine temperature and prevent overheating. Some of the ways that Mercury has earned its stripes are through the supple suspension, spacious cabins, and silent insulation which allowed friends to chat rather than fight tire howl. Separate seats within a Mercury are a little higher to provide improved sightlines, and the steering system is light but stable. Value never equaled cheap with the soft-touch panels and heavy door seals dampening out the wind such that the music could be heard. The dash had airflow vents that were placed high up to give the drive a more even feel, especially during summer, so it was not as harsh. The hinges were designed so that they could not squash the luggage, a little gesture that was respectful to those who were going to use it in their daily lives. Intelligent radiator installation slots also allow a replacement Cooling Fan Assembly to be installed by sliding in rather than bending metal. Since Mercury preferred the simplicity, the majority of bolts are in direct sight, and wire clips can be released by a mere squeeze. To fit in the new Cooling Fan Assembly on your Mercury, park on level ground and then turn off the ignition, allow the engine to cool, disconnect the battery, and then lift the upper cover. Unplug the harness and remove four shroud bolts, then remove the old unit and drop the new Cooling Fan Assembly onto the tabs, then thread with the hand tightening bolts, then tighten, then spin the blades to fit into position, reattach ducts, reconnect the battery, then turn on the engine and hear the fan spin neatly.