FordParts
My Garage
My Account
Cart
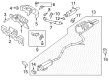
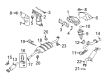
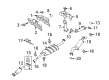
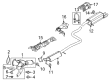
OEM Mercury Exhaust Manifold Clamp
- Select Vehicle by Model
- Select Vehicle by VIN
Select Vehicle by Model
orMake
Model
Year
Select Vehicle by VIN
For the most accurate results, select vehicle by your VIN (Vehicle Identification Number).
7 Exhaust Manifold Clamps found

Mercury Muffler & Pipe Clamp Part Number: 6E5Z-5A231-A
$24.16 MSRP: $36.38You Save: $12.22 (34%)Ships in 1-2 Business DaysProduct Specifications- Other Name: Clamp; Exhaust Muffler Clamp; Exhaust Clamp

Mercury Clamp Connector, Rear Part Number: 9L8Z-5K256-A
$357.81 MSRP: $502.39You Save: $144.58 (29%)Ships in 1-3 Business DaysProduct Specifications- Other Name: Connector - Pipe; Exhaust Intermediate Pipe, Rear; Exhaust Pipe Connector; Exhaust System Kit; Exhaust Pipe; Connector Pipe
- Position: Rear

Mercury Muffler Connector, Rear Part Number: 9L8Z-5K256-B
$382.36 MSRP: $536.87You Save: $154.51 (29%)Ships in 1-3 Business DaysProduct Specifications- Other Name: Connector - Pipe; Exhaust Intermediate Pipe, Rear; Exhaust Pipe Connector; Exhaust Pipe; Connector Pipe
- Position: Rear
Mercury Muffler Connector, Rear Part Number: AL8Z-5K256-A
$388.28 MSRP: $510.60You Save: $122.32 (24%)Ships in 1-3 Business DaysProduct Specifications- Other Name: Connector - Pipe; Exhaust Intermediate Pipe, Rear; Exhaust Pipe Adapter; Exhaust Pipe Connector; Exhaust System Kit; Connector Pipe; Exhaust Pipe
- Position: Rear

Mercury Muffler Clamp Part Number: 9L8Z-5K272-B
$13.78 MSRP: $18.75You Save: $4.97 (27%)Ships in 1-3 Business DaysProduct Specifications- Other Name: Kit - U-Bolt And Clamp; Exhaust Muffler Clamp; Exhaust Clamp

Mercury Connector Pipe Clamp Part Number: XS5Z-5K272-JA
$7.58 MSRP: $9.63You Save: $2.05 (22%)Ships in 1-2 Business DaysProduct Specifications- Other Name: Kit - Exhaust System Mountings; Exhaust Muffler Clamp; Exhaust Clamp; Front Muffler Clamp; Rear Muffler Clamp
- Replaces: YS4Z-5A231-BA, XS8Z-5A231-AA


Mercury Muffler Clamp Part Number: 9L8Z-5K272-A
Product Specifications- Other Name: Kit - U-Bolt And Clamp; Catalytic Converter Clamp; Exhaust Muffler Clamp; Exhaust Clamp; Converter Clamp; Clamp
Mercury Exhaust Manifold Clamp
If you own Mercury and want to keep it in top shape, choosing OEM Exhaust Manifold Clamp is a smart move. They are precisely engineered and follow strict factory standards. They are made in advanced facilities that use cutting edge technology. Each part goes through thorough testing to confirm strength and safety, so you can trust it. FordPartsDeal.com gives you genuine Mercury Exhaust Manifold Clamp at some of the affordable online prices without cutting quality. Every OEM Mercury part includes the manufacturer's warranty, easy returns, and super-fast delivery. So why wait? Shop now and get your vehicle back to peak condition.
The Mercury Exhaust Manifold Clamp ensures that the gases are contained and are not heard, thus the drivers get the smooth ride they want as a Mercury driver. Mercury was born in 1938 and made a name of balanced value, crisp styling and cabins that dulled road noise, yet remained easy to handle. Ranging in personality between the rogue Cougar and the aristocratic Grand Marquis, its models combined graceful suspension tuning with spacious interiors which softened every ride. Although comfort upgrades were implemented with each passing decade, Mercury did not forget to focus on affordability, making the brand an option of families that desired to have a luxurious feel without paying a fortune. The production was stopped in 2011, but Mercury is still fond of cars that continue to run smoothly on the modern roads. The Exhaust Manifold Clamp is the solid component, which fixes the manifold to the exhaust line, and blocks the joint to avoid the possibilities of leakages, vibrations, and unnecessary rumors. In order to fit the Exhaust Manifold Clamp, ensure that the engine is completely cooled and then elevate and fasten the car on ground. Test and examine the manifold flange and change any deteriorated gasket, polish mating surfaces, and square up pipe and flange. Please position the Exhaust Manifold Clamp over the joint and begin with the nuts by hand and tighten each side separately in that order until the parts come together and fit together evenly. Once it has been cleared, turn on the engine, test to ensure there are no leaks and when the metal has heated and cooled, retorque the hardware to ensure a permanent seal.
Related Mercury Parts
 Mercury Catalytic Converter
 Mercury Catalytic Converter Gasket
 Mercury Diverter Valve
 Mercury EGR Tube
 Mercury EGR Valve
 Mercury Exhaust Hanger
 Mercury Exhaust Heat Shield
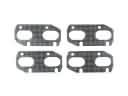 Mercury Exhaust Manifold Gasket
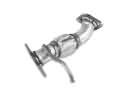 Mercury Exhaust Pipe
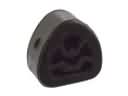 Mercury Muffler Strap
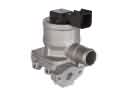 Mercury Secondary Air Injection Check Valve
 Mercury Tail Pipe