FordParts
My Garage
My Account
Cart
OEM Mercury Mariner Alternator
Generator- Select Vehicle by Model
- Select Vehicle by VIN
Select Vehicle by Model
orMake
Model
Year
Select Vehicle by VIN
For the most accurate results, select vehicle by your VIN (Vehicle Identification Number).
8 Alternators found

Mercury Mariner Alternator Part Number: 8S4Z-10346-A
$282.99 MSRP: $467.27You Save: $184.28 (40%)Ships in 1-2 Business Days
Mercury Mariner Alternator Part Number: 9L8Z-10346-A
$277.52 MSRP: $458.18You Save: $180.66 (40%)Ships in 1-2 Business Days
Mercury Mariner Alternator Part Number: 4U2Z-10V346-DERM
$179.25 MSRP: $283.64You Save: $104.39 (37%)
Mercury Mariner Alternator Part Number: 6L8Z-10346-ADRM
$268.30 MSRP: $427.27You Save: $158.97 (38%)
Mercury Mariner Alternator Part Number: AU2Z-10V346-BZRM
$227.44 MSRP: $361.82You Save: $134.38 (38%)
Mercury Mariner Alternator Part Number: AU2Z-10V346-AZRM
$251.28 MSRP: $400.00You Save: $148.72 (38%)
Mercury Mariner Alternator Part Number: 8L8Z-10346-A
$251.28 MSRP: $400.00You Save: $148.72 (38%)
Mercury Mariner Alternator Part Number: 6L8Z-10346-BARM
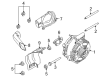
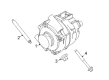
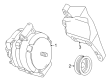
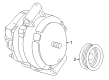
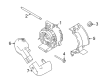
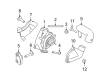
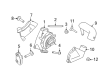
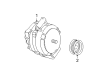
Mercury Mariner Alternator
OEM Alternator boasts unmatched quality. Each part goes through full quality checks. They adhere to Mercury's official factory standards. These steps remove flaws and inconsistencies. So you can get Alternator with long life and a perfect fit. Come to our website and find genuine Mercury Mariner parts. We keep a wide inventory of OEM Mariner parts at the highly affordable prices. It's easy to search, compare, and pick what you need. You'll love the clear info and simple checkout. We offer top-rated customer service, and we reply fast. We also ship promptly to ensure your order arrives on time.
The Mercury Mariner vehicles employs an alternator most especially for charging of its battery but at the same time providing power to various electrical devices in a vehicle that is in operation. The alternator works by turning the mechanical energy from the engine into AC by using a rotating magnetic field within a stator that is then converted in to DC for usage. Various kinds of alternators have been used in the course of time on Mercury Mariner vehicles, as well as using change over excitation types including field coils and permanent magnets. While, the contemporary models employ voltage regulation system into the PCM to give stable voltage outputs, the earlier models employ both external as well as internal voltage regulators. The change to high output alternators is commonly implemented for customized Mercury Mariner vehicles in which other factory installed electrical equipments raise the load demand more than the standard alternator capability.
Mercury Mariner Alternator Parts and Q&A
- Q: How to Ensure Proper Functioning of the Alternator in a Mercury Mariner?A:Service procedures for the alternator should begin with placing your vehicle in neutral position on a hoist. The battery needs to be disconnected to avoid electrical problems. Turn the front end accessory Drive Belt tensioner to the counterclockwise direction while setting the accessory drive belt to the side. The service requires removal of the generator B+ protective cover and its terminal nut for replacement after tightening to 8 Nm (71 lb-in). To start the alternator service disconnect the generator electrical connector followed by moving the generator B+ cable to a safe position. The generator should be removed by uninstalling its lower Air Duct bolt while you should tighten this bolt to 4 Nm (35 lb-in) when reinstalling. Operating the locking tab will free the lower air duct from its connection to the generator before extraction. The generator shield installation starts with removing its bottom pin-type retainer followed by the generator shield nut for removal of the generator shield. Tighten all components to 20 Nm (15 lb-ft). The generator stud nut requires removal first while tightening it to 47 Nm (35 lb-ft) before removing the generator stud and tightening it to 24 Nm (18 lb-ft) for reinstallation. Researchers should first discard the generator along with its two bolts before torquing these bolts to 47 Nm (35 lb-ft) for installation. The final process becomes reverse-oriented by following the previous removal stages.
- Q: How to service the alternator on a 2.5L generator on Mercury Mariner?A:Service operations for the alternator of a 2.5L generator must begin with a vehicle in neutral mode while it is situated on a hoist. Begin by disconnecting the battery followed by removing the five bolts and pushpin alongside the right-hand lower splash shield. Twist the front end accessory Drive Belt tensioner to set the accessory drive belt on the aside position. Start by taking off the battery harness locator from the generator stud at the lower position before removing the generator bolt and the 2 generator stud nuts. The top part of the vehicle requires a locking tab press to free the generator lower Air Duct before its removal. The B+ terminal nut of the generator needs removal before disconnecting the electrical connector and generator B+ cable while setting the B+ protective cover and generator aside. To proceed with the generator upper air duct removal process you must take out the three securing screws. Secure the generator upper air duct to its position using the 3 screws before tightening them to 4 Nm (35 lb-in). Place the generator device into position from the top before tightening its nuts on the generator studs by hand. Safely reposition the generator B+ cable and fasten the B+ terminal nut at 12 Nm (106 lb-in) before reinstating both the power supply connection and applying the generator B+ protective cover onto the B+ terminal. From beneath the vehicle begin by tightening the lower generator bolt using hand strength first before securing both generator stud nuts to 47 Nm (35 lb-ft). The generator air duct needs installation alongside tightening of the generator bolt to 47 Nm (35 lb-ft). The front end accessory drive belt tensioner should be turned clockwise to move the belt onto correct pulleys while you install all 5 bolts along with the pushpin and right-hand lower splash shield and torque them to 8 Nm (71 lb-in). Attach the harness locator to the generator stud and connect the battery before finishing the procedure.