FordParts
My Garage
My Account
Cart
OEM Mercury Mariner Steering Shaft
Steering Stem Shaft- Select Vehicle by Model
- Select Vehicle by VIN
Select Vehicle by Model
orMake
Model
Year
Select Vehicle by VIN
For the most accurate results, select vehicle by your VIN (Vehicle Identification Number).
1 Steering Shaft found


Mercury Mariner Lower Shaft Part Number: 9L8Z-3B676-A
$173.49 MSRP: $285.45You Save: $111.96 (40%)Ships in 1-2 Business Days
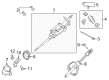
Mercury Mariner Steering Shaft
OEM Steering Shaft boasts unmatched quality. Each part goes through full quality checks. They adhere to Mercury's official factory standards. These steps remove flaws and inconsistencies. So you can get Steering Shaft with long life and a perfect fit. Come to our website and find genuine Mercury Mariner parts. We keep a wide inventory of OEM Mariner parts at the highly affordable prices. It's easy to search, compare, and pick what you need. You'll love the clear info and simple checkout. We offer top-rated customer service, and we reply fast. We also ship promptly to ensure your order arrives on time.
Steering Shaft is one of the more crucial parts Mercury Mariner has exhibited a good example of reliable and high performant coups de grace. This is an essential segment that interprets the input of a driver out of the steering wheel to the wheels and guarantees smooth functional and safe steering. Steering Shaft is responsible for connecting the steering wheel to the steering gearbox and for adding to the steadiness of the ship and overall ease of driving. The Steering Shaft can be used on different Mariner series boats such as the Mariner hybrid series; the part is made using high-quality materials to prevent early degradation. Periodic check on Steering Shaft is recommended since signs like difficult steering or noisy should be taken to the mechanic in order to avoid hazardous situations on the road. Specifically, the Mercury Mariner was awarded for it interesting features like pull-drift steering compensation which proves the necessity of properly functioning Steering Shaft. By being awarded the Consumers Digest optimal Buy the Mariner is known to have high quality and the Steering Shaft contributes to this. As the car manufacturer improves its production bowers, self-governing the Steering Shaft remains characterized in the auto market because of its dependability boosting the car efficiency and safety. In conclusion it will be proper to note that the Steering Shaft is not just another component; it is symbol of Mercury Mariner's passion for cars and innovation.
Mercury Mariner Steering Shaft Parts and Q&A
- Q: How to service and repair the Steering Shaft on Mercury Mariner?A:The repair or service of steering column shaft starts with removing the steering column opening trim and the left-hand instrument panel side finish panel. Remove the ground wire eyelet bolt through the side finish panel opening before placing the two ground wire eyelets and wires properly in position. Disconnect the two wiring harnesses on the instrument panel while you also detach the high-voltage jumper switch electrical connector (if present) and place all hardware to the side. Follow this procedure to gain access to the steering column coupling-to-steering column bolt during removal then discard it and tighten the new bolt to 55 Nm (41 lb-ft) when installing. Press the Ignition Switch to lock and remove the key so you can turn the Steering Wheel opposite to its original position while the column keeps itself locked. Steering column shaft rotation needs to be prevented when the lower shaft is separated from the installation as this movement will damage the Clock Spring; rotating the shaft requires Clock Spring recentering for repair. First detach the coupling between the steering column and column before removing three steering column dash seal nuts for new installation where final torque should be set at 8 Nm (71 lb-in). Passengers should move the dash seal up the steering column shaft from inside the compartment before discarding the steering column coupling-to-steering column shaft bolt. They must tighten this new bolt to 55 Nm (41 lb-ft) when installing it. Take out the steering column shaft and dash seal for inspection of the dash seal along with clip-type retainers for potential damage before getting a new dash seal if needed. The reverse steps of the removal process will finish this operation.

Related Mercury Mariner Parts
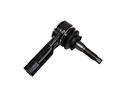 Mercury Mariner Tie Rod
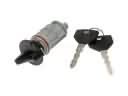 Mercury Mariner Ignition Lock Assembly
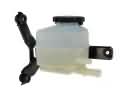 Mercury Mariner Power Steering Reservoir
 Mercury Mariner Rack & Pinion Bushing
 Mercury Mariner Rack And Pinion
 Mercury Mariner Rack and Pinion Boot
 Mercury Mariner Steering Column
 Mercury Mariner Steering Column Cover
 Mercury Mariner Steering Column Seal
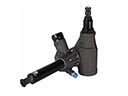 Mercury Mariner Steering Gear Box
 Mercury Mariner Steering Wheel
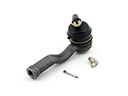 Mercury Mariner Tie Rod End
Browse Mercury Mariner Steering Shaft by Years
2011
2010
2009
2008