FordParts
My Garage
My Account
Cart
OEM Mercury Mariner Clock Spring
Spiral Cable Clock Spring- Select Vehicle by Model
- Select Vehicle by VIN
Select Vehicle by Model
orMake
Model
Year
Select Vehicle by VIN
For the most accurate results, select vehicle by your VIN (Vehicle Identification Number).
2 Clock Springs found


Mercury Mariner Clockspring Part Number: 8L8Z-14A664-A
$130.13 MSRP: $200.82You Save: $70.69 (36%)Ships in 1-3 Business Days
Mercury Mariner Clockspring Part Number: 5L8Z-14A664-AB
$166.33 MSRP: $256.68You Save: $90.35 (36%)Ships in 1-3 Business Days
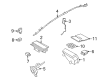
Mercury Mariner Clock Spring
OEM Clock Spring boasts unmatched quality. Each part goes through full quality checks. They adhere to Mercury's official factory standards. These steps remove flaws and inconsistencies. So you can get Clock Spring with long life and a perfect fit. Come to our website and find genuine Mercury Mariner parts. We keep a wide inventory of OEM Mariner parts at the highly affordable prices. It's easy to search, compare, and pick what you need. You'll love the clear info and simple checkout. We offer top-rated customer service, and we reply fast. We also ship promptly to ensure your order arrives on time.
A Mercury Mariner Clock Spring functions as an essential SRS piece in Mercury Mariner vehicles where it maintains dependable electrical links between the airbag module and the entire electrical system. A fast airbag deployment depends on this connection which boosts passenger safety in vehicular accidents. Designed as a flat spiral-shaped multicore cable the Clock Spring simultaneously stores energy and lets the steering wheel rotate which establishes its significance for Mariner safety systems. A wide range of Mariner models can use the Mercury Mariner Clock Spring which demonstrates the company's dedication to quality through high-level performance and proven reliability rates. Before present time multiple Clock Spring versions were implemented by manufacturers creating variations in designs which affected the airbag system's functioning abilities. The replacement expenses for a Clock Spring typically fall between $50 and $400 which demonstrates its essential role for vehicle security with its efficiency component. Analysis of the Mercury Mariner awarded recognition to its dual advantages of pull-drift steering and hybrid technology that emerges from the essential role of the Clock Spring in vehicle efficiency. The Mercury model Clock Spring excels in automotive markets by protecting safety while maximizing efficiency and represents the advanced engineering that differentiates Mercury vehicles.
Mercury Mariner Clock Spring Parts and Q&A
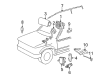
- Q: How to Service and Repair the Clock Spring Assembly on Mercury Mariner?A:Depowering the Supplemental Restraint System (SRS) must be the first step to commence Clock Spring assembly service or repair since removing the correct Restraints Control Module (RCM) fuse with the ignition ON will activate the air bag warning indicator for safety purposes. Before returning the vehicle to the customer it is crucial to confirm that the SRS operates without defects. Start by detaching the driver air bag module followed by Steering Wheel tilting down while securing the tilt handle. Any servicing of the Clock Spring requires that both road wheels remain in a straight-ahead condition before steering wheel removal. The 2-piece upper steering column shroud requires removal as an assembling unit by tab release. The installation process begins by uninstalling the three screws from the lower steering column shroud followed by releasing the tilt column locking lever and then taking off the lower shroud. Remove the Clock Spring electrical connector while using caution to detach its mounting screws which sustain the Clock Spring unit. To avoid Clock Spring damage do not remove the anti-rotation key until putting in the steering wheel during installation. Place the Clock Spring into position while screwing it with the two screws before you connect the electrical connector. Fasten the lower steering column shroud back with its three screws then secure the upper shroud afterwards. Repeated centralization of the Clock Spring will prevent premature failure when proper centralization remains uncertain. Excessive rotation of inner rotor in the Clock Spring can injure the ribbon wire inside the device. Proceed to install the steering wheel after installing a fresh Clock Spring when the anti-rotation key was not taken out before. To correctly set the new inner rotor position rotate it counterclockwise until you feel minor resistance after which apply four clockwise turns to complete centralization. To verify proper centering check the positions of the Clock Spring rotor window and the alignment of the arrows present on the inner and outer rotors. The road wheels must position at 12 o'clock before installing the steering wheel and then follow the process of removing the anti-rotation key if present and installing the driver air bag module and activating the SRS system.

Related Mercury Mariner Parts
 Mercury Mariner Air Bag Control Module
 Mercury Mariner Air Bag Sensor
 Mercury Mariner Airbag
 Mercury Mariner Body Control Module
 Mercury Mariner Headlight Relay
 Mercury Mariner Headlight Switch
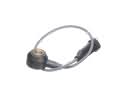 Mercury Mariner Knock Sensor
 Mercury Mariner Occupant Detection Sensor
 Mercury Mariner PCV Hose
 Mercury Mariner Power Window Switch
 Mercury Mariner Relay
 Mercury Mariner Speedometer Cable