My Garage
Cart
Make sure this part fits

Ford XS2Z-19860-AA
Evaporator Core

1995-2000 Ford XS2Z19860AA

Customer Questions & Expert Answers (4)
Ford XS2Z-19860-AA Evaporator Core
  • Part Description
    Core - Air Conditioning; A/C Evaporator Core Repair Kit; Evaporator.
  • Base No.
    19860
  • Manufacturer
    Ford
Make sure this part fits
$109.75 MSRP: $149.35
You Save: $39.60 (27%)
1
ADD TO CART
  • Related Parts
  • Product Specifications
  • Vehicle Fitment
  • Customer Questions & Expert Answers
  • Product Specifications

    BrandGenuine Ford
    Base No.19860
    Manufacturer Part NumberXS2Z-19860-AA
    Part DescriptionCore - Air Conditioning; A/C Evaporator Core Repair Kit; Evaporator.
    Other NamesCore - Air Conditioning Evaporator
    Manufacturer NoteFROM 4/1/99
    Item Dimensions8.7 x 9.3 x 9.6 inches
    Item Weight4.70 Pounds
    ConditionNew
    Fitment TypeDirect Replacement
    ManufacturerFord
    SKUXS2Z-19860-AA
    WarrantyThis genuine Ford part is guaranteed by Ford's factory warranty.
    Shipping & ReturnShipping Policy Return Policy
    Warning: California's Proposition 65
  • Vehicle Fitment

    Year Make Model Trim Engine
    1995-2000 Ford ContourBase, GL, GL Sport, LX, LX Sport, SE, Sport, SVT4 Cyl 2.0 L BI-FUEL, 4 Cyl 2.0 L GAS, 6 Cyl 2.5 L GAS
    1999-2000 Mercury CougarBase, V64 Cyl 2.0 L GAS, 6 Cyl 2.5 L GAS
    1995-2000 Mercury MystiqueBase, GS, GS Spree, LS, LS Young America4 Cyl 2.0 L GAS, 6 Cyl 2.5 L GAS
  • Customer Questions & Expert Answers

    Q:
    Do you think this XS2Z-19860-AA will fit my car? Posted by FordPartsDeal Specialist
    A:
    Select Your Vehicle model to verify if part number XS2Z-19860-AA fits your car.
    Posted by FordPartsDeal Specialist
    Q:
    How to service and repair the evaporator core on Ford Contour? Posted by Customer
    A:
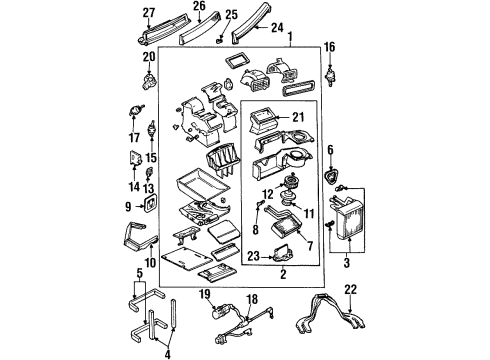
    The evaporator service requires a starting point of vacuum control actuator removal by disconnecting the connecting rod and removing nuts and vacuum lines to take out the actuator. The service continues with removing the Panel (PNL)/Floor (FLR) vacuum control actuator through the same process. The service begins with recirculation/fresh air vacuum control actuator removal through disconnecting the connecting rod followed by removing nuts then disconnection of vacuum line before actuator removal. Start by taking out the vacuum line harness and afterward unbolt and extract the blend door motor through its four screws. Remove the heater outlet floor duct from the heater/evaporator core housing by first removing the screw and next sliding the air duct upward before releasing each retaining tab located on both sides. The heater core requires unclipping of four retaining components to free itself and its cover separately. The blower motor/evaporator housing requires removal of screws before you can extract the evaporator core cover by first removing its bolts then separating the rubber seal and evaporator nut and cover. First remove the evaporator and air baffle from the system then detach the upper housing of the blower by unclipping metal brackets if present (if equipped), followed by freeing eight retaining tabs. The process starts by unscrewing the resistor and its screw before releasing the two retaining tabs which separates the bottom segments of the blower housing. Begin the blower upper housing disassembly by unsealing it and freeing its three retaining tabs before dividing the housing through the five retaining tabs and pulling off the clip. The housing disassembly ends with pulling out the air door control shafts then removing the air doors one by one. The reverse procedure of disassembling should be followed during assembly while using additional clips to protect the retaining tabs when reattaching components.
    Posted by FordPartsDeal Specialist
    Q:
    How to service and repair the evaporator core on Mercury Cougar? Posted by Customer
    A:
    The first step is to take away the heater/evaporator core housing followed by a disconnect of the blower motor/evaporator housing from the heater/evaporator housing by unfastening the bolts and rubber seal and nut and cover. The first step in servicing the evaporator includes unclipping the vacuum hose followed by disconnecting all housing parts before removing the evaporator. The right procedure for installation includes reversing the steps of removal. Also perform checks to verify normal air conditioning operations. You must install O-rings which have refrigerant oil coating together with gaskets on the new evaporator so they match their original positioning from the old evaporator.
    Posted by FordPartsDeal Specialist
    Q:
    How to service and repair the evaporator core on Mercury Mystique? Posted by Customer
    A:
    The evaporator service requires a starting point of vacuum control actuator removal by disconnecting the connecting rod and removing nuts and vacuum lines to take out the actuator. The service continues with removing the Panel (PNL)/Floor (FLR) vacuum control actuator through the same process. The service begins with recirculation/fresh air vacuum control actuator removal through disconnecting the connecting rod followed by removing nuts then disconnection of vacuum line before actuator removal. Start by taking out the vacuum line harness and afterward unbolt and extract the blend door motor through its four screws. Remove the heater outlet floor duct from the heater/evaporator core housing by first removing the screw and next sliding the air duct upward before releasing each retaining tab located on both sides. The heater core requires unclipping of four retaining components to free itself and its cover separately. The blower motor/evaporator housing requires removal of screws before you can extract the evaporator core cover by first removing its bolts then separating the rubber seal and evaporator nut and cover. First remove the evaporator and air baffle from the system then detach the upper housing of the blower by unclipping metal brackets if present (if equipped), followed by freeing eight retaining tabs. The process starts by unscrewing the resistor and its screw before releasing the two retaining tabs which separates the bottom segments of the blower housing. Begin the blower upper housing disassembly by unsealing it and freeing its three retaining tabs before dividing the housing through the five retaining tabs and pulling off the clip. The housing disassembly ends with pulling out the air door control shafts then removing the air doors one by one. The reverse procedure of disassembling should be followed during assembly while using additional clips to protect the retaining tabs when reattaching components.
    Posted by FordPartsDeal Specialist
    If you have any questions about this product, please don't hesitate to ask us. We will be happy to help you!

OEM Ford XS2Z-19860-AA, Excellent Performance and Perfect Fitment

To ensure reliability, purchase Ford part # XS2Z-19860-AA Evaporator Core. It is sometimes referred to as Ford Evaporator. For those Ford owners who aspire to maintain their vehicles in optimal shape, opting for OEM parts is a wise choice. Precisely engineered, these components adhere to stringent factory guidelines and are produced in state-of-the-art facilities using cutting-edge technologies. Moreover, they are subjected to thorough testing to certify their resilience and safety, thereby making them a dependable option for Ford owners.

FordPartsDeal.com is a leading supplier of genuine Ford parts such as Ford XS2Z19860AA Evaporator Core. A vast selection of genuine Ford parts is available on our website, all offered at discounted prices. Every OEM Ford part is covered by the manufacturer's warranty, which also applies to our hassle-free return policy. Enjoy fast delivery service, ensuring you get your parts when you need them. Your shopping experience here is guaranteed to be pleasurable. For detailed Ford parts information, click here.
Choose FordPartsDeal for discounted prices, exceptional service and fast delivery