My Garage
Cart
Make sure this part fits

Ford 2L7Z-6019-BA
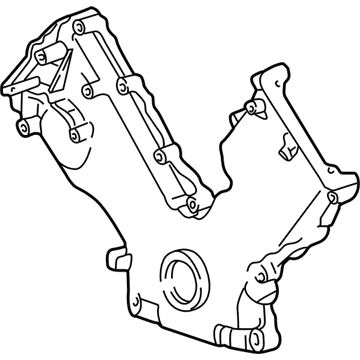
Timing Cover, Front

1999-2002 Ford 2L7Z6019BA

Customer Questions & Expert Answers (4)
Ford 2L7Z-6019-BA Timing Cover, Front
  • Part Description
    Cover - Cylinder Front
  • Base No.
    6019
  • Position
    Front
  • Manufacturer
    Ford
  • Manufacturer's Notes
    This part is discontinued.
Make sure this part fits
  • Related Parts
  • Product Specifications
  • Vehicle Fitment
  • Customer Questions & Expert Answers
  • Product Specifications

    BrandGenuine Ford
    Base No.6019
    Manufacturer Part Number2L7Z-6019-BA
    Part DescriptionCover - Cylinder Front
    Other NamesFront Cover
    Item Weight12.10 Pounds
    PositionFront
    ConditionNew
    Fitment TypeDirect Replacement
    ManufacturerFord
    SKU2L7Z-6019-BA
    WarrantyThis genuine Ford part is guaranteed by Ford's factory warranty.
    Shipping & ReturnShipping Policy Return Policy
    Warning: California's Proposition 65
  • Vehicle Fitment

    Year Make Model Trim Engine
    2002 Lincoln BlackwoodBase8 Cyl 5.4 L GAS
    1999-2001 Lincoln NavigatorBase8 Cyl 5.4 L GAS
  • Customer Questions & Expert Answers

    Q:
    Can you verify if 2L7Z-6019-BA is the right one for my car? Posted by FordPartsDeal Specialist
    A:
    Select Your Vehicle model to verify if part number 2L7Z-6019-BA fits your car.
    Posted by FordPartsDeal Specialist
    Q:
    How to service and repair the timing cover on Lincoln Blackwood? Posted by Customer
    A:
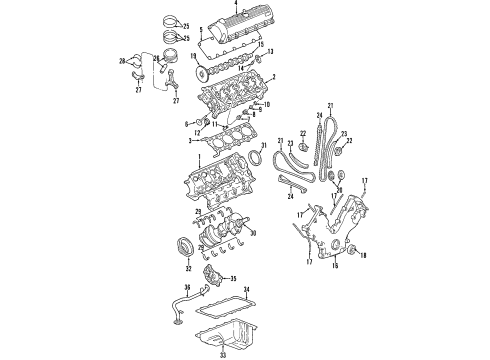
    Start servicing or repairing the timing cover by removing left and right valve covers, the cooling fan and water pump pulley bolts. Begin by removing the crankshaft pulley then take out its bolts before you put the power steering pump to the side. Starting with the removal of the A/C muffler nut to move the component away then proceed by disconnecting the Crankshaft Position (CKP) sensor electrical connector. Pour out all engine oil before taking out bolts from the rear of the crankshaft to remove its front oil seal. The vehicle should be lowered while removing the electrical connector from the Camshaft Position (CMP) sensor. Use a plastic scraping tool to eliminate all traces of sealant because metal scrapers and abrasive tools will damage the sealing surfaces during the removal of the bolt and belt idler pulley. You should extract the bolts along with studs and engine front cover and gaskets before thoroughly cleaning and inspecting both the oil pan sealing surfaces and front cover sealing surfaces. Apply metal surface cleaner to delete all sealant when installing since the front cover and gasket requires securement within four minutes. Install the engine front cover after applying specified silicone sealant while following these bolt installation steps: bolt one through five to 25 Nm (18 ft. lbs.) then six and seven to 50 Nm (37 ft. lbs.) until bolt 11 through 15 reaches 25 Nm (18 ft. lbs.). Bolt and connect the CMP sensor before lifting the vehicle to execute a bolt tightening procedure at three stages beginning with 2 Nm (18 inch lbs.) then moving to 20 Nm (15 ft. lbs.) and finally completing the process by torquing the bolts an additional 60 degrees. Position the crankshaft front oil seal before installing the drain plug and restoring connection between the sensor and crank pulser. Position the A/C muffler before securing the nut and afterward position the power steering pump for bolt installation. Begin by installing the hose support nuts and then proceed with crankshaft pulley installation alongside water pump pulley and their related bolts. The vehicle requires clean engine oil before reinstalling the cooling fan together with left and right valve covers.
    Posted by FordPartsDeal Specialist
    Q:
    How to service and repair the timing cover on Lincoln Navigator? Posted by Customer
    A:
    A proper timing cover repair starts with the removal of valve covers along with the cooling fan and water pump pulley by unfastening their bolts. Start by taking off the crankshaft pulley followed by removing the nuts and hose support that may be installed on the system. Begin the procedure by moving the Power Steering (P/S) pump to the side after unbolt it then remove Air Conditioner (A/C) muffler using its retaining nut. Begin service and repair of the timing cover by disconnecting the Crankshaft Position (CKP) sensor and draining the engine oil. You should start by removing the bolts securing both the crankshaft front oil seal along with the crankshaft before lowering the vehicle. The Camshaft Position (CMP) sensor disconnects first before eliminating its bolt followed by belt idler pulley removal and bolts along with studs and engine front cover and gaskets. Examine both the sealing surfaces on the front cover and oil pan and clean their areas. Use Silicone Gasket and Sealant F7AZ-19554-EA or an equivalent product to apply sealer on the front cover along with its gasket but ensure both components have four-minute retention before removing the sealant or cleaning the surface with Metal Surface Cleaner F4AZ-19A536-RA or an equivalent cleaner. The installation of engine front cover bolts and studs should proceed in sequential stages: begin by tightening bolts one through five to 25 Nm (18 ft. lbs.) followed by bolts six and seven to 50 Nm (37 ft. lbs.) and conclude by tightening bolts eleven through fifteen to 25 Nm (18 ft. lbs.). After connecting the CMP sensor and raising the vehicle install the belt idler followed by the bolt. The bolt installation process requires three rounds: beginning with 2 Nm (18 ft. lbs.) then progressing to 20 Nm (15 ft. lbs.) before obtaining a 60-degree additional tightening. Fitting the crankshaft front oil seal while also installing the drain plug comes after reconnecting the CKP sensor and the A/C muffler needs to be repositioned with its nut tightened followed by positioning the power steering pump and bolt installation. First install the hose support equipment followed by hardware nuts before you can proceed with attaching the crankshaft pulley alongside the water pump pulley and cooling fan. Complete the process by reinstalling the left and right valve covers then add clean engine oil of Super Premium SAE 5W-30 Motor Oil XO-5W30-QSP or equivalent.
    Posted by FordPartsDeal Specialist
    Q:
    How to service and repair the engine front timing cover on Lincoln Navigator? Posted by Customer
    A:
    Service or repair operations on the engine front cover start by detaching left and right valve covers and cooling fan and water pump pulley with bolt removal. Take off the crankshaft pulley next and proceed with the removal of the nuts along with any present hose support. Position the power steering pump away after disconnecting the bolts while making space for the air conditioner (A/C) muffler removal by unscrewing its retaining nut. Shop technicians should start by detaching the CKP sensor then drain the entire engine oil. First remove the crankshaft front oil seal bolts then lower the vehicle and extract the bolts. Follow the procedure to disconnect the CMP sensor and remove both bolt and belt idler pulley before uninstalling engine front cover bolts and studs together with gaskets. Treating the front cover along with the oil pan sealing surfaces requires both cleaning and inspection steps. The installation requires applying silicone gasket and sealant according to specification followed by placing the engine front cover and three-step bolt and stud tightening procedure starting at 25 Nm (18 ft. lbs.) for bolts one through five proceeding to 50 Nm (37 ft. lbs.) for bolts six and seven and finishing with 25 Nm (18 ft. lbs.) for bolts 11 through 15. Begin by connecting the CMP sensor followed by installation of the belt idler and its bolt. Raise the vehicle next. First, tighten all bolts to 2 Nm (18 inch lbs.) followed by 20 Nm (15 ft. lbs.) and a final step of an additional 60-degree tightening. After installing the drain plug the technician must place the crankshaft front oil seal followed by reconnecting the CKP sensor. The muffler returns to its proper position followed by nut tightness while the power steering pump takes its installation spot through bolt installation. First position any hose support then install its nuts before placing the crankshaft pulley and water pump pulley and cooling fan and left and right valve covers. Completing the procedure requires you to add clean engine oil into the engine crankcase.
    Posted by FordPartsDeal Specialist
    If you have any questions about this product, please don't hesitate to ask us. We will be happy to help you!

OEM Ford 2L7Z-6019-BA, Excellent Performance and Perfect Fitment

To ensure reliability, purchase Ford part # 2L7Z-6019-BA Timing Cover, Front. It is sometimes referred to as Ford Timing Cover. For those Ford owners who aspire to maintain their vehicles in optimal shape, opting for OEM parts is a wise choice. Precisely engineered, these components adhere to stringent factory guidelines and are produced in state-of-the-art facilities using cutting-edge technologies. Moreover, they are subjected to thorough testing to certify their resilience and safety, thereby making them a dependable option for Ford owners.

FordPartsDeal.com is a leading supplier of genuine Ford parts such as Ford 2L7Z6019BA Timing Cover, Front. A vast selection of genuine Ford parts is available on our website, all offered at discounted prices. Every OEM Ford part is covered by the manufacturer's warranty, which also applies to our hassle-free return policy. Enjoy fast delivery service, ensuring you get your parts when you need them. Your shopping experience here is guaranteed to be pleasurable. For detailed Lincoln parts information, click here.
Choose FordPartsDeal for discounted prices, exceptional service and fast delivery