My Garage
Cart
Make sure this part fits

Ford 8G1Z-4R602-B
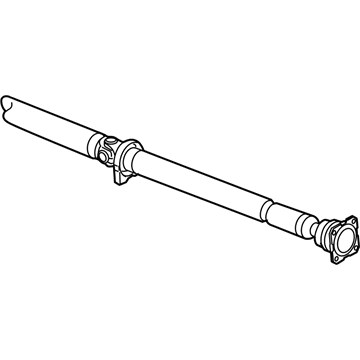
Drive Shaft, Rear

2008-2015 Ford 8G1Z4R602B

Customer Questions & Expert Answers (5)
Ford 8G1Z-4R602-B Drive Shaft, Rear
  • Part Description
    Shaft Assembly - Drive; Drive Shaft, Rear; Driveshaft
  • Base No.
    4R602
  • Position
    Rear
  • Replaces
    8G1Z-4R602-A
  • Manufacturer
    Ford
Make sure this part fits
$731.25 MSRP: $1000.00
You Save: $268.75 (27%)
Ships in 1-3 Business Days
1
ADD TO CART
  • Related Parts
  • Product Specifications
  • Vehicle Fitment
  • Customer Questions & Expert Answers
  • Product Specifications

    BrandGenuine Ford
    Base No.4R602
    Manufacturer Part Number8G1Z-4R602-B
    Part DescriptionShaft Assembly - Drive; Drive Shaft, Rear; Driveshaft
    Other NamesDrive Shaft Assembly
    Item Dimensions6.1 x 6.1 x 58.4 inches
    Item Weight25.30 Pounds
    PositionRear
    ConditionNew
    Fitment TypeDirect Replacement
    Replaces8G1Z-4R602-A
    ManufacturerFord
    SKU8G1Z-4R602-B
    WarrantyThis genuine Ford part is guaranteed by Ford's factory warranty.
    Shipping & ReturnShipping Policy Return Policy
    Warning: California's Proposition 65
  • Vehicle Fitment

    Year Make Model Trim Engine
    2011-2015 Ford ExplorerBase, Limited, Sport, XLT4 Cyl 2.0 L GAS, 6 Cyl 3.5 L GAS
    2013-2015 Ford Police Interceptor SedanBase6 Cyl 3.5 L FLEX, 6 Cyl 3.5 L GAS, 6 Cyl 3.7 L FLEX, 6 Cyl 3.7 L GAS
    2013-2015 Ford Police Interceptor UtilityBase6 Cyl 3.5 L GAS, 6 Cyl 3.7 L FLEX, 6 Cyl 3.7 L GAS
    2014-2015 Ford Special Service Police SedanBase4 Cyl 2.0 L GAS
    2008-2015 Ford TaurusLimited, SE, SEL, SHO4 Cyl 2.0 L GAS, 6 Cyl 3.5 L FLEX, 6 Cyl 3.5 L GAS
    2008-2009 Ford Taurus XEddie Bauer, Limited, SEL6 Cyl 3.5 L GAS
    2009-2015 Lincoln MKSBase, EcoBoost6 Cyl 3.5 L GAS, 6 Cyl 3.7 L GAS
    2008-2009 Mercury SableBase, Premier6 Cyl 3.5 L GAS
  • Customer Questions & Expert Answers

    Q:
    Will this 8G1Z-4R602-B work in my car? Posted by FordPartsDeal Specialist
    A:
    Select Your Vehicle model to verify if part number 8G1Z-4R602-B fits your car.
    Posted by FordPartsDeal Specialist
    Q:
    How to Remove and Replace the Drive Shaft on Ford Taurus? Posted by Customer
    A:
    The first step of drive shaft replacement involves indexing the two flange ends. First put the vehicle in NEUTRAL position while it rests on a hoist then remove the muffler and tailpipe followed by the 4 exhaust support brace bolts and the exhaust brace which need to be tightened to 30 Nm (22 lb-ft) torque when reinstalling. You should use new bolt-washer assemblies during installation of the rear constant velocity (CV) joint flange while discarding the original 3 pinion flange bolt and washer assemblies that require 25 Nm (18 lb-ft) torque during installation. You must detach the driveshaft CV flange from the Rear Drive Unit (RDU) flange by using a flat-blade screwdriver. Keep the new bolts in storage as the CV joint bolts cannot be reused. After removing and discarding the 4 driveshaft-to-Power Transfer Unit (PTU) flange bolts install new ones with 70 Nm (52 lb-ft) torque. A suitable prybar enables the separation of driveshaft flange from PTU flange before technicians remove the 2 outer center bearing bracket bolts and driveshaft while assisting each other to tighten the bolts to 30 Nm (22 lb-ft) torque upon reinstallation. To proceed you should take out 2 inner center bearing bolts along with the bracket as you will need to tighten them to 20 Nm (177 lb-in) upon reinstallation. Vibration in the driveshaft after installation should be addressed by indexing it followed by the backward execution of the removal steps before reinstalling.
    Posted by FordPartsDeal Specialist
    Q:
    How to Remove and Replace the Drive Shaft on Ford Taurus X? Posted by Customer
    A:
    The first step of drive shaft replacement involves indexing the two flange ends. First put the vehicle in NEUTRAL position while it rests on a hoist then remove the muffler and tailpipe followed by the 4 exhaust support brace bolts and the exhaust brace which need to be tightened to 30 Nm (22 lb-ft) torque when reinstalling. You should use new bolt-washer assemblies during installation of the rear constant velocity (CV) joint flange while discarding the original 3 pinion flange bolt and washer assemblies that require 25 Nm (18 lb-ft) torque during installation. You must detach the driveshaft CV flange from the Rear Drive Unit (RDU) flange by using a flat-blade screwdriver. Keep the new bolts in storage as the CV joint bolts cannot be reused. After removing and discarding the 4 driveshaft-to-Power Transfer Unit (PTU) flange bolts install new ones with 70 Nm (52 lb-ft) torque. A suitable prybar enables the separation of driveshaft flange from PTU flange before technicians remove the 2 outer center bearing bracket bolts and driveshaft while assisting each other to tighten the bolts to 30 Nm (22 lb-ft) torque upon reinstallation. To proceed you should take out 2 inner center bearing bolts along with the bracket as you will need to tighten them to 20 Nm (177 lb-in) upon reinstallation. Vibration in the driveshaft after installation should be addressed by indexing it followed by the backward execution of the removal steps before reinstalling.
    Posted by FordPartsDeal Specialist
    Q:
    How to Remove and Replace the Drive Shaft on Lincoln MKS? Posted by Customer
    A:
    The first step of drive shaft replacement involves indexing the two flange ends. First put the vehicle in NEUTRAL position while it rests on a hoist then remove the muffler and tailpipe followed by the 4 exhaust support brace bolts and the exhaust brace which need to be tightened to 30 Nm (22 lb-ft) torque when reinstalling. You should use new bolt-washer assemblies during installation of the rear constant velocity (CV) joint flange while discarding the original 3 pinion flange bolt and washer assemblies that require 25 Nm (18 lb-ft) torque during installation. You must detach the driveshaft CV flange from the Rear Drive Unit (RDU) flange by using a flat-blade screwdriver. Keep the new bolts in storage as the CV joint bolts cannot be reused. After removing and discarding the 4 driveshaft-to-Power Transfer Unit (PTU) flange bolts install new ones with 70 Nm (52 lb-ft) torque. A suitable prybar enables the separation of driveshaft flange from PTU flange before technicians remove the 2 outer center bearing bracket bolts and driveshaft while assisting each other to tighten the bolts to 30 Nm (22 lb-ft) torque upon reinstallation. To proceed you should take out 2 inner center bearing bolts along with the bracket as you will need to tighten them to 20 Nm (177 lb-in) upon reinstallation. Vibration in the driveshaft after installation should be addressed by indexing it followed by the backward execution of the removal steps before reinstalling.
    Posted by FordPartsDeal Specialist
    Q:
    How to Service and Repair the Drive Shaft on Mercury Sable? Posted by Customer
    A:
    At the start of driveshaft maintenance you should write reference marks on both driveshaft flanges. You should place the vehicle in NEUTRAL position before hoisting it for muffler and tailpipe removal. The next procedure requires removal of the 4 exhaust support brace bolts in addition to the exhaust brace before tightening the new setup to 30 Nm (22 lb-ft). Fitting fresh bolt and washer assemblies at the rear constant velocity (CV) joint flange prevents vehicle damage because you should remove and eliminate the 3 existing CV joint flange bolt and washer assemblies before installing new ones with 70 Nm (52 lb-ft) torque. It is necessary to replace all constant velocity (CV) joint bolts as you remove the 4 driveshaft-to-transfer case bolts and secure new ones with 70 Nm (52 lb-ft) torque specification. Two helpers are needed to remove 2 bolts from the center bearing bracket along with driveshaft removal before securing new bolts at 30 Nm (22 lb-ft). You can tighten the new installation by 20 Nm (15 lb-ft) after removing the 2 center bearing bolts and the bracket if necessary. Once driveshaft vibrations appear after installation users must index the driveshaft before reattempting the drive removal procedure for final installation.
    Posted by FordPartsDeal Specialist
    If you have any questions about this product, please don't hesitate to ask us. We will be happy to help you!

OEM Ford 8G1Z-4R602-B, Excellent Performance and Perfect Fitment

To ensure reliability, purchase Ford part # 8G1Z-4R602-B Drive Shaft, Rear. It is sometimes referred to as Ford Drive Shaft. For those Ford owners who aspire to maintain their vehicles in optimal shape, opting for OEM parts is a wise choice. Precisely engineered, these components adhere to stringent factory guidelines and are produced in state-of-the-art facilities using cutting-edge technologies. Moreover, they are subjected to thorough testing to certify their resilience and safety, thereby making them a dependable option for Ford owners.

FordPartsDeal.com is a leading supplier of genuine Ford parts such as Ford 8G1Z4R602B Drive Shaft, Rear. A vast selection of genuine Ford parts is available on our website, all offered at discounted prices. Every OEM Ford part is covered by the manufacturer's warranty, which also applies to our hassle-free return policy. Enjoy fast delivery service, ensuring you get your parts when you need them. Your shopping experience here is guaranteed to be pleasurable. For detailed Ford parts information, click here.
Choose FordPartsDeal for discounted prices, exceptional service and fast delivery