FordParts
My Garage
My Account
Cart
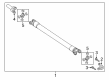
OEM Ford Drive Shaft
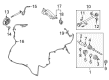
Axle Shaft- Select Vehicle by Model
- Select Vehicle by VIN
Select Vehicle by Model
orMake
Model
Year
Select Vehicle by VIN
For the most accurate results, select vehicle by your VIN (Vehicle Identification Number).
987 Drive Shafts found


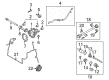
Ford Axle Assembly, Front Driver Side Part Number: 7T4Z-3A427-C
$125.44 MSRP: $206.40You Save: $80.96 (40%)Product Specifications- Other Name: Shaft - Front Axle; CV Axle Assembly, Front Left; CV Axle Assembly; GSP CV Axle; Axle Shaft
- Position: Driver Side
- Replaces: 7T4Z-3A427-A, 7T4Z-3A427-B, TX-513


Ford Axle Assembly, Front Passenger Side Part Number: CT4Z-3A428-C
$216.81 MSRP: $360.00You Save: $143.19 (40%)Ships in 1-2 Business DaysProduct Specifications- Other Name: Shaft - Front Axle; CV Axle Assembly, Front Right; CV Axle Assembly; GSP CV Axle; Axle Shaft
- Position: Passenger Side
- Replaces: CT4Z-3A428-A, TX-575


Ford Axle Shaft, Front Driver Side Part Number: EC3Z-3220-D
$414.50 MSRP: $608.67You Save: $194.17 (32%)Ships in 1-2 Business DaysProduct Specifications- Other Name: Shaft - Front Axle; Drive Axle Shaft, Front Left; Axle Assembly
- Position: Driver Side
- Replaces: AC3Z-3220-C, BC3Z-3220-B, EC3Z-3220-B


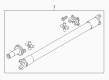
Ford Drive Shaft Part Number: 5C2Z-4602-E
$675.99 MSRP: $1001.54You Save: $325.55 (33%)Product Specifications- Other Name: Shaft Assembly - Drive; Driveshaft; Drive Shaft Assembly
- Replaces: 5C2Z-4602-BC, 5C2Z-4602-BA


Ford Drive Shaft, Rear Part Number: HC3Z-4602-BD
$344.54 MSRP: $495.38You Save: $150.84 (31%)Product Specifications- Other Name: Shaft Assembly - Drive; Drive Shaft, Rear; Driveshaft
- Position: Rear
- Replaces: HC3Z-4602-Q


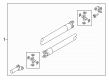
Ford Drive Shaft Part Number: DL3Z-4602-K
$532.56 MSRP: $770.77You Save: $238.21 (31%)Product Specifications- Other Name: Shaft Assembly - Drive; Driveshaft
- Replaces: BL3Z-4602-C, DL3Z-4602-E


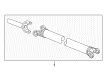
Ford Drive Shaft, Rear Part Number: 5C2Z-4602-G
$444.92 MSRP: $603.08You Save: $158.16 (27%)Product Specifications- Other Name: Shaft Assembly - Drive; Drive Shaft, Rear; Driveshaft
- Position: Rear
- Replaces: 3C2Z-4602-SA, 5C2Z-4602-GB


Ford Drive Shaft Part Number: DL3Z-4602-L
$507.35 MSRP: $687.69You Save: $180.34 (27%)Ships in 1-3 Business DaysProduct Specifications- Other Name: Shaft Assembly - Drive; Driveshaft
- Replaces: DL3Z-4602-A, DL3Z-4602-F


Ford Drive Shaft, Front Part Number: BL3Z-4A376-B
$441.52 MSRP: $598.46You Save: $156.94 (27%)Product Specifications- Other Name: Shaft Assembly - Drive; Drive Shaft, Front; Driveshaft
- Position: Front


Ford Drive Shaft, Front Part Number: FL3Z-4A376-A
$492.59 MSRP: $667.69You Save: $175.10 (27%)Ships in 1 Business DayProduct Specifications- Other Name: Shaft Assembly - Drive; Drive Shaft, Front; Driveshaft
- Position: Front


Ford Drive Shaft, Front Part Number: AL3Z-4A376-D
$613.13 MSRP: $838.46You Save: $225.33 (27%)Product Specifications- Other Name: Shaft Assembly - Drive; Drive Shaft, Front; Driveshaft
- Position: Front
- Replaces: AL3Z-4A376-C, 7L1Z-4A376-B


Ford Drive Shaft Part Number: BL3Z-4602-N
$622.13 MSRP: $850.77You Save: $228.64 (27%)Product Specifications- Other Name: Shaft Assembly - Drive; Driveshaft
- Replaces: BL3Z-4602-J, BL3Z-4602-G


Ford Drive Shaft Part Number: FL3Z-4602-S
$661.50 MSRP: $904.62You Save: $243.12 (27%)Ships in 1-3 Business DaysProduct Specifications- Other Name: Shaft Assembly - Drive; Driveshaft
- Replaces: FL3Z-4602-K


Ford Drive Shaft, Rear Part Number: BC3Z-4602-X
$607.50 MSRP: $830.77You Save: $223.27 (27%)Product Specifications- Other Name: Shaft Assembly - Drive; Drive Shaft, Rear; Driveshaft
- Position: Rear
- Replaces: BC3Z-4602-Q, BC3Z-4602-K

Ford Drive Shaft, Rear Part Number: FL3Z-4R602-Z
$648.00 MSRP: $886.15You Save: $238.15 (27%)Product Specifications- Other Name: Shaft Assembly - Drive; Drive Shaft, Rear; Driveshaft
- Position: Rear
- Replaces: FL3Z-4R602-H


Ford Drive Shaft, Rear Part Number: JL3Z-4602-AC
$661.50 MSRP: $904.62You Save: $243.12 (27%)Ships in 1-3 Business DaysProduct Specifications- Other Name: Shaft Assembly - Drive; Drive Shaft, Rear; Driveshaft
- Position: Rear
- Replaces: JL3Z-4602-K

Ford Drive Shaft Part Number: FL3Z-4602-A
$587.81 MSRP: $803.85You Save: $216.04 (27%)Ships in 1-3 Business DaysProduct Specifications- Other Name: Shaft Assembly - Drive; Driveshaft


Ford Drive Shaft, Rear Part Number: DL1Z-4602-C
$622.46 MSRP: $851.23You Save: $228.77 (27%)Ships in 1-3 Business DaysProduct Specifications- Other Name: Shaft Assembly - Drive; Drive Shaft, Rear; Driveshaft
- Position: Rear
- Replaces: 7L1Z-4602-A, DL1Z-4602-A

Ford Drive Shaft, Rear Part Number: FL3Z-4602-T
$756.00 MSRP: $1033.85You Save: $277.85 (27%)Ships in 1-3 Business DaysProduct Specifications- Other Name: Shaft Assembly - Drive; Drive Shaft, Rear; Driveshaft
- Position: Rear
- Replaces: FL3Z-4602-H

Ford Drive Shaft, Front Part Number: JL3Z-4A376-E
$640.13 MSRP: $875.38You Save: $235.25 (27%)Ships in 1-2 Business DaysProduct Specifications- Other Name: Shaft Assembly - Drive; Drive Shaft, Front; Driveshaft
- Position: Front
| Page 1 of 50 |Next >
1-20 of 987 Results
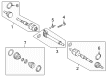
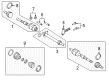
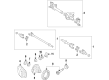
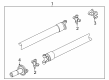
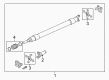
Ford Drive Shaft
If you own Ford and want to keep it in top shape, choosing OEM Drive Shaft is a smart move. They are precisely engineered and follow strict factory standards. They are made in advanced facilities that use cutting edge technology. Each part goes through thorough testing to confirm strength and safety, so you can trust it. FordPartsDeal.com gives you genuine Ford Drive Shaft at some of the affordable online prices without cutting quality. Every OEM Ford part includes the manufacturer's warranty, easy returns, and super-fast delivery. So why wait? Shop now and get your vehicle back to peak condition.
Ford Drive Shaft provides the engine torque to the wheels with a minimum loss and stable balance. Ford began in 1903 and upset the manufacturing system by dropping cars down a moving production belt ten years later, making personal transportation more of a necessity than a luxury to millions who suddenly realized that the highway had been cleared. Ford matches EcoBoost power with reasonable gas mileage, as speed does not necessarily burn a tank. Ford loads SYNC in a way that drivers swore a song request or route change without putting even a finger on the wheel and remained attentive to what was ahead without losing track. Ford supports such reactions with Co-pilot 360 that stomps the brakes or taps the lane in case danger is lurking, and its electric F-150 Lightning demonstrates that loud trucks can be run silently and cleanly without spitting smoke. In any rear or four-wheel configuration, Drive Shaft must sustain spinning force under savage torsion and shear but remain light enough not to drag when crossing bumps and hills. Drive Shaft applies splined or universal joints to flex with the suspension motion allowing the axles to remain powered as the frame turns over ruts. Drive Shaft may be available as one-piece steel, two-piece because of long wheelbases, or slip-in tube designs, which would collapse in a crash and save lives. Drive Shaft believes in transfer cases to separate muscle between front and rear axles to maintain grip in various conditions, pavement glittering or dirt kicking up.
Ford Drive Shaft Parts and Q&A
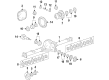
- Q: How to remove and install the Ford Expedition's drive shaft?A:When the vehicle has air suspension, switch it to the off mode. Set the car on jackstands, safely supporting it as you lift it. Unshift into Neutral and take off the handbrake while holding back the wheels with blocks. Before removing the driveshaft, you must carefully mark how it connects to the differential pinion flange. This marking enables us to realign the driveshaft's balance with the existing pinion flange when we reinstall it later. We use a scribe, hammer and punch, or paint to make the marks. Take out the bolts holding the rear universal joint. To keep the driveshaft from spinning, stick a screwdriver through its hole before loosening all 4 bolts connecting the U-joint to the pinion flange. When the bolts are difficult to reach, spin the drive shaft (or wheels) to find the best angle. Before you take out the driveshaft on models with two-piece driveshafts, take away the screws holding the center bearing support brackets. Pull down the back of the driveshaft, scoop out the slip yoke from the front end, and take off the entire driveshaft unit. Before taking out the driveshaft, slip a plastic bag over the transmission or transfer case extension housing, secure it with a rubber band, and keep it this way to stop fluid from dripping and protect from dirt. When you take out the driveshaft, stop and check both the extension housing seal and the differential pinion seal. If they need replacing, do that now. When you have a split driveshaft, take time to look for any issues affecting your center bearing. First, put the center bearing and bracket back in place on your two-piece driveshaft before fixing the two ends together again. When you took off the old extension housing seal, it's time to install a brand new one. Clean both the transmission and transfer case extension housing parts with the plastic bag removed. Place the drive shaft's front slip yoke carefully onto the end of the transmission or transfer case output shaft, making sure you avoid damaging the shaft seal's rim. Just put the rear end of the driveshaft and the center bearing assembly into place, fasten the support bracket bolts, and make them tight. Position the rear of the driveshaft overtop the vehicle alignment marks. When the marks don't match, spin the rear wheels until everything lines up with the pinion flange. Lower the car after you've checked and kneaded all bolts. Take out your jackstands. Bring back the air suspension system working if your vehicle has it.
- Q: How to remove and install the rear and front drive shafts on 2000-2011 Ford Ranger?A:To replace the rear driveshaft follow these steps, Set the parking brake, connect the negative terminal of battery and click to safely lift the car on jackstands by putting the transmission in Neutral mode. Make sure there is factory yellow paint on the companion flange and the driveshaft flange, otherwise make your alignment marks using a scribe or white paint. For 4WD models, going back for marking on the front end of the driveshaft should also be done. Lift up the rear of the vehicle and then unbolt the rear driveshaft to detach the front end from either the transfer case in the case of 4WD models, or sliding it out of the transmission assembly in the case of 2WD models. The process of its removal is quite similar, the alignment marks should be matched; for cars of 2011 and younger models, the driveshaft-to-axle bolts should be tightened with an interference pattern. In the case of two-piece driveshafts, a similar first series of actions, such as removing the negative battery terminal and lifting the car. The driveshaft center bearing bracket and the rear axle circular flange will be unbolted, make sure to find the support for the driveshaft before doing so. For 2WD models, remove the connection from the rear axle companion flange and plug the extension housing. For 4 WD models, disconnect from the transfer case circular flange Tell a friend about us, add a link to this page, or visit the webmaster's page. Areas in the slip yoke that needs lubrication are the splines, the housing seal should also be checked during installation, and the center bearing bracket should be aligned during the installation. For front driveshaft on 4WD models, just like on the case of rear shaft, it's necessary to mark alignment points, to un bolt the flange fixing the driveshaft to the transfer case, and the bolts fixing the driveshaft to the differential yoke. Secure universal joint bearings, so they won't just pop out, and then, UNSCREW in reverse sequence and make sure it is aligned and tightened to the correct torque.


Related Ford Parts
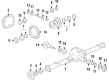
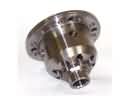 Ford Differential
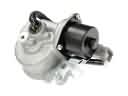 Ford 4WD Actuator
 Ford Universal Joint
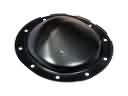 Ford Differential Cover
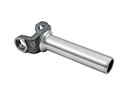 Ford Slip Yoke
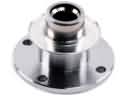 Ford CV Joint Companion Flange
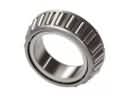 Ford Differential Bearing
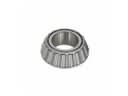 Ford Differential Pinion Bearing
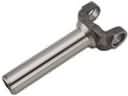 Ford Driveshaft Yokes
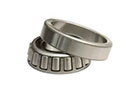 Ford Pinion Bearing
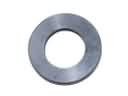 Ford Pinion Washer
 Ford Transfer Case Shim
Browse Ford Drive Shaft by Models
Ranger Bronco Mustang Explorer Focus Fusion F-150 Maverick Escape Edge Excursion Expedition Fiesta Taurus Thunderbird Flex Transit Connect Bronco Sport Explorer Sport Trac Crown Victoria EcoSport Escort F-250 Aerostar E-150 Econoline Explorer Sport Five Hundred Freestyle Police Interceptor Utility Taurus X Windstar F-350 Super Duty Police Interceptor Sedan E-150 E-150 Club Wagon E-150 Econoline Club Wagon E-250 E-250 Econoline E-350 Club Wagon E-350 Econoline E-350 Econoline Club Wagon E-350 Super Duty F-150 Heritage F-250 Super Duty Special Service Police Sedan Transit-150 Transit-250 Transit-350 Transit-350 HD