FordParts
My Garage
My Account
Cart
Ignition System
2009 Ford Expedition Ignition Coil, Camshaft Position Sensor, Spark Plug, Engine Control Module
Currently shopping for
2009 Ford Expedition
Change VehicleVehicle Options
8 Cyl 5.4 L FLEXVehicle Options
8 Cyl 5.4 L FLEXCategories Close X
Currently selected
Electrical
- ABS Components
- Air Bag Components
- Alarm System
- Antenna & Radio
- Anti-Theft Components
- Auto Leveling Components
- Controls - Instruments & Gauges
- Cruise Control System
- Electrical Components
- Entertainment System Components
- Flashers
- Front Seat Belts
- Fuse & Relay
- Heated Seats
- Horn
- Ignition System
- Instruments & Gauges
- Keyless Entry Components
- Navigation System
- Parking Aid
- Power Seats
- Second Row Seat Belts
- Senders
- Supplemental Restraint System
- Switches
- Third Row Seat Belts
- Tire Pressure Monitoring
- Wipers
Other Categories
A/C & Heating
Air & Fuel Delivery
Belts & Cooling
Body & Hardware
Brakes
Charging & Starting
Driveline & Axles
Emission Control & Exhaust
Engine
Headlights & Lighting
Interior & Exterior Trim
Maintenance & Lubrication
Steering
Suspension
Transmission
Categories Close X
How to use OE catalog
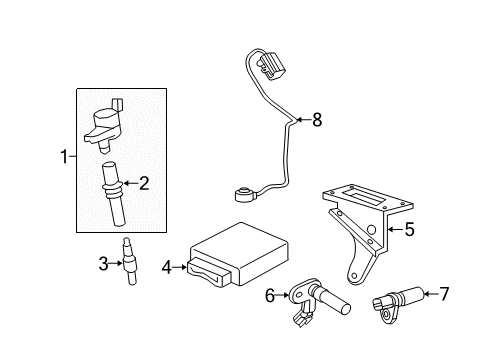
Diagram (1 of 1): Electrical - Ignition System
Sort by:
Ref No.
Ref No.
Part No. & Part Description
Price & Qty.
Part No. &
Part Description
Part Description
- 1


 MSRP: $84.75 Your Price: $51.501
- 2

 MSRP: $18.55 Your Price: $11.681
- 3
 MSRP: $15.81 Your Price: $9.951
- 4

- 4
- 4
- 4
 MSRP: $841.67 Your Price: $568.13
- 5
 MSRP: $26.36 Your Price: $17.041
- 6


 MSRP: $66.55 Your Price: $41.911
- 7


 MSRP: $49.64 Your Price: $31.261
- 8


 MSRP: $88.27 Your Price: $52.681
 9L1Z-14335-EA
Wire Assy- Part Notes: Service Wire Harness May Contain Extra Connectors Than O.E. Harness
- Fit Note: 131"/3327.4MM Wheelbase, Less Camera
- Production Date: 09/2008-08/2014
- Callout Name: 14335
MSRP: $181.67 Your Price: $124.81
 9L1Z-18B518-A
Wire Assy- Part Notes: Jumper Wire To Heater Blower Motor
- Fit Note: With Auxiliary Air Conditioning
- Production Date: 09/2008-08/2010
- Callout Name: 18B518
- Replaced By: BL1Z-18B518-A
MSRP: $132.33 Your Price: $85.99
OEM 2009 Ford Expedition Parts for Ignition System
Genuine OEM 2009 Ford Expedition parts are made using the original design, the high standards, in the Ford official factories, and all of these ensure that they always fit perfectly and easily. FordPartsDeal.com is a trusted source for finding these authentic OEM Ignition System parts at very competitive prices. Our professional team is here to help you choose the right 2009 Ford Expedition Ignition Coil, Camshaft Position Sensor, Spark Plug, Engine Control Module, and our fast delivery options ensure that your parts are always delivered quickly.
Ignition Coil Installation and Repair Tips for 2009 Ford Expedition
- Q: How to service the ignition coil-on-plug on 2009 Ford Expedition?A: Removal of ignition coil-on-plug To remove ignition coil-on-plug, disconnect electrical connector, loosen securing bolt and twist as you lift the coil-on-plug. Adjust the new coil to 6 Nm (53 lb-in), the spring should be correctly placed, and look at the boot and see whether it is damaged. Installation By undoing the procedure and placing dielectric compound.