FordParts
My Garage
My Account
Cart
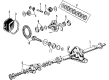
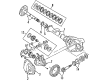
OEM 2007 Ford E-250 Axle Shaft
Car Axle Shaft- Select Vehicle by Model
- Select Vehicle by VIN
Select Vehicle by Model
orMake
Model
Year
Select Vehicle by VIN
For the most accurate results, select vehicle by your VIN (Vehicle Identification Number).
4 Axle Shafts found


2007 Ford E-250 Axle Shaft, Rear Driver Side Part Number: YC2Z-4234-AB
$206.00 MSRP: $302.50You Save: $96.50 (32%)Product Specifications- Other Name: Shaft Assembly - Rear Axle; CV Axle Shaft, Rear Left; Axle Shafts
- Manufacturer Note: LH - use with axle #YC25-YA, ZA, 1C24-RA, SA, 2C24-AA, BA, 3C24-AA, BA, 4C24-AA, AB, 6C24-BA - 2000/
- Position: Rear Driver Side
- Base No.: 4234
- Item Weight: 21.20 Pounds
- Item Dimensions: 39.7 x 8.3 x 8.4 inches
- Condition: New
- Fitment Type: Direct Replacement
- SKU: YC2Z-4234-AB
- Warranty: This genuine part is guaranteed by Ford's factory warranty.
2007 Ford E-250 Axle Shaft, Rear Passenger Side Part Number: YC2Z-4234-AA
$204.04 MSRP: $297.00You Save: $92.96 (32%)Product Specifications- Other Name: Shaft Assembly - Rear Axle; CV Axle Shaft, Rear Right; Axle Shafts
- Manufacturer Note: RH - use with axle #YC25-YA, ZA #1C24-RA, SA, 2C24-AA, BA, 3C24-AA, BA, 4C24-AA, AB, 6C24-BA - 2000/
- Position: Rear Passenger Side
- Base No.: 4234
- Item Weight: 20.10 Pounds
- Item Dimensions: 42.8 x 4.8 x 4.8 inches
- Condition: New
- Fitment Type: Direct Replacement
- SKU: YC2Z-4234-AA
- Warranty: This genuine part is guaranteed by Ford's factory warranty.

2007 Ford E-250 Axle Shaft, Rear Driver Side Part Number: F5UZ-4234-B
$334.60 MSRP: $491.33You Save: $156.73 (32%)Product Specifications- Other Name: Shaft - Rear Axle Outer Stub; Drive Axle Shaft, Rear Left; Axle Shafts
- Position: Rear Driver Side
- Base No.: 4234
- Item Weight: 35.00 Pounds
- Item Dimensions: 38.0 x 10.4 x 10.7 inches
- Condition: New
- Fitment Type: Direct Replacement
- SKU: F5UZ-4234-B
- Warranty: This genuine part is guaranteed by Ford's factory warranty.
2007 Ford E-250 Axle Shaft, Rear Passenger Side Part Number: F5UZ-4234-A
$332.10 MSRP: $487.67You Save: $155.57 (32%)Product Specifications- Other Name: Shaft Assembly - Rear Axle; Drive Axle Shaft, Rear Right; Axle Shafts
- Position: Rear Passenger Side
- Base No.: 4234
- Item Weight: 36.40 Pounds
- Item Dimensions: 41.5 x 8.4 x 8.3 inches
- Condition: New
- Fitment Type: Direct Replacement
- SKU: F5UZ-4234-A
- Warranty: This genuine part is guaranteed by Ford's factory warranty.
2007 Ford E-250 Axle Shaft
If you're seeking quality and affordability, look no further than our extensive inventory of genuine 2007 Ford E-250 Axle Shaft available at FordPartsDeal.com. You can confidently purchase our OEM 2007 Ford E-250 Axle Shaft as they are supported by the manufacturer's warranty and our hassle-free return policy, alongside the benefit of our fast delivery service.
2007 Ford E-250 Axle Shaft Parts Q&A
- Q: How to Service and Repair the Rear Axle Shaft for Dana 60 and 70 Semi-Floating Axles on 2007 Ford E-250?A: The first step for repairing or servicing Dana 60 and 70 semi-floating rear drive axle/differentials requires you to lift the vehicle using a hoist with safety stands for securement. Start by removing the rear wheel assembly combined with the tire before taking off the brake disc. Remove fluid from inside the differential housing when you remove the cover then wipe off all remnants of gasket material from both components. Monitors should use care when working with the differential pinion shaft lock screw that has a 12-point drive head and a maximum reuse limit of four times but must be discarded for replacement following any doubt. You should remove the lock screw and the differential pinion shaft one by hand. You should guide the axle shaft's flanged end toward the chamber's midpoint to take out the U-washer while staying clear of the wheel bearing oil seal's damage and keeping the differential side gears from rotation to stop internal parts from escaping. Insert the differential pinion shaft and the original lock screw initially but keep them tight only to stop gear movement. The installation process requires to push the axle shaft toward the differential tube while its side gear locks with splines and after that add the U-washer before gradually pulling the shaft to achieve a secure fit. Insert the differential pinion shaft lock screw hole into the differential case while placing the thrust washers within proper position. Apply a new lock screw to threads that have been cleared of debris and tighten it to 27 Nm (20 ft. lbs.). Apply a continuous silicone bead onto the differential housing cover mounting surfaces before installation within a 15-minute period. Begin installation by placing two bolts at 8 o'clock and 2 o'clock positions to guide the cover before you alternate the tightening process for Grade 5 and Grade 8 bolts up to 47 Nm (35 ft. lbs.) and 61 Nm (45 ft. lbs.), respectively. The axle fluid requires one hour of sealant cure time before adding both 5.9 pt of specified rear axle lubricant and 6 oz of limited-slip axles' friction modifier. The last step involves reattaching the brake disc together with wheel and tire assembly followed by lowering the vehicle.
Related 2007 Ford E-250 Parts
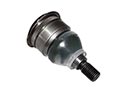 2007 Ford E-250 Ball Joint
 2007 Ford E-250 Bump Stop
 2007 Ford E-250 Coil Springs
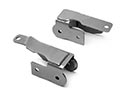 2007 Ford E-250 Control Arm Bracket
 2007 Ford E-250 Leaf Spring
 2007 Ford E-250 Radius Arm
 2007 Ford E-250 Shock Absorber
 2007 Ford E-250 Spare Wheel
 2007 Ford E-250 Spindle
 2007 Ford E-250 Sway Bar Bushing
 2007 Ford E-250 Wheel Seal
 2007 Ford E-250 Wheel Stud