FordParts
My Garage
My Account
Cart
OEM Ford E-250 Econoline A/C Condenser
Air Conditioning Condenser- Select Vehicle by Model
- Select Vehicle by VIN
Select Vehicle by Model
orMake
Model
Year
Select Vehicle by VIN
For the most accurate results, select vehicle by your VIN (Vehicle Identification Number).
3 A/C Condensers found


Ford E-250 Econoline Condenser Part Number: 6C2Z-19712-BA

Ford E-250 Econoline Condenser Part Number: F6UZ-19712-AA

Ford E-250 Econoline Condenser Part Number: E8UZ19712B
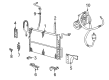
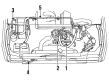
Ford E-250 Econoline A/C Condenser
OEM A/C Condenser boasts unmatched quality. Each part goes through full quality checks. They adhere to Ford's official factory standards. These steps remove flaws and inconsistencies. So you can get A/C Condenser with long life and a perfect fit. Come to our website and find genuine Ford E-250 Econoline parts. We keep a wide inventory of OEM E-250 Econoline parts at the highly affordable prices. It's easy to search, compare, and pick what you need. You'll love the clear info and simple checkout. We offer top-rated customer service, and we reply fast. We also ship promptly to ensure your order arrives on time.
Ford E-250 Econoline A/C Condenser Parts and Q&A
- Q: How to service and repair the A/C condenser core on Ford E-250 Econoline?A:The first step before changing the suction accumulator/drier requires evidence that the system and its components have become contaminated or damaged. Start the A/C condenser core leak testing before removing it when there is a leak suspicion. Initiate Refrigerant Discharging and Recovery Procedure while removing the Air Deflector by detaching its five retaining pins. Denoting the compressor discharge line isolator requires removing its screw before placing it in a different position. Communication of refrigerant flow occurs by disconnecting compression discharge tubes and condenser to evaporator tubing assemblies while applying wrenches to both sides of fitting interfaces to prevent damage. The radiator needs to be moved backward carefully after unscrewing its two upper mounting brackets so you can reach the A/C condenser mounting brackets to remove them. Detach the A/C condenser core by removing it while protecting the cooling fins before removing the two seals using their eight retaining pins. The service process requires using PAG Refrigerant Compressor Oil (R-134a Systems) F7AZ-19589-DA (Motorcraft YN-12-C) or an equivalent that meets Ford specification WSH-M1C231-B for the correct amount serving the new A/C condenser core. Then install the two seals with the eight retaining pins to complete the installation. Fasten the radiator with screws after relocating it to place the two upper radiator brackets. New O-ring seals need to receive PAG Refrigerant Compressor Oil (R-134a Systems) F7AZ-19589-DA (Motorcraft YN-12-C) or equivalent petroleum-free hydraulic fluid for lubrication before being installed to the condenser and evaporator tube and compressor discharge line. Use wrenches on both fitting sides to avoid damage. The last step involves installation of the compressor discharge line isolator screw before putting the five retaining pins back on the air deflector and performing an evacuation and charging process on the A/C system.

Related Ford E-250 Econoline Parts
 Ford E-250 Econoline A/C Accumulator
 Ford E-250 Econoline A/C Compressor
 Ford E-250 Econoline A/C Compressor Clutch
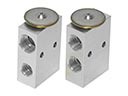 Ford E-250 Econoline A/C Expansion Valve
 Ford E-250 Econoline A/C Hose
 Ford E-250 Econoline A/C Idler Pulley
 Ford E-250 Econoline A/C System Valve Core
 Ford E-250 Econoline Blower Motor
 Ford E-250 Econoline Blower Motor Resistor
 Ford E-250 Econoline Evaporator
 Ford E-250 Econoline Heater Core
 Ford E-250 Econoline HVAC Pressure Switch