
Popular OEM Ford E-250 Econoline Parts
- Body & Hardware Parts View More >
- Electrical Parts View More >
- Interior & Exterior Trim Parts View More >
- Air & Fuel Delivery Parts View More >
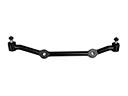
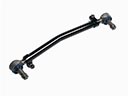
- Steering Parts View More >
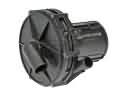
- Emission Control & Exhaust Parts View More >
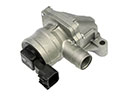
- Charging & Starting Parts View More >
- Engine Parts View More >
- Belts & Cooling Parts View More >
- Suspension Parts View More >
- Brakes Parts View More >
- A/C & Heating Parts View More >


Why Buy Genuine Ford E-250 Econoline Parts From FordPartsDeal.com
FordPartsDeal.com offers a smart and convenient way to buy genuine parts online. We sell new OEM Ford E-250 Econoline parts, including Headlights & Lighting. Authorized dealers directly provide all the Ford E-250 Econoline parts and assemblies to ensure the optimal quality and fit. We also provide all properly fitting Ford E-250 Econoline parts, such as Transmission, Driveline & Axles specific to your model. When you shop here, you get real Ford value at highly competitive prices. All our products come with the same Ford warranty available at other dealerships. Our easy-to-use catalog helps you quickly identify the right part for your car. You'll receive fast shipping from our warehouse network, keeping your Ford E-250 Econoline running smoothly. Our staff consists of Ford professionals who are ready to assist you. We aim to treat each customer as if they were stepping out of a Ford showroom. VIN verification and our live support ensure that the part you order is the right Ford E-250 Econoline part for your vehicle.
During the 1960s Ford began creating the E-250 Econoline that would eventually take over as the successor to the F-series full-size van model. Different purposes could be supported through six-cylinder engine configurations ranging from 144 to 240 cubic-inch in the initial production model. A front-mounted powertrain was the key feature of the second-generation whereas the first-generation had its engine placed in the middle of the vehicle. The engine relocation generated two benefits for drivers including enhanced operations and better servicing capabilities. Both commercial and personal owners could select from two wheelbase options as the third-generation Ford E-250 Econoline models kept manual and automatic three-speed transmission options. A redesign emerged during 1975 to extend the hood which improved cabin space together with passenger comfort. The 1992 Ford E-250 Econoline received major upgrades when it gained a truck-size chassis that enabled production of ambulance and cargo van variations. Through development the E-250 Econoline system gained more efficient fuel treatment and enhanced operational performance. During its entire lifespan the Ford E-250 Econoline gained a reputable reliability reputation through its use of genuine parts which conform to Ford factory standards to maintain peak performance and longevity. Ford E-250 Econoline maintains its structural quality through OEM parts that satisfy commercial needs and domestic requirements effectively.
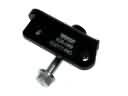
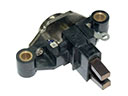
Ford E-250 Econoline models show three issues grouped by electrical charging, fuel evaporative control, and exhaust sealing. In the engine bay, the E-250 Econoline charging circuit can fail due to a weak alternator. Expect dim lamps, battery warnings, and intermittent accessories. Load test output, inspect grounds, then replace the alternator and verify steady voltage at idle. Within the fuel system, the E-250 Econoline may set codes from a stuck purge valve. A leak or blocked line raises emissions and prevents test monitors from completing. Perform a smoke test, repair hoses, confirm purge flow, and clear codes after sealing faults. Along the exhaust side, the E-250 Econoline can leak when exhaust manifold bolts break. Ticking on cold start and sooty joints often reveals the exact flange location. Replace damaged bolts, resurface mating faces, and fit new gaskets to restore sealing. Follow Ford diagnostic routines, torque values, and charging specifications throughout each procedure. Verify repairs with Ford scan data and charging thresholds. Routine inspections keep the E-250 Econoline quiet and reliable during work. Use Ford service records to schedule checks and select compatible parts for the E-250 Econoline.
Ford E-250 Econoline Parts and Q&A
- Q: How to service and repair the water pump on Ford E-250 Econoline?A:Removing the fan, fan clutch, and accessory drive belt; to service the water pump you must drain the cooling system and remove the fan. Un-bolt the lower radiator hose and engine harness. Take out A/C support bracket, water pump bolts and pulley. Before replacing, cover the gasket surfaces with a clean surface by reversing the process.
- Q: How to service the air filter element on Ford E-250 Econoline?A:In order to service the air filter element, you first need to lift and remove the air cleaner inlet tube. Next, unlock the clamp and remove the air cleaner tray, and the Air Cleaner (ACL) element. Installation is a reverse process.
- Q: How to service the intake manifold and spacer assembly on Ford E-250 Econoline?A:In order to service the intake manifold and spacer assembly, the upper intake manifold should be removed and the cooling system emptied. Unscrew different hoses and connectors and take off the spacer assembly bolts. Install and checking of the spacer in two steps and bolts are to be tightened. Installation of the upper intake manifold, reconnect hoses and connectors and fill the cooling system again.


