FordParts
My Garage
My Account
Cart
OEM Ford E-250 Pitman Arm
Steering Pitman Arm- Select Vehicle by Model
- Select Vehicle by VIN
Select Vehicle by Model
orMake
Model
Year
Select Vehicle by VIN
For the most accurate results, select vehicle by your VIN (Vehicle Identification Number).
4 Pitman Arms found

Ford E-250 Pitman Arm, Front Part Number: 8C2Z-3590-A
$71.56 MSRP: $104.17You Save: $32.61 (32%)Ships in 1-2 Business Days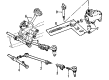
Ford E-250 Pitman Arm Part Number: 8C2Z-3590-B
$40.49 MSRP: $55.09You Save: $14.60 (27%)

Ford E-250 Pitman Arm, Front Part Number: F2UZ-3590-C

Ford E-250 Pitman Arm, Front Part Number: 4C2Z-3590-AA
Ford E-250 Pitman Arm
OEM Pitman Arm boasts unmatched quality. Each part goes through full quality checks. They adhere to Ford's official factory standards. These steps remove flaws and inconsistencies. So you can get Pitman Arm with long life and a perfect fit. Come to our website and find genuine Ford E-250 parts. We keep a wide inventory of OEM E-250 parts at the highly affordable prices. It's easy to search, compare, and pick what you need. You'll love the clear info and simple checkout. We offer top-rated customer service, and we reply fast. We also ship promptly to ensure your order arrives on time.
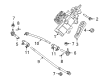
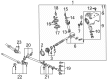
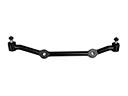
The Ford E-250 Pitman Arm is a component well acclaimed for its stability and efficiency in the steering mechanism of the different models of the E-250. This important element translates rotary movement from the steering wheel into straight movement; hence, it links the steering box sector shaft to the drag link. When it comes to the aspect of precision in vehicle control and usage, such parts like the Ford E-250 Pitman Arm helps to improve the efficiency and reduce the risks which may be experienced, thus warranting the safety of a driver. Like any other vehicle, the Ford E-250 has undergone through some changes of the Pitman Arm with improvements in the recent models by introducing ball joints and bearings that help to enhance the strength of the arm and its sensitivity to movement. Maintenance is important on a Pitman Arm because over time it wears out and can cause play in the steering, which affects the handling of the car. The Ford E-250 comes from the E-series and for more than half a century after its introduction in 1957, many changes have occurred which the Pitman Arm has countered to be consistent with the ever-transforming models of the vehicle. This versatility coupled with the durability of arm that is Pitman Arm makes this arm to stand out in the automotive market. As this part in a Ford E-250 chassis, the Pitman Arm plays a significant role in steering mechanism and the general handling of the car; therefore, being a safety feature, it is a crucial element in the vehicle.
Ford E-250 Pitman Arm Parts and Q&A
- Q: How to service and repair the Pitman arm and associated components on Ford E-250?A:A beginning step for servicing the Pitman arm includes swapping out the steering sector shaft drag link and Tie Rod End if the ball stud shows loosening in the socket or drag link bending or tie rod end taper wear occurs. When performing front suspension steering ball stud dust seal replacement it is crucial to replace the seal when detecting nicks, tears or cuts in the seal. Also skip repairs attempting to restore straightness to damaged drag links and tie rod ends. Steering drag link castellated nuts should be removed first while discarding the associated cotter pins. The first step involves disconnecting the right-hand steering knuckle outer tie rod end while also removing the left-handle inner tie rod end from the steering sector shaft arm drag link. Take off the castellated nut from the steering sector shaft arm drag link before discarding both the nut and cotter pin. A Pitman Arm Puller enables the separation of the drag link while you remove the tie rod adjusting sleeve from the drag link making note of the turns needed for removal. The installation process should follow the opposite order of removal steps while replacing all cotter pins with new ones. Position the two bolts and nuts on the tie rod adjusting sleeve clamp at an angle between 45 degrees and its opposite with the threaded ends on the left tie rod end directed forward and the threaded ends on the right tie rod end aimed backward. Finish the process by tightening the castellated nuts and adjusting the tie rod sleeve bolts and verify proper toe-in along with unobstructed visibility.

Related Ford E-250 Parts
 Ford E-250 Center Link
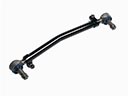 Ford E-250 Drag Link
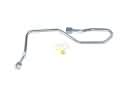 Ford E-250 Power Steering Hose
 Ford E-250 Power Steering Pump
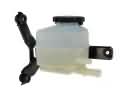 Ford E-250 Power Steering Reservoir
 Ford E-250 Rack And Pinion
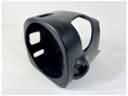 Ford E-250 Steering Column Cover
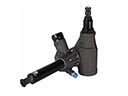 Ford E-250 Steering Gear Box
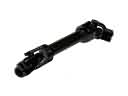 Ford E-250 Steering Shaft
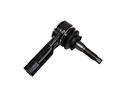 Ford E-250 Tie Rod
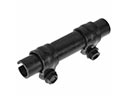 Ford E-250 Tie Rod Adjusting Sleeve
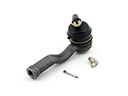 Ford E-250 Tie Rod End