FordParts
My Garage
My Account
Cart
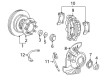
OEM Ford F-250 Super Duty Hydraulic Hose
Brake Hydraulic Line- Select Vehicle by Model
- Select Vehicle by VIN
Select Vehicle by Model
orMake
Model
Year
Select Vehicle by VIN
For the most accurate results, select vehicle by your VIN (Vehicle Identification Number).
70 Hydraulic Hoses found


Ford F-250 Super Duty Flex Hose, Front Driver Side Part Number: F81Z-2078-HA
$32.06 MSRP: $50.91You Save: $18.85 (38%)
Ford F-250 Super Duty Flex Hose, Front Passenger Side Part Number: F81Z-2078-GA
$34.58 MSRP: $54.91You Save: $20.33 (38%)Ships in 1-2 Business Days


Ford F-250 Super Duty Flex Hose, Front Driver Side Part Number: GC3Z-2078-C
$51.21 MSRP: $85.82You Save: $34.61 (41%)


Ford F-250 Super Duty Brake Hose, Front Passenger Side Part Number: GC3Z-2078-F
$54.68 MSRP: $91.64You Save: $36.96 (41%)
Ford F-250 Super Duty Flex Hose, Front Passenger Side Part Number: 6C3Z-2078-BB
$69.84 MSRP: $114.91You Save: $45.07 (40%)

Ford F-250 Super Duty Brake Hose, Passenger Side Part Number: 8C3Z-2267-A
$49.84 MSRP: $82.00You Save: $32.16 (40%)

Ford F-250 Super Duty Brake Hose, Passenger Side Part Number: F81Z-2267-AA
$50.72 MSRP: $83.45You Save: $32.73 (40%)


Ford F-250 Super Duty Flex Hose, Front Driver Side Part Number: 6C3Z-2078-BA
$64.09 MSRP: $105.45You Save: $41.36 (40%)

Ford F-250 Super Duty Flex Hose, Front Driver Side Part Number: HC3Z-2078-A
$82.65 MSRP: $136.00You Save: $53.35 (40%)Ships in 1-2 Business Days

Ford F-250 Super Duty Flex Hose, Front Driver Side Part Number: BC3Z-2078-C
$91.72 MSRP: $150.91You Save: $59.19 (40%)


Ford F-250 Super Duty Flex Hose, Passenger Side Part Number: HC3Z-2282-AA
$145.86 MSRP: $240.00You Save: $94.14 (40%)


Ford F-250 Super Duty Flex Hose, Front Part Number: F81Z-2282-KA
$40.08 MSRP: $63.64You Save: $23.56 (38%)
Ford F-250 Super Duty Flex Hose, Front Passenger Side Part Number: GC3Z-2078-D
$52.16 MSRP: $85.82You Save: $33.66 (40%)


Ford F-250 Super Duty Flex Hose, Passenger Side Part Number: DC3Z-2282-A
$52.93 MSRP: $87.09You Save: $34.16 (40%)Ships in 1-2 Business Days
Ford F-250 Super Duty Flex Hose, Front Passenger Side Part Number: BC3Z-2078-D
$86.52 MSRP: $142.36You Save: $55.84 (40%)
Ford F-250 Super Duty Flex Hose, Driver Side Part Number: DC3Z-2282-E
$39.62 MSRP: $62.91You Save: $23.29 (38%)


Ford F-250 Super Duty Flex Hose, Front Part Number: 5C3Z-2282-AA
$49.05 MSRP: $76.55You Save: $27.50 (36%)
| Page 1 of 4 |Next >
1-20 of 70 Results
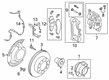
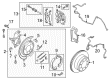
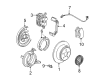
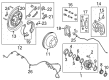
Ford F-250 Super Duty Hydraulic Hose
OEM Hydraulic Hose boasts unmatched quality. Each part goes through full quality checks. They adhere to Ford's official factory standards. These steps remove flaws and inconsistencies. So you can get Hydraulic Hose with long life and a perfect fit. Come to our website and find genuine Ford F-250 Super Duty parts. We keep a wide inventory of OEM F-250 Super Duty parts at the highly affordable prices. It's easy to search, compare, and pick what you need. You'll love the clear info and simple checkout. We offer top-rated customer service, and we reply fast. We also ship promptly to ensure your order arrives on time.
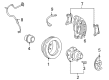
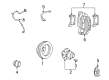
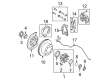
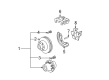
A vital component of the Ford F-250 Super Duty hydraulic system functions through the Hydraulic Hose to pass hydraulic fluid between critical elements of power steering and brake functions. The Ford F-250 Super Duty Hydraulic Hose demonstrates reliability and performance by withstanding high pressures and temperatures and thus increasing overall safety functions in the vehicle. The Hydraulic Hose supports multiple F-250 Super Duty models such as Regular Cab, Super Cab and Crew Cab which proves its flexible design for keeping performance levels high throughout different generations. The engineers designed every version of the Hydraulic Hose specifically for particular F-250 Super Duty variants so drivers get smooth control along with minimized leakage risks. System failures become more likely when the Hydraulic Hose needs regular check-ups and maintenance because poor hose condition causes major hydraulic damage. The technology incorporated into Ford F-250 Super Duty Hydraulic Hose allows it to withstand harsh conditions while presenting superior corrosion resistance capabilities that distinguish this product from other automotive parts. The high-quality standards at Ford create more efficient production while sustaining its well-known status as a producer of reliable vehicles. Through its dedication to performance alongside safety Ford created the Hydraulic Hose which stands as an essential component of the F-250 Super Duty vehicles.
Ford F-250 Super Duty Hydraulic Hose Parts and Q&A
- Q: How to service and repair the hydraulic hose in a clutch hydraulic system on Ford F-250 Super Duty?A:The complete clutch hydraulic system requires removal as one unit before performing any repair work on the new master cylinder-to-slave cylinder hydraulic tube. The service begins with clip removal from the dash of the clutch hydraulic tube followed by vehicle elevation and support. This allows the slave cylinder unlocking by compression and twisting then transmission removal. It is crucial to position the slave cylinder and hydraulic tube forward below the left engine bank after disconnecting the floor pan clip from the clutch hydraulic tube to minimize hydraulic tube tension. You need to lower the vehicle to access the push rod bushing retaining clips which will let you detach the Clutch Master Cylinder push rod from the clutch pedal before discarding the push rod bushing. The technicians must detach the clutch pedal position switch and switch cover from the clutch master cylinder push rod before they separate the power distribution box from its bracket for clutch master cylinder access. The clutch master cylinder needs to be twisted clockwise by 45 degrees while being compressed before removal followed by unhooking the clutch hydraulic reservoir from its place in the wiring tray and pulling apart the hydraulic tube from the Brake Master Cylinder assembly. The user needs to exercise caution because brake fluid damages painted and plastic surfaces yet water immediately clears the spillage. A suitable container should be placed below the master cylinder before you disconnect the hydraulic tube by using a 3/32-inch punch and hammer to drive out the roll pin. All components need cleaning to avoid system contamination. Follow this method to clean the slave cylinder while taking out and disposing of any present O-rings from its internal area. Install the hydraulic tube by placing new O-ring seals with coating of Ford High Performance DOT 3 Motor Vehicle Brake Fluid C6AZ-19542-AB or equal to ESA-M6C25-A on the end of the tube. Then connect the tube to both the clutch master cylinder and secure the roll pin for installation. Position the components in a specific way to keep the reservoir elevated above the master cylinder and the hydraulic tube located beneath it thus preventing the reservoir from running dry as air escapes from the system. Add fluid to the reservoir after which you must run master cylinder fluid before repeating the process until all air is removed from the system. You should hold the slave cylinder above a proper container at an angle which shows the hydraulic tube connection port above the push rod as you fill it with DOT 3 brake fluid. Connect the hydraulic tube to its slave cylinder port by sliding a new O-ring onto the opening and wetting it with brake fluid then putting the tube in position while installing the roll pin to secure it. The technician will bench bleed the clutch hydraulic system followed by installing it into the vehicle with proper routing of the hydraulic tube while attaching the clutch hydraulic reservoir to the wiring tray. Attach the clutch master cylinder by applying force to compress it while twisting it counterclockwise to 45 degrees so it locks to the clutch pedal and support bracket maintaining proper orientation of the rubber seal to the bulkhead. Install the clutch pedal position switch onto the clutch master cylinder push rod where its flat side should point toward the tab on the master cylinder at a 12 o'clock position with the switch covered secure. Insert the new push rod bushing into place before attaching the clutch master cylinder push rod to the clutch pedal and raise and support the vehicle before directing the hydraulic tube and slave cylinder to the transmission correctly. Proceed to install the slave cylinder by twisting and compressing it to lock it onto the transmission. The system should be tested for normal operation after connecting the clutch hydraulic tube both to the floor pan and dash clips while lowering the vehicle.

Related Ford F-250 Super Duty Parts
 Ford F-250 Super Duty ABS Reluctor Ring
 Ford F-250 Super Duty ABS Sensor
 Ford F-250 Super Duty Backing Plate
 Ford F-250 Super Duty Brake Caliper
 Ford F-250 Super Duty Brake Caliper Piston
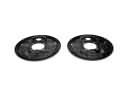 Ford F-250 Super Duty Brake Dust Shields
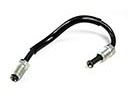 Ford F-250 Super Duty Brake Line
 Ford F-250 Super Duty Brake Rotor
 Ford F-250 Super Duty Brake Shoe Set
 Ford F-250 Super Duty Parking Brake Shoes
 Ford F-250 Super Duty Wheel Bearing Dust Cap
 Ford F-250 Super Duty Wheel Hub