FordParts
My Garage
My Account
Cart
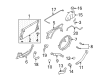
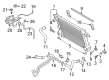
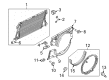
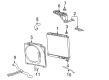
OEM Ford F-350 Super Duty Radiator
Cooling Radiator- Select Vehicle by Model
- Select Vehicle by VIN
Select Vehicle by Model
orMake
Model
Year
Select Vehicle by VIN
For the most accurate results, select vehicle by your VIN (Vehicle Identification Number).
19 Radiators found


Ford F-350 Super Duty Radiator Assembly Part Number: 4C3Z-8005-EB
$634.50 MSRP: $940.00You Save: $305.50 (33%)Ships in 1 Business Day


Ford F-350 Super Duty Radiator Part Number: BC3Z-8005-H
$725.31 MSRP: $1103.97You Save: $378.66 (35%)Ships in 1-2 Business Days


Ford F-350 Super Duty Radiator Assembly Part Number: 4C3Z-8009-BA
$731.64 MSRP: $1113.60You Save: $381.96 (35%)Ships in 1-2 Business Days

Ford F-350 Super Duty Radiator Part Number: HC3Z-8005-J
$695.32 MSRP: $1045.35You Save: $350.03 (34%)Ships in 1-2 Business Days


Ford F-350 Super Duty Radiator Assembly Part Number: 6C3Z-8005-BA
$605.17 MSRP: $960.58You Save: $355.41 (37%)Ships in 1-3 Business Days

Ford F-350 Super Duty Radiator Assembly Part Number: 7C3Z-8005-G
$453.25 MSRP: $689.88You Save: $236.63 (35%)Ships in 1-2 Business Days
Ford F-350 Super Duty Radiator Assembly Part Number: 4C3Z-8009-AA
$472.15 MSRP: $718.65You Save: $246.50 (35%)Ships in 1-3 Business Days
Ford F-350 Super Duty Auxiliary Radiator Part Number: PC3Z-8005-A
$514.09 MSRP: $782.48You Save: $268.39 (35%)Ships in 1-2 Business DaysFord F-350 Super Duty Auxiliary Radiator Part Number: PC3Z-8005-B
$510.24 MSRP: $776.62You Save: $266.38 (35%)Ships in 1-2 Business DaysFord F-350 Super Duty Radiator Assembly Part Number: 6C3Z-8005-A
$598.32 MSRP: $910.68You Save: $312.36 (35%)Ships in 1-2 Business Days
Ford F-350 Super Duty Radiator Part Number: LC3Z-8005-C
$637.78 MSRP: $970.75You Save: $332.97 (35%)Ships in 1-3 Business Days
Ford F-350 Super Duty Auxiliary Radiator Part Number: BC3Z-8005-M
$735.19 MSRP: $1105.28You Save: $370.09 (34%)Ships in 1-3 Business Days
Ford F-350 Super Duty Radiator Part Number: HC3Z-8005-K
$691.50 MSRP: $1039.60You Save: $348.10 (34%)Ships in 1 Business Day
Ford F-350 Super Duty Radiator Assembly Part Number: 8C3Z-8009-F
$965.42 MSRP: $1451.42You Save: $486.00 (34%)Ships in 1-2 Business Days

Ford F-350 Super Duty Auxiliary Radiator Part Number: HC3Z-8005-E
$430.35 MSRP: $641.67You Save: $211.32 (33%)Ships in 1 Business Day
Ford F-350 Super Duty Radiator Part Number: HC3Z-8005-G
$550.91 MSRP: $828.25You Save: $277.34 (34%)Ships in 1-3 Business Days
Ford F-350 Super Duty Auxiliary Radiator Part Number: LC3Z-8005-A
$677.82 MSRP: $1004.18You Save: $326.36 (33%)Ships in 1-3 Business Days


Ford F-350 Super Duty Radiator Part Number: BC3Z-8005-K
$746.67 MSRP: $1106.18You Save: $359.51 (33%)
Ford F-350 Super Duty Radiator Assembly Part Number: 3C3Z-8005-FA
$458.69 MSRP: $673.55You Save: $214.86 (32%)
Ford F-350 Super Duty Radiator
OEM Radiator boasts unmatched quality. Each part goes through full quality checks. They adhere to Ford's official factory standards. These steps remove flaws and inconsistencies. So you can get Radiator with long life and a perfect fit. Come to our website and find genuine Ford F-350 Super Duty parts. We keep a wide inventory of OEM F-350 Super Duty parts at the highly affordable prices. It's easy to search, compare, and pick what you need. You'll love the clear info and simple checkout. We offer top-rated customer service, and we reply fast. We also ship promptly to ensure your order arrives on time.
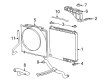
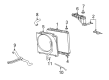
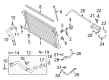
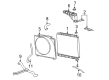
Ford F-350 Super Duty Radiator is a key part well known for its durability ans effectiveness when it comes to regulating engine heat in numerous F-350 Super Duty vehicles. Functional in its purpose to serve as the vehicle's heat exchanger, the heating and cooling of the Ford F-350 Super Duty Radiator relies on the exchange of heat from the engine coolant and the air it dissipates to regulate the engine's temperature. They are generally done working with light metallic aluminum which improves their strength while at the same time improving the rate in which the coolant flows as well as its ability to transfer heat. Besides, increasing the overall performance of the Ford F-350 Super Duty, this design substantially contributes to the vehicle's safety due to preventing overheating. This Ford F-350 Super Duty Radiator is compatible with a formidable number of generations of the F-350 Super Duty hence making it our pick. The Ford F-350 Super Duty Radiator is precisely designed to practically incorporate features like direct fit options for its smooth installation and advanced cooling design among other things that makes it unique in the automotive market. Due to its effectiveness on the ramp, the Ford Radiator is compatible with high shock absorptive and high performing engine configurations such as the power stroke diesel engine which boosts on towing capacities. Therefore, the Ford Radiator not only stands for the brand's quality, but also for the trust, people can put in their trucks, in case of heavy-duty jobs.
Ford F-350 Super Duty Radiator Parts and Q&A
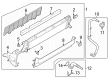
- Q: How to Service and Repair a Radiator Cooling Module for Gasoline Engines on Ford F-350 Super Duty?A:The cooling module service and repair process starts with hanging the vehicle using a hoist until the vehicle is placed in neutral gear before recovering the refrigerant. The maintenance starts with draining the engine cooling system before removing the air cleaner outlet pipe. Start by disconnecting both the hood switch electrical connector with pushpin retainer and the Horn assembly electrical connector if they apply. Detach the LH hood latch cable together with its retainers and also remove the horn assembly bolt. The procedure must be conducted once more for the RH hood safety latch cable. Detach the power steering fluid cooler hose retainer from the radiator then remove the LH Air Deflector retainer while carefully placing the power steering fluid cooler apart from the rest. First use the upper and lower radiator coolant hoses quick connect couplings to disconnect them before removing the A/C compressor-to-condenser and condenser outlet tubes. Discard both gasket and O-ring seal components. Before any fluid could escape the RH air deflector retainer must be removed to cap off transmission cooler tube entries and avoid fluid siphoning. Next follow with separating both transmission auxiliary fluid cooler tube fittings from their connections. Displace the engine compartment wiring harness outside the way and remove the lower air deflector retainers before rotating the lower cooling Fan Shroud upward. The top radiator support bolts with the engine cooling module should be taken off first. Position the engine cooling module before installing upper radiator support bolts finger-tight and tightening the top bolts to 40 Nm (30 lb-ft) while tightening front bolts to 63 Nm (46 lb-ft). Reinstall the lower air deflector while connecting transmission auxiliary cooler tube couplings to their respective places. The installation requires new gasket and O-ring seals which need to be tightened to 15 Nm (133 lb-in) torque when connecting A/C compressor-to-condenser and condenser outlet tubes. Reinstall the RH air deflector along with 4WD differential vacuum valve if included and the engine compartment wiring harness. Attach the lower radiator coolant hose while fitting the lower fan shroud back properly and connecting the degas bottle coolant inlet hose. Install the Power Steering Reservoir followed by tightening its bolts to 7 Nm (62 lb-in) and the power steering fluid cooler where its bolts require 11 Nm (97 lb-in) torque. Reinstall the hood safety latch cable together with the horn assembly along with all other components before installing the ACL outlet pipe. The final steps include filling and bleeding the cooling system after which you evacuate and perform refrigerant system leak testing before carrying out its gas recharging.

Related Ford F-350 Super Duty Parts
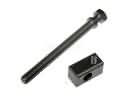 Ford F-350 Super Duty Belt Tensioner Bolt
 Ford F-350 Super Duty Coolant Reservoir Cap
 Ford F-350 Super Duty Cooling Fan Assembly
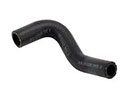 Ford F-350 Super Duty Cooling Hose
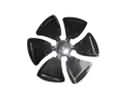 Ford F-350 Super Duty Fan Blade
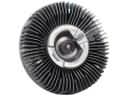 Ford F-350 Super Duty Fan Clutch
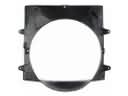 Ford F-350 Super Duty Fan Shroud
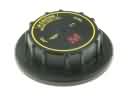 Ford F-350 Super Duty Radiator Cap
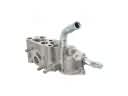 Ford F-350 Super Duty Thermostat Housing
 Ford F-350 Super Duty Water Hose
 Ford F-350 Super Duty Water Pump
 Ford F-350 Super Duty Water Pump Gasket