
Popular OEM Ford F-350 Super Duty Parts
- Body & Hardware Parts View More >
- Electrical Parts View More >
- Interior & Exterior Trim Parts View More >
- Air & Fuel Delivery Parts View More >
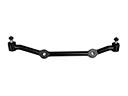
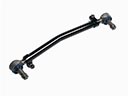
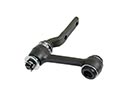
- Steering Parts View More >
- Emission Control & Exhaust Parts View More >
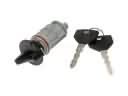
- Charging & Starting Parts View More >
- Engine Parts View More >
- Belts & Cooling Parts View More >
- Suspension Parts View More >
- Brakes Parts View More >
- A/C & Heating Parts View More >


Why Buy Genuine Ford F-350 Super Duty Parts From FordPartsDeal.com
FordPartsDeal.com offers a smart and convenient way to buy genuine parts online. We sell new OEM Ford F-350 Super Duty parts, including Headlights & Lighting. Authorized dealers directly provide all the Ford F-350 Super Duty parts and assemblies to ensure the optimal quality and fit. We also provide all properly fitting Ford F-350 Super Duty parts, such as Transmission, Driveline & Axles specific to your model. When you shop here, you get real Ford value at highly competitive prices. All our products come with the same Ford warranty available at other dealerships. Our easy-to-use catalog helps you quickly identify the right part for your car. You'll receive fast shipping from our warehouse network, keeping your Ford F-350 Super Duty running smoothly. Our staff consists of Ford professionals who are ready to assist you. We aim to treat each customer as if they were stepping out of a Ford showroom. VIN verification and our live support ensure that the part you order is the right Ford F-350 Super Duty part for your vehicle.
Introduced in 1999 the Ford F-350 Super Duty emerged as one of the leading heavy-duty pickup trucks recognized by its rugged performance and versatile utility alongside remarkable towing abilities. The Ford F-350 Super Duty features three powerful engine options which include a 6.2L V8 engine and a 6.7L Power Stroke V8 Diesel engine along with the previously available 7.3L V8 Diesel engine. These engines generate powerful performance levels by delivering up to 475 hp and 1,050 lb-ft of torque which results in excellent towing capabilities. The Ford F-350 Super Duty's front-engine rear-wheel-drive structure benefits from an optional four-wheel-drive system which provides enhanced control across various terrain conditions. Passenger and cargo space in the Ford F-350 Super Duty vehicle depends on its adjustable wheelbase length which spans from 137 to 176 inches based on specific configurations. Rear antilock brakes come as standard equipment to maintain stable driving conditions when the vehicle is loaded. Customers find versatile solutions with the Ford F-350 Super Duty due to its wide range of trim options along with Regular, SuperCab, and CrewCab configurations and multiple cargo bed sizes. The manufacturer shows serious commitment to genuine Ford parts since they must meet strict quality standards which guarantee reliable performance for an extended period. The Ford F-350 Super Duty earns its reputation as a reliable pickup through its advanced engineering that results in dependable features built with top-quality components catering to professional and recreational needs. The Ford F-350 Super Duty remains dominant in the heavy-duty pickup sector because of its exceptional performance and durability along with powerful towing abilities.
Ford F-350 Super Duty concerns group into intake and turbo sealing, HVAC controls, and high pressure oil systems. When the F-350 Super Duty runs with a clogged air filter, intake vacuum rises. This can pull oil past turbo seals on the F-350 Super Duty. Watch the restriction indicator, replace the air filter, inspect compressor play, and correct oil carryover. Service per Ford guidelines to prevent repeat failures. HVAC electrical on the F-350 Super Duty can lose lower speeds. A failed blower motor resistor leaves only high speed and weak defrost control. Check the connector behind the glove box and replace the blower motor resistor. On diesel models, the high pressure oil pump can fail and cause a no start. The F-350 Super Duty may crank without firing and set pressure codes. Verify supply oil, test command versus actual pressure, and prime the system. Replace or reseal the oil pump as needed. Follow Ford diagnostics and confirm readings after repair. Finish with a road test. The F-350 Super Duty should boost cleanly, step the blower through speeds, and restart hot quickly. Use Ford service data for torque and rechecks.
Ford F-350 Super Duty Parts and Q&A
- Q: How to service the alternator on Ford F-350 Super Duty?A:In order to maintain the alternator, detach battery and, where necessary, take away air cleaner intake pipe. Loosen the drive belt tension, eliminate the generator bracket bolts and unhook the generator. Installation Re-Installation Consult all installation instructions, particularly tightening all bolts to correct torque values.
- Q: How to service and repair the steering wheel on Ford F-350 Super Duty?A:In order to service the steering wheel, you have to remove the driver airbag module after which you must align the wheel to the straight-ahead position. Join the old bolt and put a new one in and tighten it to 40 Nm (30 ft. lbs. ). The wheel should be carefully pulled out, the wires of the Clock Spring being directed and the process inverted again on replacement.
- Q: How to service and repair the catalytic converter on gasoline engines on Ford F-350 Super Duty?A:In order to repair the catalytic converter, place the vehicle on a hoist, and unscrew the skid plate (where necessary). Disassemble the parts of the exhaust, disconnect the catalytic converter, and replace it with a new one that has anti-seize on the sensor threads. Re-assemble all, screw the nuts, and in place of the skid plate, screw it back in.


