FordParts
My Garage
My Account
Cart
OEM Ford Five Hundred Door Latch Assembly
Door Latch- Select Vehicle by Model
- Select Vehicle by VIN
Select Vehicle by Model
orMake
Model
Year
Select Vehicle by VIN
For the most accurate results, select vehicle by your VIN (Vehicle Identification Number).
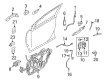
11 Door Latch Assemblys found


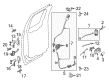
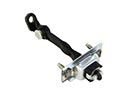
Ford Five Hundred Cable Retainer Clip, Rear Part Number: E83Z-5421952-B
$4.64 MSRP: $6.59You Save: $1.95 (30%)Ships in 1 Business Day
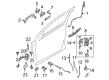
Ford Five Hundred Lock Actuator, Rear Passenger Side Part Number: 6L2Z-78218A42-B
$10.50 MSRP: $16.93You Save: $6.43 (38%)Ships in 1-3 Business DaysFord Five Hundred Lock Actuator, Front Driver Side Part Number: 6L2Z-78218A43-B
$12.74 MSRP: $20.55You Save: $7.81 (38%)Ships in 1-2 Business Days
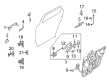

Ford Five Hundred Lock Assembly, Front Driver Side Part Number: 8F9Z-5421813-A
$41.39 MSRP: $59.22You Save: $17.83 (31%)

Ford Five Hundred Door Latch Assembly
OEM Door Latch Assembly boasts unmatched quality. Each part goes through full quality checks. They adhere to Ford's official factory standards. These steps remove flaws and inconsistencies. So you can get Door Latch Assembly with long life and a perfect fit. Come to our website and find genuine Ford Five Hundred parts. We keep a wide inventory of OEM Five Hundred parts at the highly affordable prices. It's easy to search, compare, and pick what you need. You'll love the clear info and simple checkout. We offer top-rated customer service, and we reply fast. We also ship promptly to ensure your order arrives on time.
Ford Five Hundred Door Latch Assembly is one of the most essential parts that can underpin dependability and competence in Ford's full-sized sedan range in the United States during 2004 to 2007. This Door Latch Assembly is made with an aim of ensuring that doors are effectively locked to enable protection against any form of trespassing thus increasing the safety of the Ford Five Hundred. Ensuring compatibility with a range of Five Hundred models makes it possible for drivers derive from an enhanced locking mechanism no matter the SE, SEL or Limited they use. Door Latch Assembly works in connection with the manual and automatic locking system so as to make it highly efficient and easy to handle. However, the Ford Five Hundred Door Latch Assembly can be considered to be long-lasting while it might demand its replacement because of wear from the broken outer door handles or sticking latches. This assembly is very important in providing that the doors of the vehicle are working properly and are correctly sealed. Besides, the Ford Five Hundred has a large passenger compartment and an improved safety equation of the side impact - multiple airbags and a modified Side Impact Protection System are also accompanied by the sturdiness provided by the Door Latch Assembly. Because the safety and the efficiency are the significant concerns in the automotive market, the Ford Five Hundred Door Latch Assembly is the important part of the Ford Five Hundred and its performance.
Ford Five Hundred Door Latch Assembly Parts and Q&A
- Q: How to service and repair the rear Door Latch Assembly on Ford Five Hundred?A:The starting point for rear door latch service and repair involves taking off the interior trim panel of the rear door and its access hole watershield. Connect the electrical connectors between regulator and switch before aiming the front door window to view the clamp bolt for the glass. To proceed disconnect window switch connectors and Window Regulator connectors while loosening the clamp bolt of the glass window and securing the window by taping it at the highest position. Lower the window regulator toward its stopping points on the track before disconnecting the rear door latch assembly electrical connector along with the interior door handle bolt. The first step involves lowering the push button rod down from the rear door latch assembly to detach it. Next, use a screwdriver to remove the three bolts which connect the rear door latch assembly-to-rear door module while keeping the interior door handle safe from scratches that could happen while passing the door module. The eight bolts should be removed to relocate the rear door module into position. The Five Hundred and Montego models need the tape removed before lowering the window glass and taking out the scrivet together with the rear door glass run top bolt and rear door glass run seal. Disconnect the glass after setting it properly to the side and unfasten the rear door glass top run. To replace the rear door latch you must separate the exterior door handle actuating rod from the recess then remove the three bolts before taking out the rear door latch assembly. Cable removal from the interior door handle activation system follows black plastic cover removal from the door latch. Then you can take out the rear door latch from its mounting bracket. Mount the rear door latch onto the bracket and establish an interior door handle actuating cable connection followed by these steps for the remote cable cover installation. Place the rear door latch assembly into position before installing its three bolts to a torque value of 12 Nm (9 lb-ft). The exterior door handle installation must be properly oriented and secured before the exterior door handle actuating rod gets connected to the yellow clip where the rod will stay free to prevent misalignment. The exterior door handle actuating rod must be connected to the rear door latch before securing it with the yellow clip. To manufacture the Five Hundred and Montego rear door glass hosting the top run, install the glass correctly and secure the rear door glass run seal and rear door glass run top bolt before applying the scrivet. Securely tape up the window glass before reaching its maximum height. The procedure requires you to pass the interior door handle without scratching it and then position the rear door module while installing the eight bolts which should be tightened to 8 Nm (71 lb-in). Install the push button rod on the rear door latch assembly before connecting its electrical connector. Meanwhile, tighten the three rear door latch assembly-to-rear door module bolts to 12 Nm (9 lb-ft). Position the interior door handle and loosely install its bolt then remove tape from the window glass before lowering it to install the window glass clamp bolt with a torque of 8 Nm (71 lb-in) while ensuring the window stays fully forward in the clamp. The last step involves the combination of installing the access hole watershield together with the rear door trim panel followed by placing the inside door handle alignment pins at the center of the rear door trim panel and securing the interior door handle bolt with a torque of 7 Nm (62 lb-in).
- Q: How to service and repair the front Door Latch Assembly on Ford Five Hundred?A:You should start front door latch service work by taking out the interior trim panel and bolt on the front door before setting the handle aside. The procedure starts by placing the watershield aside and then disconnecting external mirror electrical connectors and keyless entry keypad cables and front door disarm switch electrical connector cables. The service requires you to first push the door module's wiring harness grommet and only then reconnect the electrical connectors for both Window Regulator and window switch. Maintaining proper access to clamp bolts requires positioning the window to an appropriate angle. Disconnect both wiring connectors which control the window regulator and window switch. Next untighten the two window glass clamp bolts before using tape to keep the window in an upright position. The front Door Lock Cylinder pawl must be extracted from the actuating rod after removing the door lock cylinder circlip to set aside the lock cylinder rod and pawl when the vehicle has this equipment. You will open the yellow clip to release the Exterior Door Handle actuating rod from the front door latch before disassembly and bolt removal of three front door latch bolts and eleven bolts required for the door module re-positioning. The door ajar switch and door lock actuator electrical connectors need to be separated before disconnecting the push button rod from the front door latch. Remove the remote cable cover from the latch before taking out the front door latch from the bracket while releasing the Interior Door Handle cable from its corresponding latch position. The installation steps demand you to mount the door disarm switch together with the door lock cylinder pawl onto the door lock cylinder followed by attaching the circlip. The front door latch requires placement on the bracket while you link the interior door handle cable to the latch before adding the remote cable cover on the latch. Loop the push button rod into the front door latch before attaching both the door ajar switch and door lock actuator electrical wires. The door module should be positioned first and eleven bolts installed and tightened to 8 Nm (71 lb-in) then the three front door latch bolts tightened to 12 Nm (9 lb-ft). After making certain the exterior door handle and door latch meet specifications the worker should connect the exterior door handle actuating rod to the yellow clip while keeping the rod free to avoid incorrect adjustments. Install the exterior door handle actuating rod to the front door latch then dispose of the yellow clip. To install the front door lock cylinder actuating rod connect it to the front door lock cylinder pawl while also installing both window glass clamp bolts and position the window in the clamps for shifting door window glass fully rearward followed by tightening it to 8 Nm (71 lb-in). Open the wiring harness grommet to direct it into the door module and then join all available electrical connectors between the keyless entry keypad and front door disarm switch and exterior mirror if equipped. After watershield installation users should position the interior door handle while installing the bolt in a loose manner. You should complete the task by placing the front door interior trim panel before you align the inside door handle pins to match their position in the front door trim panel. Install the interior door handle bolt with 7 Nm (62 lb-in) torque.


Related Ford Five Hundred Parts
 Ford Five Hundred Door Check
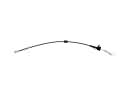 Ford Five Hundred Door Latch Cable
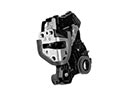 Ford Five Hundred Door Lock
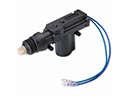 Ford Five Hundred Door Lock Actuator
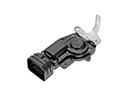 Ford Five Hundred Door Lock Actuator Motor
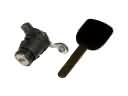 Ford Five Hundred Door Lock Cylinder
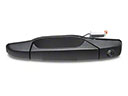 Ford Five Hundred Exterior Door Handle
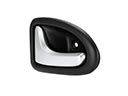 Ford Five Hundred Interior Door Handle
 Ford Five Hundred Liftgate Lift Support
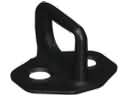 Ford Five Hundred Rear Door Striker
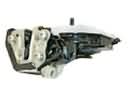 Ford Five Hundred Rear Passenger Door Handle Latch
 Ford Five Hundred Weather Strip
Browse Ford Five Hundred Door Latch Assembly by Years
2007
2006
2005