FordParts
My Garage
My Account
Cart
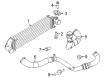
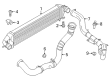
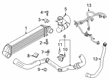
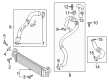
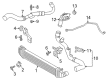
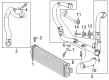
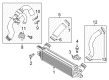
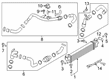
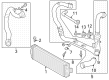
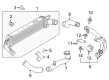
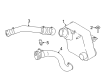
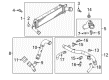
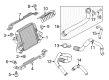
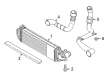
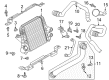
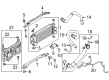
OEM Ford Intercooler
Front Intercooler- Select Vehicle by Model
- Select Vehicle by VIN
Select Vehicle by Model
orMake
Model
Year
Select Vehicle by VIN
For the most accurate results, select vehicle by your VIN (Vehicle Identification Number).
57 Intercoolers found


Ford Intercooler Part Number: CV6Z-6K775-A
$171.28 MSRP: $258.33You Save: $87.05 (34%)Ships in 1-2 Business DaysProduct Specifications- Other Name: Turbocharger Intercooler; Charge Air Cooler; Turbo Intercooler


Ford Intercooler Part Number: BV6Z-6K775-B
$396.81 MSRP: $725.00You Save: $328.19 (46%)Ships in 1-3 Business DaysProduct Specifications- Other Name: Turbocharger Intercooler; Charge Air Cooler; Turbo Intercooler
- Replaces: BV6Z-6K775-A


Ford Intercooler Part Number: EJ7Z-6K775-A
$149.18 MSRP: $225.00You Save: $75.82 (34%)Ships in 1-2 Business DaysProduct Specifications- Other Name: Cooler Assembly - Engine Charge Air; Charge Air Cooler


Ford Intercooler Part Number: G3GZ-6K775-A
$244.51 MSRP: $372.17You Save: $127.66 (35%)Ships in 1-3 Business DaysProduct Specifications- Other Name: Cooler Assembly - Engine Charge Air; Charge Air Cooler


Ford Intercooler Part Number: AA5Z-6K775-B
$560.64 MSRP: $853.33You Save: $292.69 (35%)Ships in 1-3 Business DaysProduct Specifications- Other Name: Cooler Assembly - Engine Charge Air; Turbocharger Intercooler; Charge Air Cooler; Turbo Intercooler
- Replaces: AA5Z-6K775-A


Ford Intercooler Part Number: 7C3Z-6K775-C
$772.69 MSRP: $1161.67You Save: $388.98 (34%)Ships in 1-2 Business DaysProduct Specifications- Other Name: Cooler Assembly - Engine Charge Air; Turbocharger Intercooler; Charge Air Cooler; Turbo Intercooler
- Replaces: 7C3Z-6K775-A, 7C3Z-6K775-B


Ford Intercooler Part Number: DS7Z-6K775-A
$204.13 MSRP: $360.00You Save: $155.87 (44%)Ships in 1 Business Day

Ford Intercooler Part Number: HG9Z-6K775-A
$243.31 MSRP: $370.33You Save: $127.02 (35%)Ships in 1-3 Business DaysProduct Specifications- Other Name: Cooler Assembly - Engine Charge Air; Charge Air Cooler


Ford Intercooler Part Number: C1BZ-6K775-B
$221.19 MSRP: $336.67You Save: $115.48 (35%)Ships in 1-2 Business Days

Ford Intercooler Part Number: CK4Z-6K775-G
$228.86 MSRP: $348.33You Save: $119.47 (35%)Ships in 1-2 Business DaysProduct Specifications- Replaces: CK4Z-6K775-A, CK4Z-6K775-E


Ford Intercooler Part Number: FR3Z-6K775-A
$281.85 MSRP: $429.00You Save: $147.15 (35%)Ships in 1 Business DayProduct Specifications- Other Name: Cooler Assembly - Engine Charge Air; Charge Air Cooler


Ford Intercooler Part Number: F2GZ-6K775-A
$283.61 MSRP: $431.67You Save: $148.06 (35%)Ships in 1-2 Business DaysProduct Specifications- Other Name: Cooler Assembly - Engine Charge Air; Charge Air Cooler


Ford Intercooler Part Number: CK4Z-6K775-H
$274.40 MSRP: $408.33You Save: $133.93 (33%)Ships in 1-2 Business DaysProduct Specifications- Other Name: Charge Air Cooler
- Replaces: CK4Z-6K775-B, CK4Z-6K775-F, CK4Z-6K775-C, CK4Z-6K775-D


Ford Intercooler Part Number: FB5Z-6K775-B
$371.21 MSRP: $565.00You Save: $193.79 (35%)Ships in 1-2 Business DaysProduct Specifications- Other Name: Turbocharger Intercooler; Charge Air Cooler; Turbo Intercooler
- Replaces: BB5Z-6K775-A


Ford Intercooler Part Number: HC3Z-6K775-A
$351.50 MSRP: $535.00You Save: $183.50 (35%)Ships in 1 Business DayProduct Specifications- Other Name: Cooler Assembly - Engine Charge Air


Ford Intercooler Part Number: FB5Z-6K775-A
$416.10 MSRP: $633.33You Save: $217.23 (35%)Ships in 1-2 Business DaysProduct Specifications- Other Name: Cooler Assembly - Engine Charge Air; Turbocharger Intercooler; Charge Air Cooler; Turbo Intercooler
- Replaces: DB5Z-6K775-A


Ford Intercooler Part Number: BL3Z-6K775-B
$414.25 MSRP: $763.33You Save: $349.08 (46%)Ships in 1-2 Business DaysProduct Specifications- Other Name: Turbocharger Intercooler; Charge Air Cooler; Turbo Intercooler
- Replaces: BL3Z-6K775-A


Ford Intercooler Part Number: G1FZ-6K775-A
$519.14 MSRP: $790.17You Save: $271.03 (35%)Product Specifications- Other Name: Cooler Assembly - Engine Charge Air; Charge Air Cooler


Ford Intercooler Part Number: DL3Z-6K775-B
$380.23 MSRP: $558.33You Save: $178.10 (32%)Product Specifications- Other Name: Turbocharger Intercooler; Charge Air Cooler; Turbo Intercooler
- Replaces: DL3Z-6K775-A


Ford Intercooler Part Number: FL3Z-6K775-B
$465.35 MSRP: $683.33You Save: $217.98 (32%)Product Specifications- Other Name: Cooler Assembly - Engine Charge Air; Turbocharger Intercooler; Charge Air Cooler; Turbo Intercooler
- Replaces: FL3Z-6K775-A
| Page 1 of 3 |Next >
1-20 of 57 Results
Ford Intercooler
If you own Ford and want to keep it in top shape, choosing OEM Intercooler is a smart move. They are precisely engineered and follow strict factory standards. They are made in advanced facilities that use cutting edge technology. Each part goes through thorough testing to confirm strength and safety, so you can trust it. FordPartsDeal.com gives you genuine Ford Intercooler at some of the affordable online prices without cutting quality. Every OEM Ford part includes the manufacturer's warranty, easy returns, and super-fast delivery. So why wait? Shop now and get your vehicle back to peak condition.
Ford Intercooler chills the air exiting the turbo, reducing the temperature by 20 percent to stuff the denser oxygen and spike the torque. Ford began in 1903 and quickly transformed the manufacturing process with the moving assembly line that reduced the build time, lowered the cost, and made personal automobiles available to average households. Ford now combines muscle and thrift using EcoBoost engines that empty the gas tank yet gulp less fuel, showing you do not have to have a giant block to shake the dust off the traffic. Ford fills cabins with SYNC voice commands to allow teens to scroll through songs or maps without lifting their eyes, and the Co-Pilot360 system brakes, steers, and warns of trouble. Another brand that goes towards zero tailpipe emissions is the F-150 Lightning and other battery rides introduced by Ford, which is based on a single objective, which is to travel fast without smoke. In between turbo and intake, Intercooler tubing will dump heat that would otherwise burn efficiency and welcome knock. Intercooler designs either have air-to-air shells for light weight or air-to-liquid cores, which include pumps and radiators, to pursue even lower charge temperatures on sustained climbs and pulls. Placing the Intercooler at the last compression phase ensures that the engine inhales dense and cool charge to give the computer an opportunity to spray more fuel and release higher real-world horsepower. The reliability of Intercoolers is important since when the core becomes heated, it takes less power than a driver can respond to.
Ford Intercooler Parts and Q&A
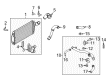
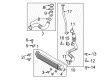
- Q: How to service the intercooler on Ford Excursion?A:The charge air cooler servicing process starts by removing the radiator along with initial removal of the air cleaner element and the air cleaner front cover. The first step involves releasing the clamp to detach the charge air cooler (CAC) duct before unfastening the clamps for removing the CAC duct. You must then remove the two stud bolts before taking out the charge air cooler. A new charge air cooler installation will follow the steps for dismantling operations in reverse order.
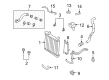
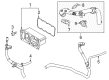
- Q: How to service and repair the intercooler on Ford F-150?A:Draining the coolant must be your first step before starting intercooler service or repair. First disconnect the two hoses from the intercooler by removing its cover. The next step involves unbolted the radiator before extracting the radiator from its position. You should follow the same procedure in reverse order for installing the radiator after removal steps.


Related Ford Parts
 Ford Serpentine Belt
 Ford Thermostat Housing
 Ford Coolant Reservoir Cap
 Ford Drive Belt
 Ford Fan Shroud
 Ford Power Steering Cooler
 Ford Radiator Cap
 Ford Water Pump Gasket
 Ford Water Pump Pulley
 Ford Belt Tensioner Bolt
 Ford Oil Cooler Hose
 Ford Water Hose
Browse Ford Intercooler by Models
Ranger Bronco Mustang Explorer Focus Fusion F-150 Maverick Escape Edge Excursion Expedition Fiesta Taurus Thunderbird Flex Transit Connect Bronco Sport EcoSport F-250 Police Interceptor Utility F-350 Super Duty Police Interceptor Sedan E-350 Club Wagon E-350 Super Duty F-150 Heritage F-250 Super Duty Special Service Police Sedan Transit-150 Transit-250 Transit-350 Transit-350 HD