FordParts
My Garage
My Account
Cart
OEM Ford Ranger Spindle
Axle Spindle- Select Vehicle by Model
- Select Vehicle by VIN
Select Vehicle by Model
orMake
Model
Year
Select Vehicle by VIN
For the most accurate results, select vehicle by your VIN (Vehicle Identification Number).
13 Spindles found


Ford Ranger Knuckle, Front Passenger Side Part Number: 5L5Z-3105-BA
$382.50 MSRP: $561.67You Save: $179.17 (32%)


Ford Ranger Knuckle, Front Driver Side Part Number: 5L5Z-3106-AA
$383.63 MSRP: $563.33You Save: $179.70 (32%)Ford Ranger Knuckle, Front Driver Side Part Number: 5L5Z-3106-BA
$363.20 MSRP: $533.33You Save: $170.13 (32%)

Ford Ranger Knuckle, Front Passenger Side Part Number: AL5Z-3105-D

Ford Ranger Knuckle, Front Passenger Side Part Number: 5L5Z-3105-AA
$442.65 MSRP: $650.00You Save: $207.35 (32%)Ford Ranger Knuckle, Front Driver Side Part Number: AL5Z-3106-C
Ford Ranger Knuckle, Front Passenger Side Part Number: AL5Z-3105-C
Ford Ranger Knuckle, Front Driver Side Part Number: F87Z-3106-AA
Ford Ranger Knuckle, Front Passenger Side Part Number: F87Z-3105-AA

Ford Ranger Spindle Part Number: F57Z-3105-C
Ford Ranger Spindle Part Number: F37Z-3105-A
Ford Ranger Spindle Part Number: E3TZ3105B
Ford Ranger Knuckle, Front Driver Side Part Number: AL5Z-3106-D
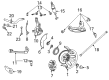
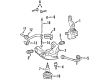
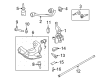
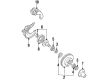
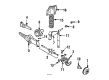
Ford Ranger Spindle
OEM Spindle boasts unmatched quality. Each part goes through full quality checks. They adhere to Ford's official factory standards. These steps remove flaws and inconsistencies. So you can get Spindle with long life and a perfect fit. Come to our website and find genuine Ford Ranger parts. We keep a wide inventory of OEM Ranger parts at the highly affordable prices. It's easy to search, compare, and pick what you need. You'll love the clear info and simple checkout. We offer top-rated customer service, and we reply fast. We also ship promptly to ensure your order arrives on time.
Ford Ranger Spindle Parts and Q&A
- Q: How to service and repair the spindle on a 4X2 on Ford Ranger?A:Service and repair of the spindle in 4X2 vehicles begins by hoisting the vehicle in the air, removing all tires and wheels followed by disc brake shields. Put a suitable jack under the lower arm of the front suspension before taking away the upper shock absorber nut/washer assembly and bushing. Separate the front wheel spindle from the Ball Joint by first taking off the upper ball joint retaining nut and pinch bolt. Begin the procedure by detaching the front shock absorber by removing both its nuts followed by removal of the tie-rod castellated nut after removing the cotter pin from it. Detaching the tie-rod end from the front wheel spindle becomes possible using a Pitman Arm Puller along with a Coil Spring Compressor to compress the coil spring. The process starts with removal of the lower ball joint castellated nut while extracting its cotter pin followed by the Pitman Arm Puller to detach both parts from the front wheel spindle. Finish this step by taking off the front wheel spindle. When installing the cotter pin position it through the lower ball joint castellated nut starting from outboard to inboard with finger-thinner fingers to maintain wheel/tire assembly safety. First position the lower ball joint on its spindle with a new castellated nut then install a new cotter pin followed by installing the upper ball joint on the spindle with a new pinch bolt and nut. Install the tie rod castellated nut by adding a new cotter pin and maintain the same direction when installing the pin as before. You should begin by placing the two lower nuts on the front shock absorber followed by adding the upper shock absorber bushing that includes a nut and washer. Conclude the brake disc shield installation then place the tire together with the wheel components followed by checking and correcting the front end alignment.

Related Ford Ranger Parts
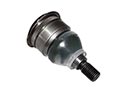 Ford Ranger Ball Joint
 Ford Ranger Control Arm
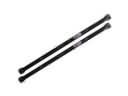 Ford Ranger Torsion Bar
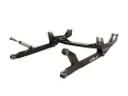 Ford Ranger Radius Arm
 Ford Ranger Axle Shaft
 Ford Ranger Coil Springs
 Ford Ranger Axle Beam
 Ford Ranger Bump Stop
 Ford Ranger Axle Support Bushings
 Ford Ranger Camber and Alignment Kit
 Ford Ranger Control Arm Bushing
 Ford Ranger Shock Absorber