FordParts
My Garage
My Account
Cart
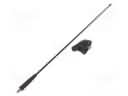
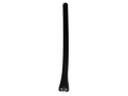
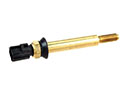
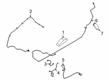
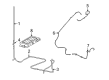
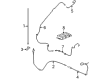
OEM Lincoln Antenna Cable
Radio Antenna Cable- Select Vehicle by Model
- Select Vehicle by VIN
Select Vehicle by Model
orMake
Model
Year
Select Vehicle by VIN
For the most accurate results, select vehicle by your VIN (Vehicle Identification Number).
106 Antenna Cables found


Lincoln Antenna Cable Part Number: F65Z-18812-AD
$15.92 MSRP: $22.58You Save: $6.66 (30%)Ships in 1-3 Business DaysProduct Specifications- Other Name: Cable Assembly - Extension; Cable Assembly; Cable

Lincoln Wire Part Number: HP5Z-18812-F
$15.82 MSRP: $46.28You Save: $30.46 (66%)Ships in 1-2 Business DaysProduct Specifications- Other Name: Cable Assembly - Extension
- Replaces: HP5Z-18812-B

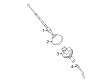
Lincoln Cable, Driver Side Part Number: LX6Z-19A397-LPE
$29.38 MSRP: $45.45You Save: $16.07 (36%)Ships in 1-2 Business DaysProduct Specifications- Other Name: Antenna Cable; Wire
- Position: Driver Side
- Replaces: LX6Z-19A397-LPD

Lincoln Antenna Cable, Rear Part Number: BT4Z-18812-D
$57.80 MSRP: $88.78You Save: $30.98 (35%)Ships in 1-2 Business DaysProduct Specifications- Other Name: Cable Assembly - Extension; Antenna Cable, Rear
- Position: Rear

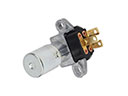
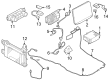
Lincoln Control Box, Rear Passenger Side Part Number: CP9Z-18K891-A
$22.40 MSRP: $31.77You Save: $9.37 (30%)Ships in 1-2 Business DaysProduct Specifications- Other Name: Isolator; Antenna Amplifier, Right; Radio Capacitor; Amplifier; Booster
- Manufacturer Note: Wavetrap
- Position: Passenger Side

Lincoln Extension, Rear Driver Side Part Number: LX6Z-18812-AA
$29.87 MSRP: $43.48You Save: $13.61 (32%)Ships in 1-2 Business DaysProduct Specifications- Other Name: Cable Assembly - Extension; Antenna Cable, Rear Left
- Position: Driver Side
- Replaces: LX6Z-18812-RLB

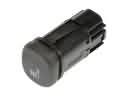
Lincoln Antenna Booster, Rear Part Number: 7CPZ-18K891-E
$30.92 MSRP: $45.00You Save: $14.08 (32%)Ships in 1-3 Business DaysProduct Specifications- Other Name: Isolator; Amplifier
- Manufacturer Note: AM/FM (Rear Window)
- Position: Rear

Lincoln Antenna Cable Part Number: JL1Z-14D202-FAA
$80.64 MSRP: $117.38You Save: $36.74 (32%)Ships in 1-3 Business DaysProduct Specifications- Other Name: Cable Assembly; Connector Wire; Cable
- Replaces: JL1Z-14D202-C

Lincoln Cable Assembly - Extension Part Number: RL1Z-18812-AA
$84.83 MSRP: $123.48You Save: $38.65 (32%)Ships in 1-2 Business DaysProduct Specifications- Other Name: CABLE ASY - EXTENSION

Lincoln Cable Assembly - Extension Part Number: RL1Z-18812-BA
$101.07 MSRP: $147.12You Save: $46.05 (32%)Ships in 1-2 Business DaysProduct Specifications- Other Name: CABLE ASY - EXTENSION
Lincoln Cable Assembly - Extension Part Number: RL7Z-18812-CA
$90.35 MSRP: $131.52You Save: $41.17 (32%)Ships in 1-2 Business DaysProduct Specifications- Other Name: CABLE ASY - EXTENSION
Lincoln Cable Assembly - Extension Part Number: RL1Z-18812-DA
$105.13 MSRP: $153.03You Save: $47.90 (32%)Ships in 1-2 Business DaysProduct Specifications- Other Name: CABLE ASY - EXTENSION

Lincoln Antenna Cable Part Number: NL1Z-18812-P
$37.38 MSRP: $53.48You Save: $16.10 (31%)Ships in 1-2 Business DaysProduct Specifications- Other Name: Cable Assembly - Extension
Lincoln Antenna Cable Part Number: NL1Z-18812-R
$37.59 MSRP: $53.78You Save: $16.19 (31%)Ships in 1-2 Business DaysProduct Specifications- Other Name: Cable Assembly - Extension

Lincoln Wire Harness Part Number: JL7Z-10E928-A
$38.97 MSRP: $55.75You Save: $16.78 (31%)Ships in 1-2 Business DaysProduct Specifications- Other Name: Splitter - Navigation Fm Antenna

Lincoln Antenna Cable, Front Part Number: BT4Z-18812-C
$43.11 MSRP: $61.67You Save: $18.56 (31%)Ships in 1-2 Business DaysProduct Specifications- Other Name: Cable Assembly - Extension; Antenna Cable, Front
- Position: Front

Lincoln CABLE ASY Part Number: RL1Z-14F662-RA
$52.51 MSRP: $75.12You Save: $22.61 (31%)Ships in 1-2 Business Days

Lincoln Antenna Cable Part Number: DP5Z-18812-G
Product Specifications- Other Name: Cable Assembly - Extension
- Replaces: DP5Z-18812-C, DP5Z-18812-E


Lincoln Antenna Cable Part Number: 4L3Z-18812-AA
Product Specifications- Other Name: Cable Assembly - Extension; Cable Assembly; Cable
- Manufacturer Note: Attaches To Radio Receiver

Lincoln Cable Assembly Part Number: 7L3Z-18812-C
Product Specifications- Other Name: Cable Assembly - Extension; Antenna Cable; Cable
- Manufacturer Note: Attaches To Radio Receiver
- Replaces: 7L3Z-18812-B
| Page 1 of 6 |Next >
1-20 of 106 Results
Lincoln Antenna Cable
If you own Lincoln and want to keep it in top shape, choosing OEM Antenna Cable is a smart move. They are precisely engineered and follow strict factory standards. They are made in advanced facilities that use cutting edge technology. Each part goes through thorough testing to confirm strength and safety, so you can trust it. FordPartsDeal.com gives you genuine Lincoln Antenna Cable at some of the affordable online prices without cutting quality. Every OEM Lincoln part includes the manufacturer's warranty, easy returns, and super-fast delivery. So why wait? Shop now and get your vehicle back to peak condition.
Lincoln Antenna Cable maintains the radio signals of drivers on every trip and they are always at good levels. Lincoln follows the Quiet Flight concept, cutting cabin noise to ensure that conversations remain unmuted and the music sounds better as soon as the road becomes bumpy. Lincoln cars are loaded with Co-Pilot360 tools which monitor the watch lanes, dark high beams, blind spots during the spot, and slide the car in a narrow parking area without any hassle. Lincoln is also introducing ActiveGlide that allows hands-free highway riding and plush seats, soft touch panel and bright screens transform long commutes into peaceful escapes. Silent glass, thick layer door seals and active noise control will block the wind roar before it can get to your ears. The constant software updates add new tricks to the infotainment allowing owners to have updated technology without necessarily having to purchase a new car. All Lincoln models have an Antenna Cable that holds radio, satellite, and data signals using tightly wound copper strands that are shielded against heat, moisture, and electrical buzz, ensuring that the reception of their car is crisp in deserts, during rainy seasons, and in the canyons of major cities. Antenna Cable is resistant to kinking due to the use of a durable jacket that does not crack when bending during installations or during subsequent dashes. The round connector of the Antenna Cable inserts in factory ports with transparent click-in ends and hence the owner completes swaps fast and gets on the road. Antenna Cable is durable and can last years protecting sound and accuracy in navigation as streaming services and map updates become increasingly more demanding.
Lincoln Antenna Cable Parts and Q&A
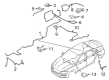
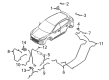
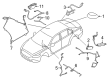
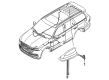
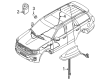
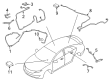
- Q: How to service and repair the antenna cable on Lincoln Navigator?A:Service and repair of the antenna cable starts by removing both the right-hand scuff plate together with the right-hand A-pillar lower trim panel. The service and repair of the antenna cable starts with unfastening the two pin-type retainers from the lower A-pillar then removing the rear antenna lead-in cable from the front antenna lead-in cable. Start by removing the front antenna lead-in cable through the process of removing its pin-type retainers from the lower Instrument Panel (I/P) channel followed by pulling the front antenna lead-in cable out from the I/P. You must do the reverse of the removal process during installation.
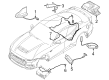
- Q: How to service and repair the front antenna cable on Lincoln Town Car?A:The procedure for front antenna lead-in cable maintenance starts with audio unit and right-hand lower A-pillar trim panel removal. Begin by removing the pin-type retainers of the right-hand lower instrument panel cover and position it to the side. Then set the lower instrument panel cover in a separate place. The light and right-hand lower instrument panel cover need to be detached before removing the cover piece. You should disconnect the antenna lead-in cable before removing it by unclipping its five fasteners. Proceed with the opposite installation steps to perform reinstallation.