FordParts
My Garage
My Account
Cart
OEM Lincoln Dimmer Switch
Light Dimmer Switch- Select Vehicle by Model
- Select Vehicle by VIN
Select Vehicle by Model
orMake
Model
Year
Select Vehicle by VIN
For the most accurate results, select vehicle by your VIN (Vehicle Identification Number).
27 Dimmer Switches found


Lincoln Dimmer Switch Part Number: 7L1Z-11691-BA
$29.38 MSRP: $41.67You Save: $12.29 (30%)Ships in 1-3 Business DaysProduct Specifications- Other Name: Resistor Assembly; Instrument Panel Dimmer Switch; Headlight Dimmer Switch; Instrument Light Rheostat; Rheostat
- Manufacturer Note: BLACK

Lincoln Headlamp Switch Part Number: EJ7Z-11654-BA
$55.25 MSRP: $90.91You Save: $35.66 (40%)Ships in 1-3 Business DaysProduct Specifications- Other Name: Switch Assembly - Headlamps; Multi Purpose Switch
- Manufacturer Note: BLACK

Lincoln Headlamp Switch Part Number: LC5Z-11654-BA
$69.62 MSRP: $114.55You Save: $44.93 (40%)Ships in 1-2 Business DaysProduct Specifications- Other Name: Switch Assembly - Headlamps; Multi Purpose Switch

Lincoln Headlamp Switch Part Number: LC5Z-11654-AA
$69.62 MSRP: $114.55You Save: $44.93 (40%)Ships in 1-2 Business DaysProduct Specifications- Other Name: Switch Assembly - Headlamps

Lincoln Headlamp Switch Part Number: KA1Z-11654-BA
$69.62 MSRP: $114.55You Save: $44.93 (40%)Ships in 1-3 Business DaysProduct Specifications- Other Name: Switch Assembly - Headlamps; Multi Purpose Switch
Lincoln Headlamp Switch Part Number: KA1Z-11654-AA
$69.62 MSRP: $114.55You Save: $44.93 (40%)Ships in 1-3 Business DaysProduct Specifications- Other Name: Switch Assembly - Headlamps; Multi Purpose Switch

Lincoln Headlamp Switch Part Number: LC5Z-11654-EA
$86.19 MSRP: $141.82You Save: $55.63 (40%)Ships in 1-2 Business DaysProduct Specifications- Other Name: Switch Assembly - Headlamps
Lincoln Headlamp Switch Part Number: LC5Z-11654-CA
$86.19 MSRP: $141.82You Save: $55.63 (40%)Ships in 1-2 Business DaysProduct Specifications- Other Name: Switch Assembly - Headlamps; Multi Purpose Switch
Lincoln Headlamp Switch Part Number: JL7Z-11654-BA
$104.98 MSRP: $172.73You Save: $67.75 (40%)Ships in 1-3 Business DaysProduct Specifications- Other Name: Switch Assembly - Headlamps; Multi Purpose Switch
Lincoln Headlamp Switch Part Number: DP5Z-11654-BA
$55.25 MSRP: $90.91You Save: $35.66 (40%)Ships in 1-3 Business DaysProduct Specifications- Other Name: Switch Assembly - Headlamps; Headlight Switch; Multi Purpose Switch
- Manufacturer Note: BLACK
Lincoln Headlamp Switch Part Number: LC5Z-11654-DA
$69.62 MSRP: $114.55You Save: $44.93 (40%)Ships in 1-2 Business DaysProduct Specifications- Other Name: Switch Assembly - Headlamps

Lincoln Headlamp Switch Part Number: DE9Z-11654-CA
$45.80 MSRP: $72.73You Save: $26.93 (38%)Product Specifications- Other Name: Switch Assembly - Headlamps; Multi Purpose Switch
- Manufacturer Note: BLACK

Lincoln Dimmer Switch Part Number: FL7Z-11691-AA
$28.63 MSRP: $41.67You Save: $13.04 (32%)Ships in 1-2 Business DaysProduct Specifications- Other Name: Resistor Assembly; Instrument Light Rheostat
- Manufacturer Note: Switch - Dimmer
Lincoln Dimmer Switch Part Number: 7L7Z-11691-BA
$46.60 MSRP: $66.67You Save: $20.07 (31%)Ships in 1-3 Business DaysProduct Specifications- Other Name: Resistor Assembly

Lincoln Dimmer Switch Part Number: DE9Z-11691-AA
$29.38 MSRP: $41.67You Save: $12.29 (30%)Ships in 1-3 Business DaysProduct Specifications- Other Name: Resistor Assembly; Instrument Light Rheostat
- Manufacturer Note: BLACK

Lincoln Dimmer Switch Part Number: DA5Z-11691-AA
$29.38 MSRP: $41.67You Save: $12.29 (30%)Ships in 1-3 Business DaysProduct Specifications- Other Name: Resistor Assembly; Instrument Light Rheostat
- Manufacturer Note: BLACK
Lincoln Dimmer Switch Part Number: AE9Z-11691-AB
$29.38 MSRP: $41.67You Save: $12.29 (30%)Ships in 1-3 Business DaysProduct Specifications- Other Name: Resistor Assembly; Instrument Light Rheostat
- Replaces: AE9Z-11691-AA

Lincoln Dimmer Switch Part Number: 9H6Z-11691-AA
$14.44 MSRP: $19.65You Save: $5.21 (27%)Product Specifications- Other Name: Resistor Assembly; Instrument Light Rheostat


Lincoln Dimmer Switch Part Number: 3W1Z-11691-AA
Product Specifications- Other Name: Resistor Assembly; Headlight Dimmer Switch; Instrument Light Rheostat
- Manufacturer Note: Thumbwheel design


Lincoln Dimmer Switch Part Number: 9E5Z-11691-AA
Product Specifications- Other Name: Resistor Assembly; Instrument Light Rheostat
| Page 1 of 2 |Next >
1-20 of 27 Results
Lincoln Dimmer Switch
If you own Lincoln and want to keep it in top shape, choosing OEM Dimmer Switch is a smart move. They are precisely engineered and follow strict factory standards. They are made in advanced facilities that use cutting edge technology. Each part goes through thorough testing to confirm strength and safety, so you can trust it. FordPartsDeal.com gives you genuine Lincoln Dimmer Switch at some of the affordable online prices without cutting quality. Every OEM Lincoln part includes the manufacturer's warranty, easy returns, and super-fast delivery. So why wait? Shop now and get your vehicle back to peak condition.
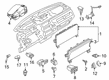
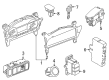
Lincoln Dimmer Switch toggles headlight beams quickly and allows tuning cabin glow at a flick of a switch. Lincoln began in 1917 and continues to enhance comfort with its Quiet Flight attitude that silences road noise, but the cabin materials remain soft, seats will snuggle you, and the digital displays will be readable even in the glaring sun, and long journeys leave drivers less fatigued. Lincoln equips each ride with Co-Pilot360 to ensure that drivers receive lane-keeping, automatic high beams, blind-spot warnings, parking assist and even the hands-free ActiveGlide when the highway straightens to allow drivers to relax without losing focus even during snarl-ups of rush hours. Lincoln is a listening brand and introduces new technology every year rather than living by the glory of the past, demonstrating that quiet luxury can be progressive as well. Dimmer Switch is located on the steering column and is operated by a single decisive action of either high or low beam by clicking one button instead of the hands operating through several steps to do the same in busy nighttime traffic. Dimmer Switch also allows drivers to adjust the interior lighting slightly to ensure that the dashboards never glare or gape into the darkness to allow the eye some relief when using tough and rural roads where one can stumble into the bends unexpectedly. Dimmer Switch has durable contacts and sufficient insulation that wipes off vibration, heat, spilled coffee and nightlong use since nothing should malfunction halfway through a storm. Dimmer Switch not only enhances safety, as it removes the ability to guess at all, but also it does not require filler menus or distracting displays; it only needs a clear sight line, which in the case of rain or fog, becomes obscured.
Lincoln Dimmer Switch Parts and Q&A
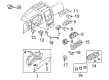
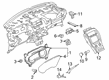
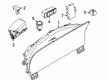
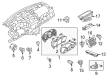
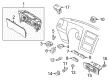
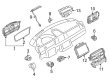
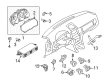
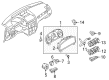
- Q: How to service and repair the instrument panel dimmer switch on Lincoln Navigator?A:You must remove the instrument cluster finish panel as your first step to serve or fix the instrument panel dimmer switch. The instrument panel dimmer switch tabs need to be pressed to detach it from the system. The installation procedure for the new switch requires following the reverse order of removal steps.
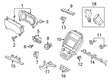
- Q: How to service the instrument panel dimmer switch on Lincoln Town Car?A:The initial step for servicing the instrument panel dimmer switch requires the user to disconnect the battery ground cable and activate the parking brake. Start by placing the transmission selector in the 1 position followed by removing the screws holding the instrument cluster finish panel before disconnecting the electrical connectors. The instrument panel dimmer switch extraction can begin with releasing its three retaining tabs. Replacement of this component requires you to perform the opposite steps from the removal procedure.