FordParts
My Garage
My Account
Cart
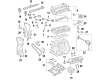
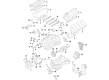
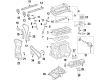
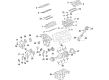
OEM Lincoln MKZ Timing Cover
Engine Timing Cover- Select Vehicle by Model
- Select Vehicle by VIN
Select Vehicle by Model
orMake
Model
Year
Select Vehicle by VIN
For the most accurate results, select vehicle by your VIN (Vehicle Identification Number).
7 Timing Covers found


Lincoln MKZ Timing Cover, Front Part Number: BT4Z-6019-B
$122.17 MSRP: $177.83You Save: $55.66 (32%)


Lincoln MKZ Timing Cover, Front Part Number: 9E5Z-6019-B
$127.21 MSRP: $185.17You Save: $57.96 (32%)Ships in 1-3 Business Days
Lincoln MKZ Timing Cover, Front Part Number: 7T4Z-6019-C
$127.10 MSRP: $185.00You Save: $57.90 (32%)Ships in 1-3 Business Days

Lincoln MKZ Timing Cover, Front Part Number: CJ5Z-6019-G
$103.32 MSRP: $159.00You Save: $55.68 (36%)Ships in 1-3 Business Days
Lincoln MKZ Cover - Cylinder Front Part Number: KS7Z-6019-B
$129.39 MSRP: $188.33You Save: $58.94 (32%)Ships in 1-2 Business Days
Lincoln MKZ Timing Cover, Front Part Number: FT4Z-6019-H
$214.52 MSRP: $315.00You Save: $100.48 (32%)Ships in 1-3 Business Days

Lincoln MKZ Timing Cover, Front Part Number: CJ5Z-6019-D
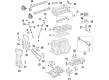
Lincoln MKZ Timing Cover
OEM Timing Cover boasts unmatched quality. Each part goes through full quality checks. They adhere to Lincoln's official factory standards. These steps remove flaws and inconsistencies. So you can get Timing Cover with long life and a perfect fit. Come to our website and find genuine Lincoln MKZ parts. We keep a wide inventory of OEM MKZ parts at the highly affordable prices. It's easy to search, compare, and pick what you need. You'll love the clear info and simple checkout. We offer top-rated customer service, and we reply fast. We also ship promptly to ensure your order arrives on time.
The Lincoln MKZ Timing Cover is a critical part that emphasizes the use of the Lincoln MKZ automobiles' dependability and speed. Supplies to guard the engine timing gears which could be a timing belt, chain or cam belt the Timing Cover comes in a variety of materials for instance aluminum, plastic or steel. This strong design shields the elaborated parts of the timing system from any interfering debris, which in turn increases the Lincoln MKZ's efficiency and security. Since the launch of this model in 2007, the Timing Cover features gaskets that add the extra layer of protection to the timing belt for preserving the durability and efficiency of the engine. Lincoln MKZ has established itself as a car with some of the outstanding features and excellent performance, and the Timing Cover has been proved to be an important part and parcel of the vehicle. Because of its durable, yet protective nature, it has become one of the prime selling points in the automobile trade. As well, the aesthetics of the Lincoln MKZ Timing Cover is a way of living up to the brand and creating a product that will not only provide a smooth and safe ride for the drivers. Given those aspects of the car, the Lincoln MKZ Timing Cover is a must-have part that corroborates the credentials of the Lincoln MKZ as one of the best luxury sedans.
Lincoln MKZ Timing Cover Parts and Q&A
- Q: How to service and repair the timing cover on Lincoln MKZ?A:Service or repair operations on the timing cover require first attaching two wiring harness retainers to the left-hand valve cover stud bolts then connecting both engine wiring harness electrical connectors. After installing two wiring harness retainers on the A/C tubes attach new O-ring seals and fasten nuts to 8 Nm (71 inch lbs.). Fasten the A/C tube bracket bolt to 8 Nm (71 inch lbs.) while the two A/C tube bracket bolts should be tightened to 10 Nm (89 inch lbs.). Connect the A/C tube to the condenser while using a new O-ring seal and tighten the nut to 8 Nm (71 inch lbs.). The installation process includes connecting the coolant tube retainer clips to the A/C tube and if present an engine block heater harness needs to be connected to the radiator support, Power Steering Hose and A/C tube and engine wiring harness. Fasten the ground wire and bolt until they reach 12 Nm (9 ft. lbs.) torque setting before mounting the transaxle control cable bracket with three nuts which should be torqued to 12 Nm (9 ft. lbs.). Connect the transaxle control cable onto the control lever followed by attaching high and low radiator hoses and the two heater hoses to the Thermostat Housing. Securely fasten the ground wire along with its bolt by torquing it to 10 Nm (89 inch lbs.). Vent the battery and install the 6 Nm (53 inch lbs.) tightened nut on the connector feeding power to the battery terminal. The wiring harness retainers should be mounted on the transmission mount and battery tray bracket before connecting both engine harness electrical connectors. First, install the battery tray and then move to the engine air cleaner and air cleaner outlet pipe before mounting the degas bottle. The accessory Drive Belt must be installed before power steering belt installation. After which the engine requires clean engine oil for filling. Next, the cooling system needs both filling and bleeding before the power steering gets filled. Power steering system requires fluid then transaxle needs a fluid check to determine addition requirements and the air conditioning needs a recharging intervention.

Related Lincoln MKZ Parts
 Lincoln MKZ Crankshaft
 Lincoln MKZ Crankshaft Seal
 Lincoln MKZ Cylinder Head
 Lincoln MKZ Dipstick
 Lincoln MKZ Engine Mount
 Lincoln MKZ Engine Mount Bracket
 Lincoln MKZ Engine Mount Torque Strut
 Lincoln MKZ Oil Pump Gasket
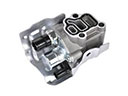 Lincoln MKZ Spool Valve
 Lincoln MKZ Timing Belt Idler Pulley
 Lincoln MKZ Timing Chain
 Lincoln MKZ Variable Timing Sprocket