FordParts
My Garage
My Account
Cart
OEM Lincoln Motor And Transmission Mount
Motor and Trans Mount- Select Vehicle by Model
- Select Vehicle by VIN
Select Vehicle by Model
orMake
Model
Year
Select Vehicle by VIN
For the most accurate results, select vehicle by your VIN (Vehicle Identification Number).
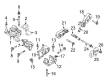
194 Motor And Transmission Mounts found


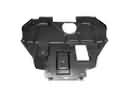
Lincoln Transmission Mount, Lower Part Number: DP5Z-6068-A
$55.42 MSRP: $80.67You Save: $25.25 (32%)Ships in 1-2 Business DaysProduct Specifications- Other Name: Automatic Transmission Mount, Lower; Engine Torque Strut; Transfer Case Mount; Motor Mount; Torque Arm; Torque Strut; Mount
- Position: Lower


Lincoln Torque Strut Part Number: 9E5Z-6068-A
$91.69 MSRP: $133.47You Save: $41.78 (32%)Ships in 1-3 Business DaysProduct Specifications- Other Name: Housing; Engine Torque Strut; Engine Mount Torque Strut; Engine Mount Bracket; Motor Mount; Strut


Lincoln Transmission Mount Part Number: GB5Z-6068-A
$46.02 MSRP: $65.83You Save: $19.81 (31%)Product Specifications- Other Name: Housing; Engine Support Rod; Engine Mount Torque Strut; Transfer Case Mount; Motor Mount; Torque Arm; Torsion Arm
- Manufacturer Note: Rear
- Replaces: AA5Z-6068-A


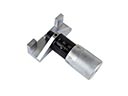
Lincoln Mount Bracket, Lower Part Number: BV6Z-5K291-A
$15.57 MSRP: $23.45You Save: $7.88 (34%)Ships in 1-3 Business DaysProduct Specifications- Other Name: Bracket - Exhaust Pipe Mounting; Catalytic Converter Bracket; Exhaust Manifold Bracket; Exhaust Hanger
- Position: Lower


Lincoln Transmission Mount, Driver Side Part Number: 7A1Z-6038-AA
$89.65 MSRP: $130.50You Save: $40.85 (32%)Ships in 1-2 Business DaysProduct Specifications- Other Name: Insulator Assembly; Automatic Transmission Mount, Left; Engine Mount Bracket; Transfer Case Mount; Motor Mount; Front Mount; Mount
- Manufacturer Note: INSULATOR
- Position: Driver Side
- Replaces: 7T4Z-6038-AD


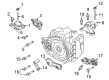
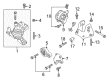
Lincoln Motor Mount, Passenger Side Part Number: 8T4Z-6038-A
$128.24 MSRP: $186.67You Save: $58.43 (32%)Product Specifications- Other Name: Bracket - Insulator Mounting; Engine Mount, Right; Engine Mount Bracket; Front Mount; Mount
- Manufacturer Note: Bracket And Insulator
- Position: Passenger Side
- Replaces: 7T4Z-6038-AA


Lincoln Transmission Mount, Driver Side Part Number: 6H6Z-6038-BA
$78.95 MSRP: $121.50You Save: $42.55 (36%)Ships in 1-2 Business DaysProduct Specifications- Other Name: Insulator Assembly; Automatic Transmission Mount; Transfer Case Mount
- Position: Driver Side


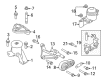
Lincoln Front Mount Part Number: EJ7Z-6038-A
$102.94 MSRP: $149.83You Save: $46.89 (32%)Product Specifications- Other Name: Bracket - Engine Front Support; Engine Mount, Front; Engine Mount Bracket; Motor Mount; Mount
- Position: Front


Lincoln Mount Bracket, Front Passenger Side Part Number: 8M8Z-6038-A
$113.72 MSRP: $175.00You Save: $61.28 (36%)Ships in 1-2 Business DaysProduct Specifications- Other Name: Bracket - Engine Mounting; Front Engine Mount Support; Right Engine Mount Bracket; Torque Strut; Motor Mount.
- Manufacturer Note: Bracket
- Position: Passenger Side


Lincoln Transmission Mount, Lower Part Number: 8H6Z-6068-A
$63.89 MSRP: $93.00You Save: $29.11 (32%)Ships in 1-3 Business DaysProduct Specifications- Other Name: Housing; Engine Support Rod, Lower; Engine Mount Torque Strut; Engine Mount Bracket; Transfer Case Mount; Motor Mount; Torque Arm; Torque Strut; Strut
- Position: Lower
- Replaces: 7H6Z-6068-CA


Lincoln Strut Assembly Part Number: 8E5Z-6068-D
$65.84 MSRP: $95.83You Save: $29.99 (32%)Ships in 1-2 Business DaysProduct Specifications- Other Name: Housing; Engine Torque Strut; Engine Support Rod; Engine Mount Torque Strut; Engine Mount Bracket; Motor Mount; Torque Strut; Strut
- Replaces: 6E5Z-6068-FC, 6E5Z-6068-B, 6E5Z-6068-A, 8E5Z-6068-A


Lincoln Transmission Mount Part Number: DT4Z-6068-A
$64.81 MSRP: $94.33You Save: $29.52 (32%)Ships in 1-3 Business DaysProduct Specifications- Other Name: Housing; Engine Torque Strut; Engine Mount Torque Strut; Transfer Case Mount; Torque Arm


Lincoln Transmission Mount Bracket, Driver Side Part Number: DT4Z-6031-A
$62.85 MSRP: $91.48You Save: $28.63 (32%)Product Specifications- Other Name: Bracket - Engine Mounting; Automatic Transmission Mount Bracket; Transfer Case Mount; Transmission Mount
- Manufacturer Note: INSULATOR
- Position: Driver Side
- Replaces: 7T4Z-6031-AA, 8T4Z-6031-B, BT4Z-6068-A


Lincoln Transmission Mount Part Number: BT4Z-6068-A
$62.85 MSRP: $91.48You Save: $28.63 (32%)Product Specifications- Other Name: Housing; Transfer Case Mount
- Replaced by: DT4Z-6031-A


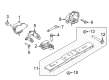
Lincoln Transmission Mount, Front Upper Part Number: DG1Z-6038-F
$66.30 MSRP: $96.50You Save: $30.20 (32%)Product Specifications- Other Name: Insulator Assembly; Automatic Transmission Mount, Front Upper; Engine Mount Bracket; Transfer Case Mount; Motor Mount; Rear Mount; Upper Trans Mount
- Position: Front Upper
- Replaces: 8G1Z-6038-C, DG1Z-6038-D


Lincoln Front Mount, Driver Side Part Number: 3W1Z-6038-BA
$67.78 MSRP: $98.67You Save: $30.89 (32%)Product Specifications- Other Name: Insulator Assembly - Engine Support; Engine Mount, Front Left, Left; Engine Mount Bracket; Motor Mount; Mount
- Manufacturer Note: LH, FRONT
- Position: Driver Side


Lincoln Front Mount Part Number: 9E5Z-6038-C
$60.11 MSRP: $87.50You Save: $27.39 (32%)Ships in 1-3 Business DaysProduct Specifications- Other Name: Bracket - Engine Front Support; Engine Mount, Front; Engine Mount Bracket; Motor Mount; Mount
- Position: Front


Lincoln Front Mount Part Number: 8G1Z-6038-A
$78.78 MSRP: $114.67You Save: $35.89 (32%)Ships in 1-2 Business DaysProduct Specifications- Other Name: Insulator Assembly; Engine Mount, Front; Engine Mount Bracket; Motor Mount; Mount; Insulator
- Position: Front


Lincoln Transmission Mount Part Number: DA8Z-6068-A
$79.38 MSRP: $122.17You Save: $42.79 (36%)Ships in 1-3 Business DaysProduct Specifications- Other Name: Housing; Engine Support Rod; Engine Mount Torque Strut; Transfer Case Mount; Motor Mount; Torque Strut


Lincoln Transmission Mount Part Number: FL3Z-6068-E
$105.34 MSRP: $153.33You Save: $47.99 (32%)Ships in 1-2 Business DaysProduct Specifications- Other Name: Insulator Assembly - Engine Support; Automatic Transmission Mount; Manual Transmission Mount; Hanger; Mount
- Replaces: BL3Z-6068-E, BL3Z-6068-B, FL3Z-6068-B
| Page 1 of 10 |Next >
1-20 of 194 Results
Lincoln Motor And Transmission Mount
If you own Lincoln and want to keep it in top shape, choosing OEM Motor And Transmission Mount is a smart move. They are precisely engineered and follow strict factory standards. They are made in advanced facilities that use cutting edge technology. Each part goes through thorough testing to confirm strength and safety, so you can trust it. FordPartsDeal.com gives you genuine Lincoln Motor And Transmission Mount at some of the affordable online prices without cutting quality. Every OEM Lincoln part includes the manufacturer's warranty, easy returns, and super-fast delivery. So why wait? Shop now and get your vehicle back to peak condition.
Lincoln Motor And Transmission Mount is applied to absorb engine vibration and maintain powertrain alignment. Lincoln began in 1917 and matured under Ford though remains in pursuit of tranquility over dramatics. Driving along any model, road hush is the rule since the Quiet Flight notion thwarts the rattle of stragglers, the wind whistle, and leaves the dialogue floating freely without the need to strain. Co-Pilot360 will provide lane assistance, blind spot warning, auto-beams, and smart parking assistance to make the trip feel lighter, and forward sensors will never sleep, and emergency braking will be on watch. Another feature of Lincoln is ActiveGlide that enables the highways to be virtually hands-free over long distances, with maps updated via the air. The use of soft leather, transparent screens, and consistent connectivity demonstrates that Lincoln pays attention to the input of drivers. Motor And Transmission Mount fixes the engine and gearbox to the subframe and absorbs vicious torque surges. Motor And Transmission Mount comprises layered rubber and occasionally fluid chambers to ingest vibration, chop idle tremor, and protect the neighboring hardware against load-related fatigue. As a Motor And Transmission Mount wears out, it makes clunking and shuddering in the shifts. Fresh Motor And Transmission Mount reinstates proper alignment, smooth launches, and crisp steering of the vehicle.
Lincoln Motor And Transmission Mount Parts and Q&A
- Q: How to Service and Repair the Motor and Transmission Mount on Lincoln Town Car?A:The procedure for servicing the transmission mount starts with removal of the transmission support crossmember and subsequent removal of the transmission support insulator. Install the system by performing the removal steps in reverse order and tighten all components to 80 Nm (59 ft.lbs.).
- Q: How to Service and Repair the Motor and Transmission Mount for the 4R70E/4R75E Automatic Transmission on Lincoln Navigator?A:The first step for servicing or repairing the 4R70E/4R75E automatic transmission mount requires that the vehicle must be in neutral gear and supported safely on a hoist. A transmission jack requires placement following the removal of the rear transmission support nuts for the current installation. After slightly lifting the transmission rear you can remove its mounting bolts to disconnect the rear transmission mount from the assembly. After repositioning the rear transmission mount use bolts to fasten it while torquing them to 80 Nm (59 ft. lbs.). Lower the transmission onto the crossmember before reattaching its nuts while tightening them to 90 Nm (66 ft. lbs.).