FordParts
My Garage
My Account
Cart
OEM Mercury Grand Marquis Clock Spring
Spiral Cable Clock Spring- Select Vehicle by Model
- Select Vehicle by VIN
Select Vehicle by Model
orMake
Model
Year
Select Vehicle by VIN
For the most accurate results, select vehicle by your VIN (Vehicle Identification Number).
9 Clock Springs found


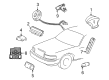
Mercury Grand Marquis Clockspring Part Number: 6W1Z-14A664-A
$97.91 MSRP: $142.52You Save: $44.61 (32%)

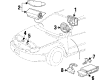
Mercury Grand Marquis Clockspring Part Number: F7AZ-14A664-BA


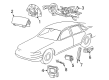
Mercury Grand Marquis Clockspring Part Number: 1W1Z-14A664-AA
$214.42 MSRP: $314.87You Save: $100.45 (32%)


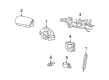
Mercury Grand Marquis Clockspring Part Number: 1W7Z-14A664-AA
$447.49 MSRP: $657.10You Save: $209.61 (32%)


Mercury Grand Marquis Clockspring Part Number: F8AZ-14A664-AA

Mercury Grand Marquis Clockspring Part Number: F4AZ-14A664-A
Mercury Grand Marquis Clockspring Part Number: F3AZ-14A664-A
Mercury Grand Marquis Clockspring Part Number: F5AZ-14A664-A

Mercury Grand Marquis Clockspring Part Number: F1VY-14A664-D
Mercury Grand Marquis Clock Spring
OEM Clock Spring boasts unmatched quality. Each part goes through full quality checks. They adhere to Mercury's official factory standards. These steps remove flaws and inconsistencies. So you can get Clock Spring with long life and a perfect fit. Come to our website and find genuine Mercury Grand Marquis parts. We keep a wide inventory of OEM Grand Marquis parts at the highly affordable prices. It's easy to search, compare, and pick what you need. You'll love the clear info and simple checkout. We offer top-rated customer service, and we reply fast. We also ship promptly to ensure your order arrives on time.
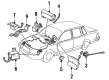
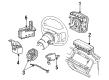
A Mercury Grand Marquis Clock Spring operates as a vital system element for delivering secure electrical connectivity that connects the airbag module to the vehicle electrical system within the Supplemental Restraint System of the vehicle. The connection operates essentially for quick airbag deployment during accidents to boost passenger safety. The flat spiral-shaped Clock Spring operates as an energy storage unit which enables wheel rotation functions to make it an essential part for the Mercury Grand Marquis vehicles. The Clock Spring maintains its reliability characteristics and performance standards through precision compatibility with all Grand Marquis versions. The automotive market acknowledges the Mercury Grand Marquis Clock Spring because of its enhanced structure combined with consistent operation that developers fortified throughout multiple production years. A basic installation of any Clock Spring costs between $50 to $400 while preserving both safety performance for Mercury Grand Marquis vehicles. The Mercury Grand Marquis Clock Spring plays a crucial role in enhancing the driving experience of this model which was manufactured between 1975 and 2011 while the production emphasized performance enhancements throughout this period. The Mercury model Clock Spring operates as a crucial component because it promotes precise airbag functionality while enhancing safety measures and operational efficiency of the vehicle.
Mercury Grand Marquis Clock Spring Parts and Q&A
- Q: How to Service and Repair the Clock Spring Assembly on Mercury Grand Marquis?A:The first task for repairing or servicing the Clock Spring assembly includes removing the driver air bag module while pointing the live air bag module toward a direction opposite the body to prevent significant harm. The vehicle must pass both tests which indicate correct operation of the Supplemental Restraint System: 1) the air bag warning indicator should illuminate during ON mode when using the proper Restraints Control Module (RCM) fuse and 2) the system should be fully operational without active faults so you can return the vehicle to the customer. After setting the road wheels straight ahead to protect the Clock Spring the technician can take out the Steering Wheel. Installation of two tape strips on the Clock Spring ensures safety against unintentional rotations after mounting operation. The removal process of the upper and lower Steering Column shrouds requires first placing the tilt steering column in the fully upward position followed by removing the tilt column lever and three screws on the lower shrouds. Disengage the retainers on the upper steering column shroud and take away the upper along with lower steering column shrouds. The installation requires disconnecting the Clock Spring electrical connector followed by removal of three retaining clips to access the Clock Spring for removal. Users must remove the key from the steering column during new Clock Spring installation by maintaining the rotor in its central position to prevent movement. Recentering a Clock Spring requires a method where you rotate the rotor counterclockwise until it stops then clockwise until the arrows match before executing two complete clockwise turns to locate the center position while maintaining rotor stability. Users should peel off the tape from the Clock Spring installation but they must not let the rotor move while doing so. Install the flats of the Clock Spring while they face the flats of the steering column and insert the Clock Spring until the retaining tabs lock into place. First secure the electrical connector of the Clock Spring then install the upper steering column shroud while also attaching the column shift lever boot if available. The installation order follows lower steering column shroud with three screws and then includes the tilt column lever before installing the steering wheel and driver air bag module.
- Q: What Precautions Should Be Taken When Servicing the Clock Spring Assembly on Mercury Grand Marquis?A:Safety glasses must be worn during Clock Spring assembly servicing to protect against accidental air bag deployment injuries while carrying a live air bag module with pointed air bag and trim cover away from your body. Depower the system before beginning. Before removing the Steering Wheel you must place the driver air bag module aside and adjust the road wheels to straight forward position. Two pieces of tape should be applied across the Clock Spring to stop any unwanted rotation when you take it off. The removal of lower and upper Steering Column shrouds requires putting the tilt steering column in its fully upright position. This removal process demands that you first take out the tilt column lever and three screws and then free the retainers to extract the lower shroud. Detach the Clock Spring electrical connector after which you can slide off the Clock Spring from the steering column by releasing its retaining clips. Vehicles needing new Clock Spring elements must remove the key that stops the rotor wheel at center position then eliminates any turning motion. To recenter the Clock Spring make sure the road wheels face forward before turning the rotor counterclockwise until it stops and continuing by turning it clockwise until arrow markers match before performing a complete two-turn clockwise rotation for center point discovery. Use the same Clock Spring in repairs by carefully removing the tape without rotating it then fit the Clock Spring flats onto the steering column and push the component onto position. Reconnect the Clock Spring electrical connector before you put the upper steering column shroud in place and connect the shift lever boot to the column followed by installing the lower shroud while tightening three screws which you must finish with installing the tilt column lever and steering wheel and the driver air bag module. Complete the system power cycle after inspecting the SRS to verify its complete functionality with zero detected faults before you send the car out.


Related Mercury Grand Marquis Parts
 Mercury Grand Marquis Air Bag Control Module
 Mercury Grand Marquis Air Bag Sensor
 Mercury Grand Marquis Airbag
 Mercury Grand Marquis Distributor
 Mercury Grand Marquis Igniter
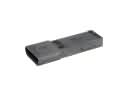 Mercury Grand Marquis Ignition Control Module
 Mercury Grand Marquis MAP Sensor
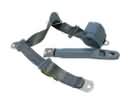 Mercury Grand Marquis Seat Belt
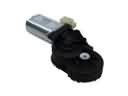 Mercury Grand Marquis Seat Motor
 Mercury Grand Marquis Speedometer
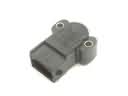 Mercury Grand Marquis Throttle Position Sensor
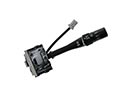 Mercury Grand Marquis Windshield Wiper Switch