FordParts
My Garage
My Account
Cart
OEM Ford F-250 Super Duty Canister Purge Valve
Vapor Canister Purge Valve EVAP- Select Vehicle by Model
- Select Vehicle by VIN
Select Vehicle by Model
orMake
Model
Year
Select Vehicle by VIN
For the most accurate results, select vehicle by your VIN (Vehicle Identification Number).
9 Canister Purge Valves found


Ford F-250 Super Duty Solenoid Valve Part Number: 9U5Z-9F945-C
$45.80 MSRP: $72.73You Save: $26.93 (38%)Ships in 1 Business Day


Ford F-250 Super Duty Solenoid Valve Part Number: 9U5Z-9C915-BE
$59.56 MSRP: $98.00You Save: $38.44 (40%)Ships in 1-2 Business Days


Ford F-250 Super Duty Purge Solenoid Part Number: 5C3Z-9C915-AA
$83.87 MSRP: $138.00You Save: $54.13 (40%)Ships in 1-2 Business Days

Ford F-250 Super Duty Purge Solenoid Part Number: F81Z-9C915-AAA
$110.50 MSRP: $181.82You Save: $71.32 (40%)Ships in 1-2 Business Days
Ford F-250 Super Duty Solenoid Valve Part Number: AU5Z-9C915-E
$40.12 MSRP: $64.73You Save: $24.61 (39%)Ships in 1 Business Day
Ford F-250 Super Duty Purge Valve Part Number: 7U5Z-9C915-C
$84.20 MSRP: $138.55You Save: $54.35 (40%)Ships in 1-3 Business Days
Ford F-250 Super Duty Purge Valve Part Number: LC3Z-9B325-A
$77.46 MSRP: $112.75You Save: $35.29 (32%)Ships in 1-3 Business Days

Ford F-250 Super Duty Purge Solenoid Part Number: PC3Z-9B325-A
$133.97 MSRP: $195.00You Save: $61.03 (32%)Ships in 1-2 Business Days


Ford F-250 Super Duty Purge Solenoid Part Number: F75Z-9C915-AA
$88.28 MSRP: $140.18You Save: $51.90 (38%)
Ford F-250 Super Duty Canister Purge Valve
OEM Canister Purge Valve boasts unmatched quality. Each part goes through full quality checks. They adhere to Ford's official factory standards. These steps remove flaws and inconsistencies. So you can get Canister Purge Valve with long life and a perfect fit. Come to our website and find genuine Ford F-250 Super Duty parts. We keep a wide inventory of OEM F-250 Super Duty parts at the highly affordable prices. It's easy to search, compare, and pick what you need. You'll love the clear info and simple checkout. We offer top-rated customer service, and we reply fast. We also ship promptly to ensure your order arrives on time.
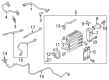
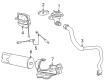
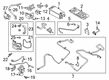
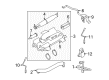
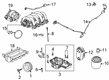
The Ford F-250 Super Duty Canister Purge Valve exists as a vital EVAP component which controls fuel vapor movement between the charcoal canister and engine intake manifold. One of Ford's reliable components works to reduce dangerous emissions through its efficient fuel vapor fueling system in the engine. The Canister Purge Valve functions with every Ford F-250 Super Duty vehicle type from Regular Cab to Super Cab to Crew Cab platforms while backwards compatible with emission system developments that integrate diagnostics through the vent solenoid and pressure sensor systems. The upgraded system simultaneously identifies leaks more efficiently while protecting system structure to achieve both operational efficiency and safety. A defective Canister Purge Valve sets the check engine light which prompts inspections that show its value in vehicle maintenance practices. The Ford F-250 Super Duty Canister Purge Valve leads the automotive market because it includes both dependable construction along with durability against tough conditions for prolonged operational life. The Ford F-250 Super Duty Canister Purge Valve plays an essential role in vehicle efficiency while lowering emissions thus making it a fundamental part that ensures the reliability and operating capabilities of the the automaker F-250 Super Duty range.
Ford F-250 Super Duty Canister Purge Valve Parts and Q&A
- Q: How to service and repair the evaporative emission canister purge valve with midship, aft-of-axle, or auxiliary fuel tanks on Ford F-250 Super Duty?A:A procedure to repair or service the evaporative emission canister purge valve requires disconnecting the battery ground cable first to stop electrical sparks that might ignite fuel vapors, which presents a fire hazard on vehicles with midship or aft-of-axle or auxiliary fuel tanks. The repair service starts with connector removal from the EVAP canister purge solenoid, followed by Intake Manifold coupling to EVAP canister purge valve vapor tube through quick connect coupling that is also applied to EVAP canister assembly to valve vapor tube. The EVAP canister purge valve needs to be detached from its support bracket. Reinstallation of the new valve requires the opposite order of removal. Perform the EVAP repair verification drive cycle and check for leaks on the EVAP system after completing the installation process.

Related Ford F-250 Super Duty Parts
 Ford F-250 Super Duty Crankcase Breather Hose
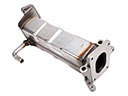 Ford F-250 Super Duty EGR Cooler
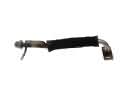 Ford F-250 Super Duty EGR Tube
 Ford F-250 Super Duty EGR Valve
 Ford F-250 Super Duty EGR Valve Gasket
 Ford F-250 Super Duty EGR Valve Position Sensor
 Ford F-250 Super Duty Exhaust Gas Temperature Sensor
 Ford F-250 Super Duty Exhaust Heat Shield
 Ford F-250 Super Duty Fuel Pump Wiring Harness
 Ford F-250 Super Duty PCV Hose
 Ford F-250 Super Duty PCV Valve
 Ford F-250 Super Duty Vapor Pressure Sensor