FordParts
My Garage
My Account
Cart
OEM Ford Flex Timing Cover
Engine Timing Cover- Select Vehicle by Model
- Select Vehicle by VIN
Select Vehicle by Model
orMake
Model
Year
Select Vehicle by VIN
For the most accurate results, select vehicle by your VIN (Vehicle Identification Number).
2 Timing Covers found


Ford Flex Timing Cover, Front Part Number: BT4Z-6019-B
$122.17 MSRP: $177.83You Save: $55.66 (32%)
Ford Flex Timing Cover, Front Part Number: 7T4Z-6019-C
$127.10 MSRP: $185.00You Save: $57.90 (32%)Ships in 1-3 Business Days
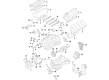
Ford Flex Timing Cover
OEM Timing Cover boasts unmatched quality. Each part goes through full quality checks. They adhere to Ford's official factory standards. These steps remove flaws and inconsistencies. So you can get Timing Cover with long life and a perfect fit. Come to our website and find genuine Ford Flex parts. We keep a wide inventory of OEM Flex parts at the highly affordable prices. It's easy to search, compare, and pick what you need. You'll love the clear info and simple checkout. We offer top-rated customer service, and we reply fast. We also ship promptly to ensure your order arrives on time.
The Ford Flex Timing Cover is one of the precise part parts, which are perceived as reliability and performance of Ford Flex. Manufactured to protect the timing mechanism often a timing belt or timing chain, the timing cover is made from materials like aluminum, plastic or steel and should handle normal usage. This part is not only to protect the timing system from dirt but also mostly has gasket to further increase the protection of it and it is one of the reasons why the Ford Flex is efficient and safe during driving. The compatibility with all Flex models guarantees that owners can service the vehicles efficiently, knowing that the Timing Cover is made for them. The Ford Flex, characterized by its interior and the rather conservative but memorable design, receives added protection from possible failures of the Timing Cover that can disrupt the work on the vehicles. In the specific field of the automotive market, the use of the Timing Cover for the protection of the timing mechanism is considered unique, which shows the concern of Ford in maintaining superior quality and techniques. What makes the Ford Flex Timing Cover unique is the fact that it is not just a shielding component but a working component that contributes to the overall efficiency of a vehicle and safety to the occupants. In the light of the above discussions, it is fair to conclude that the Ford Flex Timing Cover is an essential component of the Ford Flex car that further lays emphasis on the model's excellence in the car manufacturing market.
Ford Flex Timing Cover Parts and Q&A
- Q: How to service and repair the timing cover on Ford Flex?A:The first step to serve and fix the timing cover starts with maintaining clean conditions to stop foreign objects from resulting in engine breakdown. Position the vehicle on a hoist while keeping it in the neutral gear then perform recovery of the A/C system. The service and repair procedure begins with removal of the air cleaner outlet pipe followed by front wheels and tires then accessory Drive Belt and tensioner and power steering belt until completion with the degas bottle along with evaporative emission Canister Purge Valve. Separate the A/C pipes while discarding their O-ring elements and take away the hindmost tube of A/C equipment if necessary. Fellow professionals should drain power steering fluid while performing removal of the right-hand inner fender splash shield. Apply a strap wrench to remove the crankshaft bolt together with the washer followed by using a 3-jaw puller on the crankshaft pulley and finally using an oil seal remover to discard the crankshaft front seal. Use tooling to remove the Y-pipe-to-catalytic converter nuts and the Y-pipe and discard both the gaskets and nuts that are removed. Attach the hose which drains engine oil back to the Power Steering Reservoir. Americans should begin by removing the RH and LH valve covers and then separate the wiring harness retainer while disconnecting the power steering pressure switch electrical connector. Set up the oil pan holding fixture correctly before removing the Power Steering Pump with its Engine Mount parts. To protect the engine interior use a 3M Roloc bristle disk (part number 07528) which operates at 15,000 rpm to clean the engine front cover after extracting its bolts while preventing foreign matter from entering the engine. Add Motorcraft high performance engine RTV silicone to designated locations before attaching and torquing the engine front cover bolts in a particular order. Begin by installing new thread sealer on the engine mount studs then place both the engine mount bracket and engine mount before final torque to designated settings. The refit process starts with power steering pump installation followed by valve covers and exhaust components installation. Before installing new front seal and crankshaft pulley it is necessary to apply lubrication to the Crankshaft Seal bore. The power steering cooler tube needs new O-ring seals when reconnecting its components. Also use the crankshaft pulley bolt tightening method in stages. The last procedure requires reinstallation of degas bottles followed by replacement of accessory drive belts and front wheels before finishing with clean fluid drips into the engine and power steering system to enable A/C recharge.

Related Ford Flex Parts
 Ford Flex Oil Filter
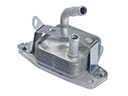 Ford Flex Engine Oil Cooler
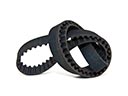 Ford Flex Timing Belt
 Ford Flex Camshaft
 Ford Flex Crankshaft Pulley
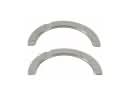 Ford Flex Crankshaft Thrust Washer
 Ford Flex Cylinder Head
 Ford Flex Cylinder Head Bolts
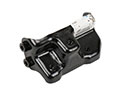 Ford Flex Engine Mount Bracket
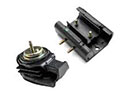 Ford Flex Motor And Transmission Mount
 Ford Flex Oil Pump Gasket
 Ford Flex Valve Cover Gasket