FordParts
My Garage
My Account
Cart
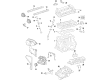
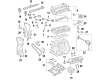
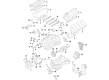
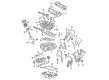
OEM Ford Fusion Timing Cover
Engine Timing Cover- Select Vehicle by Model
- Select Vehicle by VIN
Select Vehicle by Model
orMake
Model
Year
Select Vehicle by VIN
For the most accurate results, select vehicle by your VIN (Vehicle Identification Number).
13 Timing Covers found


Ford Fusion Timing Cover, Front Upper Part Number: BM5Z-6019-C
$72.14 MSRP: $105.00You Save: $32.86 (32%)Ships in 1-2 Business Days


Ford Fusion Timing Cover, Front Part Number: 9E5Z-6019-B
$127.21 MSRP: $185.17You Save: $57.96 (32%)Ships in 1-3 Business Days

Ford Fusion Timing Cover, Front Part Number: 7T4Z-6019-C
$127.10 MSRP: $185.00You Save: $57.90 (32%)Ships in 1-3 Business Days

Ford Fusion Timing Cover, Front Part Number: 9L8Z-6019-A
$152.40 MSRP: $221.83You Save: $69.43 (32%)Ships in 1-3 Business Days
Ford Fusion Timing Cover, Front Part Number: 6M8Z-6019-B
$111.97 MSRP: $162.98You Save: $51.01 (32%)Ships in 1-3 Business Days

Ford Fusion Timing Cover, Front Part Number: CV6Z-6019-C
$104.08 MSRP: $160.17You Save: $56.09 (36%)Ships in 1-3 Business Days

Ford Fusion Timing Cover, Front Part Number: CJ5Z-6019-G
$103.32 MSRP: $159.00You Save: $55.68 (36%)Ships in 1-3 Business Days
Ford Fusion Cover - Cylinder Front Part Number: KS7Z-6019-B
$129.39 MSRP: $188.33You Save: $58.94 (32%)Ships in 1-2 Business Days
Ford Fusion Timing Cover, Front Part Number: FT4Z-6019-H
$214.52 MSRP: $315.00You Save: $100.48 (32%)Ships in 1-3 Business Days
Ford Fusion Front Cover Part Number: FT4Z-6019-B
$45.67 MSRP: $65.33You Save: $19.66 (31%)Ships in 1-3 Business Days

Ford Fusion Timing Cover, Front Part Number: CJ5Z-6019-D

Ford Fusion Timing Cover, Front Part Number: 8E5Z-6019-A

Ford Fusion Timing Cover, Front Part Number: CV6Z-6019-B
Ford Fusion Timing Cover
OEM Timing Cover boasts unmatched quality. Each part goes through full quality checks. They adhere to Ford's official factory standards. These steps remove flaws and inconsistencies. So you can get Timing Cover with long life and a perfect fit. Come to our website and find genuine Ford Fusion parts. We keep a wide inventory of OEM Fusion parts at the highly affordable prices. It's easy to search, compare, and pick what you need. You'll love the clear info and simple checkout. We offer top-rated customer service, and we reply fast. We also ship promptly to ensure your order arrives on time.
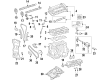
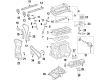
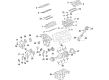
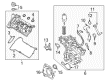
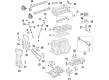
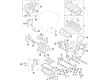
The Timing Cover of Ford Fusion cars plays a very important part in protecting the engine's timing mechanism which could consist of a belt, chain or cam belt. Made of strong and durable material including aluminum, plastic or steel, the Timing Cover shields other parts from the ravages of debris. Most Ford Fusion Timing Covers come with gaskets that provide added safeguard as to the timing belt. Timing Covers, no matter how sturdy they may be, can also fail at some point and this is why it is always important to replace it on time to avoid any danger in operating the vehicle. For Ford Fusion, a number of Timing Covers have been used throughout the years and each of them had as primary purpose the one of providing protection to the desired part, however, the construction material or the construction characteristics might have been different. The Timing Cover plays a significant role in the Ford Fusion as an automobile and it therefore requires regular maintainers and any problem that may occur must be well dealt with.
Ford Fusion Timing Cover Parts and Q&A
- Q: How to Service and Repair the Engine Front Timing Cover to Prevent Engine Failure on Ford Fusion?A:The breakdown of engine front cover service demands proper cleaning practices to avoid engine malfunction due to foreign matter. As a first step position the vehicle on a hoist while in neutral and you should evacuate the fuel system pressure and disconnect the ground cable of the battery. Proceed by removing the crankshaft front seal before disconnecting both the crankshaft position (CKP) sensor retainer and accessory drive belt tensioner and its accompanying two idler pulleys. The procedure next requires removing the LH and RH valve covers and then using three bolts to position the Power Steering Pump aside before removing the Engine Mount and bracket. The team disconnects the LH and RH camshaft position (CMP) sensors and positions the wiring harness to the side before also severing the electrical connectors of the A/C compressor and generator and oil pressure sender. To set the generator aside properly remove the stud bolt and two bolts then move on to taking out the two Oil Pan-to-front cover bolts and finally uninstalling 14 bolts and two stud bolts that secure the engine front cover by discarding the gaskets. Start by cleaning the mating surfaces with a plastic scraping tool followed by metal surface cleaner application. After that distribute 6 mm (0.23 inch) diameter dots of silicone gasket and sealer to the sealing spots. Place the engine front cover correctly while installing 14 bolts together with two stud bolts and two oil pan-to-front cover bolts. Tighten all fasteners to 25 Nm (18 ft. lbs.) according to the specified sequence. The removal of the oil pan plug allows draining the engine oil which needs to be reinstalled and torque tightened to 26 Nm (19 ft. lbs.). Use the two bolts and one stud bolt to mount the generator with 48 Nm (35 ft. lbs.) torque while reconnecting all the oil pressure sender, generator, A/C compressor electrical connectors. The LH and RH CMP sensors receive installation alongside the engine mount and bracket along with the power steering pump which utilizes three bolts that should be secured at 25 Nm (18 ft. lbs.). The complete installation includes adding LH and RH valve covers and the accessory drive belt tensioner and two idler pulleys together with CKP sensor installation and crankshaft front seal and clean engine oil and battery ground cable reconnection and power steering system filling.

Related Ford Fusion Parts
 Ford Fusion Oil Filter
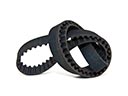 Ford Fusion Timing Belt
 Ford Fusion Engine Mount
 Ford Fusion Cylinder Head
 Ford Fusion Crankshaft Pulley
 Ford Fusion Crankshaft Seal
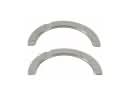 Ford Fusion Crankshaft Thrust Washer
 Ford Fusion Exhaust Valve
 Ford Fusion Oil Drain Plug Gasket
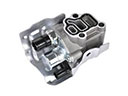 Ford Fusion Spool Valve
 Ford Fusion Timing Chain Tensioner
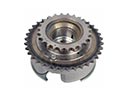 Ford Fusion Variable Timing Sprocket