FordParts
My Garage
My Account
Cart
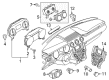
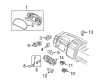
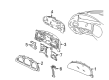
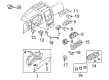
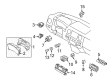
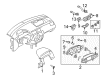
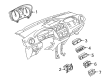
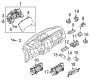
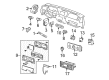
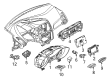
OEM Ford Instrument Cluster
Speedometer Instrument Cluster- Select Vehicle by Model
- Select Vehicle by VIN
Select Vehicle by Model
orMake
Model
Year
Select Vehicle by VIN
For the most accurate results, select vehicle by your VIN (Vehicle Identification Number).
1302 Instrument Clusters found


Ford Cluster Assembly Part Number: FR3Z-10849-AH
$618.99 MSRP: $837.86You Save: $218.87 (27%)Ships in 1-3 Business DaysProduct Specifications- Other Name: Instrument Cluster


Ford Instrument Cluster Part Number: 8L8Z-10849-A
$498.14 MSRP: $666.68You Save: $168.54 (26%)Ships in 1-3 Business DaysProduct Specifications- Other Name: Cluster Assembly
- Manufacturer Note: Order From Instrument Cluster Online Ordering System Using The Online 1878 Form


Ford Instrument Cluster Part Number: 5F1Z-10849-HA
$512.96 MSRP: $686.77You Save: $173.81 (26%)Ships in 1-3 Business DaysProduct Specifications- Other Name: Cluster Assembly
- Replaces: 4F1Z-10849-AC


Ford Instrument Cluster Part Number: DB5Z-10849-TA
$551.05 MSRP: $738.40You Save: $187.35 (26%)Ships in 1-3 Business Days


Ford Instrument Cluster Part Number: 5C7Z-10849-CA
$562.71 MSRP: $754.20You Save: $191.49 (26%)Ships in 1-3 Business DaysProduct Specifications- Other Name: Cluster Assembly
- Manufacturer Note: Instrument cluster, MPH/kmh speedometer, All diesel engines, All automatic transmissions, FROM 01-NOV-2004


Ford Instrument Cluster Part Number: 7L2Z-10849-BA
$351.90 MSRP: $468.45You Save: $116.55 (25%)Ships in 1-3 Business Days

Ford Instrument Cluster Part Number: EC3Z-10849-EA
$326.79 MSRP: $434.42You Save: $107.63 (25%)

Ford Instrument Cluster Part Number: CC3Z-10849-EA
$339.50 MSRP: $451.65You Save: $112.15 (25%)Product Specifications- Other Name: Cluster Assembly
- Replaces: BC3Z-10849-EB, BC3Z-10849-ED, BC3Z-10849-EC, BC3Z-10849-CEA


Ford Instrument Cluster Part Number: 4S4Z-10849-BA
$347.28 MSRP: $462.18You Save: $114.90 (25%)
Ford Instrument Cluster Part Number: 7L2Z-10849-AA
$384.83 MSRP: $513.09You Save: $128.26 (25%)

Ford Instrument Cluster Part Number: 9T1Z-10849-F
$385.32 MSRP: $513.75You Save: $128.43 (25%)Product Specifications- Other Name: Cluster Assembly


Ford Instrument Cluster Part Number: AL3Z-10849-VA
$398.60 MSRP: $531.75You Save: $133.15 (26%)


Ford Instrument Cluster Part Number: 5C2Z-10849-AA
$479.05 MSRP: $640.80You Save: $161.75 (26%)Product Specifications- Manufacturer Note: Order From Instrument Cluster Online Ordering System Using The Online 1878 Form


Ford Instrument Cluster Part Number: 9L8Z-10849-C
$479.80 MSRP: $641.82You Save: $162.02 (26%)Product Specifications- Other Name: Cluster Assembly
- Manufacturer Note: Order From Instrument Cluster Online Ordering System Using The Online 1878 Form


Ford Instrument Cluster Part Number: 8W7Z-10849-C
$481.07 MSRP: $643.54You Save: $162.47 (26%)
Ford Instrument Cluster Part Number: 7C2Z-10849-E
$492.25 MSRP: $658.69You Save: $166.44 (26%)Product Specifications- Manufacturer Note: Order From Instrument Cluster Online Ordering System Using The Online 1878 Form


Ford Instrument Cluster Part Number: 9C3Z-10849-FG
$495.37 MSRP: $662.92You Save: $167.55 (26%)Product Specifications- Manufacturer Note: Order From Instrument Cluster Online Ordering System Using The Online 1878 Form


Ford Cluster Assembly Part Number: CM5Z-10849-CTA
$506.01 MSRP: $677.34You Save: $171.33 (26%)Product Specifications- Other Name: Instrument Cluster

Ford Instrument Cluster Part Number: 9C3Z-10849-FE
$511.91 MSRP: $685.34You Save: $173.43 (26%)Product Specifications- Manufacturer Note: Order From Instrument Cluster Online Ordering System Using The Online 1878 Form

Ford Instrument Cluster Part Number: 4C3Z-10849-HB
$553.70 MSRP: $741.98You Save: $188.28 (26%)Product Specifications- Other Name: Cluster Assembly
| Page 1 of 66 |Next >
1-20 of 1302 Results
Ford Instrument Cluster
If you own Ford and want to keep it in top shape, choosing OEM Instrument Cluster is a smart move. They are precisely engineered and follow strict factory standards. They are made in advanced facilities that use cutting edge technology. Each part goes through thorough testing to confirm strength and safety, so you can trust it. FordPartsDeal.com gives you genuine Ford Instrument Cluster at some of the affordable online prices without cutting quality. Every OEM Ford part includes the manufacturer's warranty, easy returns, and super-fast delivery. So why wait? Shop now and get your vehicle back to peak condition.
Ford Instrument Cluster provides easy to understand real time vehicle information to ensure that drivers make prompt and sure decisions. Ford began in 1903 and continued to disrupt assembly lines to prove that a faster car could also be a better car to ordinary people. Punchy EcoBoost engines (combining power with thrift) and electric trucks (no tailpipe fumes) are some of the real things that the company counts on. SYNC voice control allows blasting the playlist or route planning without a touch of the finger, and Co-Pilot360 keeps the lanes on the screen and smacks the brakes in case of trouble. In hatchbacks, in pickups and SUVs, the brand continues to innovate to make trips smoother, fun and safer to every one on board. Instrument Cluster is positioned in front of the wheel and fits the tachometer, speedometer and fuel gauge in to a single panel that is easy to look at. Instrument Cluster throws blaring warning messages of engine heat, insufficient fuel or a loose belt in such a way that you respond before minor problems become bigger. Ford also has indicators on Instrument Cluster in all its models that allows you to check essential systems without having to move your eyes off the road. Instrument Cluster has sharp analog display dials, or digital displays depending on trim, but either way the display remains readable both in sunshine and moonlight. Ford insists that the layout remains intuitive such that drivers do not use a lot of time in scanning but steering. Ford supports that claim by providing swap in replacement that will once more give full gauge accuracy in case age or damage sneak in.
Ford Instrument Cluster Parts and Q&A
- Q: How to remove and install the instrument cluster on Ford Mustang?A:Disconnect the cable from the negative terminal of the battery. Remove the instrument cluster bezel. Detach the instrument cluster from the instrument panel by removing the four mounting screws. Pull the instrument cluster out far enough to disconnect the electrical connector by lifting up the locking lever. Installation is the reverse of removal.
- Q: Is the removal of the instrument cluster a difficult procedure not recommended for the home mechanic on 1993-2011 Ford Ranger?A:The process of removing the instrument panel is a complex operation which should be performed by an experienced mechanics because there are a lot of concealed screws and wires and connectors which should be found and unplugged. Before starting it is recommendable to write the development and to take analogue and digital photographs. If one has no high skill level, or experience; and has no assistant, it is advisable to take the car for this procedure in a dealership. First, you need to immobilize or secure the steering column in the forward most position using a lock or clamp you then have to remove the steering wheel. On the models from 1998 release the retaining tabs on the fuse box and move it aside in the engine compartment. Jump the Ohm meter by opening the hood to find and remove the instrument cluster electrical connectors. Screw the release handle of the hood and the parking brake control from the instrument panel. If the car has an inside center console, then it has to be unbolted as well and remember, if the front seats are to be relocated first, then it is much easier to do it this way. Secondly, turn and remove the knee bolster mounted on the lower part of the steering column. To shift from low range to 2WD, for 4WD models with shift levers, push the transfer case control all the way forward. The steering column cover and reinforcement can be taken off from the instrument panel, above the brake pedal near the booster pushrod and the upper connector at the clutch pedal connected to the clutch actuation rod should be detached. Remove the upper part of the steering column from the cross member of instrument panel and gently lay it down. I loosen and then unbolt the bracket at the right of the accelerator pedal And then take the trim covers at at the carpet edge of the bottom of door jam and also the kick panels and the trims at both sides of the wind shield. Disconnect the fuse box in the passenger compartment for models after 1997, which is located above the left rear portion of the dashboard, behind a cover with 'fuse' on it. Remove the electrical connectors from the center, right side, and left side of the instrument panel which interfaces to radio, climate control and electrical modules. In the fuse box opening, the two mechanical fasteners holding the IP to the cowl should be removed, in addition to the single wingnut at the lower right-hand corner of the IP. If fitted, it is possible to remove the sound deadener at the lower right of the instrument panel. Using a wooden tool start lifting the edge of the defroster grille until you remove the clips holding it and remove the grille. Take out the bolts behind the panel at the top and the accompanying electrical connectors can be disconnected as well. Make sure that the panel is fully removed from the vehicle before pulling up the panel, most preferably with the assistance of another person. It is performed in the reverse order to that followed in removal of components.


Related Ford Parts
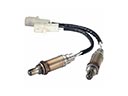 Ford Oxygen Sensor
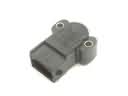 Ford Throttle Position Sensor
 Ford Relay
 Ford ABS Control Module
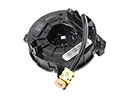 Ford Clock Spring
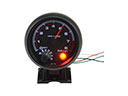 Ford Tachometer
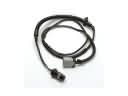 Ford Fuel Pump Wiring Harness
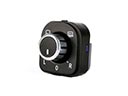 Ford Mirror Switch
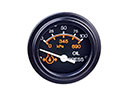 Ford Oil Pressure Gauge
 Ford Air Bag Sensor
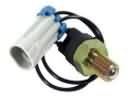 Ford Back Up Light Switch
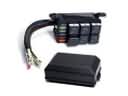 Ford Relay Block
Browse Ford Instrument Cluster by Models
Ranger Bronco Mustang Explorer Focus Fusion F-150 Maverick Escape Edge Excursion Expedition Fiesta Taurus Thunderbird Flex Transit Connect Bronco Sport Explorer Sport Trac Crown Victoria Probe EcoSport Escort F-250 Aerostar Aspire C-Max Contour E-150 Econoline Explorer Sport F-350 Five Hundred Freestar Freestyle Mustang Mach-E Police Interceptor Utility Taurus X Windstar F-350 Super Duty Police Interceptor Sedan E-150 E-150 Club Wagon E-150 Econoline Club Wagon E-250 E-250 Econoline E-350 Club Wagon E-350 Econoline E-350 Econoline Club Wagon E-350 Super Duty E-Transit F-150 Heritage F-150 Lightning F-250 HD F-250 Super Duty Police Responder Hybrid Special Service Police Sedan SSV Plug-In Hybrid Transit-150 Transit-250 Transit-350 Transit-350 HD