FordParts
My Garage
My Account
Cart
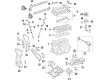
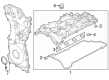
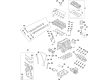
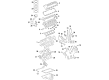
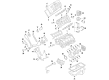
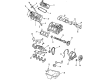
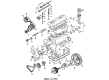
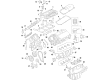
OEM Ford Mustang Timing Cover
Engine Timing Cover- Select Vehicle by Model
- Select Vehicle by VIN
Select Vehicle by Model
orMake
Model
Year
Select Vehicle by VIN
For the most accurate results, select vehicle by your VIN (Vehicle Identification Number).
22 Timing Covers found


Ford Mustang Timing Cover, Front Part Number: FR3Z-6019-A
$144.27 MSRP: $210.00You Save: $65.73 (32%)Ships in 1-3 Business Days


Ford Mustang Timing Cover, Front Part Number: BR3Z-6019-G
$139.69 MSRP: $203.33You Save: $63.64 (32%)
Ford Mustang Timing Cover, Front Part Number: CJ5Z-6019-G
$103.32 MSRP: $159.00You Save: $55.68 (36%)Ships in 1-3 Business Days
Ford Mustang Timing Cover, Front Part Number: PB5Z-6019-A
$133.97 MSRP: $195.00You Save: $61.03 (32%)Ships in 1-2 Business Days
Ford Mustang Cover - Cylinder Front Part Number: PB5Z-6019-D
$127.10 MSRP: $185.00You Save: $57.90 (32%)Ships in 1-2 Business Days

Ford Mustang Timing Cover, Front Part Number: BR3Z-6019-K
$129.73 MSRP: $188.83You Save: $59.10 (32%)Ships in 1-2 Business Days
Ford Mustang Timing Cover, Front Part Number: JR3Z-6019-B
$148.85 MSRP: $216.67You Save: $67.82 (32%)
Ford Mustang Timing Cover, Front Passenger Side Part Number: 7R3Z-6019-A
$170.61 MSRP: $248.33You Save: $77.72 (32%)
Ford Mustang Timing Cover, Front Part Number: KR3Z-6019-A
$184.35 MSRP: $268.33You Save: $83.98 (32%)
Ford Mustang Timing Cover, Front Part Number: JR3Z-6019-C
$164.88 MSRP: $240.00You Save: $75.12 (32%)Ships in 1-3 Business Days


Ford Mustang Timing Cover, Front Part Number: 5L2Z-6019-AA
$63.86 MSRP: $92.95You Save: $29.09 (32%)


Ford Mustang Timing Cover, Front Part Number: 2W7Z-6019-AB
$142.32 MSRP: $207.17You Save: $64.85 (32%)


Ford Mustang Timing Cover, Front Part Number: BR3Z-6019-B
$460.81 MSRP: $676.67You Save: $215.86 (32%)


Ford Mustang Timing Cover Part Number: F4SZ-6019-DA

Ford Mustang Oil Pump, Front Part Number: 4F2Z-6019-BA
Ford Mustang Oil Pump, Front Part Number: 4F2Z-6019-AA
Ford Mustang Timing Cover, Front Part Number: F8ZZ-6019-CA

Ford Mustang Timing Cover, Front Part Number: F1SZ-6019-A


Ford Mustang Timing Cover, Front Part Number: 9R3Z-6019-A
| Page 1 of 2 |Next >
1-20 of 22 Results
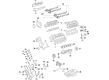
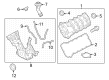
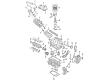
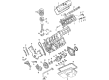
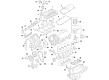
Ford Mustang Timing Cover
OEM Timing Cover boasts unmatched quality. Each part goes through full quality checks. They adhere to Ford's official factory standards. These steps remove flaws and inconsistencies. So you can get Timing Cover with long life and a perfect fit. Come to our website and find genuine Ford Mustang parts. We keep a wide inventory of OEM Mustang parts at the highly affordable prices. It's easy to search, compare, and pick what you need. You'll love the clear info and simple checkout. We offer top-rated customer service, and we reply fast. We also ship promptly to ensure your order arrives on time.
The Timing Cover of Ford Mustang vehicles locking is vital in safeguarding the engines timing mechanism part such as the timing belt or chain. Made out of strong materials including aluminum, plastic, or steel the Timing Cover protects such components from dust and impact. The majority of the covers have gasketing that boosts the defense of the timing belt. In the past, many variants of Timing Covers have been incorporated into the designs of Ford Mustang cars so as to suit the respective engine types. Although Timing Covers are very sturdy, they can develop problems suddenly which is why it is important to replace them on time to avoid any complications in your car's performance and or accidents. Failure indicators including rough engine performance or suspension sounds can also be periodically checked in an effort to keep the long term functionality of the Ford Mustang's engine components.
Ford Mustang Timing Cover Parts and Q&A
- Q: How to service and repair the timing cover on Ford Mustang?A:Service and repairs of the timing cover require first disconnecting the battery negative cable and draining the engine cooling system. Starting the service requires isolation of the crankshaft pulley and Water Pump pulley before setting the Power Steering Pump to the side. Service professionals begin maintenance on the timing cover by disconnecting the EGR Tube followed by upper radiator hose disconnect and bypass hose disconnect and then proceed to disconnect the CMP sensor and heater water tube and camshaft synchronizer assembly. The procedure for engine front cover removal starts with disconnecting the lower radiator hose and Crankshaft Position Sensor while removing the wiring harness pin-type retainer and oil filter. Before you remove the hidden cap screw ensure the engine front cover remains undamaged and note down the fastener information for disposal of the gasket. During installation seal the coolant and oil paths to stop contamination and clean gasket mounting areas without brushing them and use clean shop towels to protect the exposed Oil Pan space by plugging the oil and coolant passages. Scrape the surfaces needing gasket sealant using metal surface cleaner followed by compressed air to evacuate debris. The installation process requires you to remove shop towels and plugs before applying silicone gasket and sealant for the new engine front cover gasket installation sequence while proceeding to install engine front cover and bolts. Follow the specified fastener sequence to tighten the water pump components to 26 Nm (19 ft. lbs.) but exclude the number 12 bolt from the sequence. You should install a new oil filter along with the wiring harness pin-type retainer before connecting the crankshaft position sensor electrical connector. After successful reconnection of these components start with the lower radiator hose and then follow with the camshaft synchronizer assembly and heater water outlet tube and CMP sensor and its electrical connector. Reconnect all bypass hose elements before attaching the upper radiator hose and EGR tube simultaneously with the power steering pump and water pump pulley and crankshaft pulley. Last steps include filling the engine cooling system then changing and draining the oil with fresh clean engine oil and rejoining the battery ground wire.
- Q: How to Address Timing Cover Issues on a Ford Mustang?A:Service and repair of the timing cover begins with disconnecting the battery negative cable followed by draining the engine cooling system. Begin the procedure by removing the crankshaft pulley as well as the water pump pulley then proceed to take off the Power Steering Pump and bracket followed by EGR Tube disconnect and coolant hoses. The service starts by removing the Camshaft Position Sensor alongside the heater water outlet tube and the camshaft synchronizer assembly and lower radiator hose and Crankshaft Position Sensor. Before removing the engine front cover the hidden cap screw must be carefully removed to prevent damage to the cover along with making a record of fastener characteristics which will be needed to reinstall the cover and dispose of the gasket. Install the new engine front cover gasket by applying F7AZ-19554-EA Silicone Gasket and Sealant F7AZ-19554-EA or another product that fulfills Ford specification WSE-M4G323-A4 to the mounting surfaces of engine front cover, Oil Pan, and cylinder block. Ahead of installing the new gasket on the engine front cover, repeat the application of sealant. Use recorded fastener details to install the engine front cover by adding torque to 22 Nm (16 ft. lbs.) then continuing with an additional 90 degrees of tightening while keeping in mind that fastener number twelve is excluded from staged installation. Reinstall the wiring harness pin-type retainer while connecting the CMP sensor with electrical connector along with the lower radiator hose and the heater water outlet tube and the camshaft synchronizer assembly. In the last stage, the process involves hose connection along with the EGR tube before reinstalling the power steering pump and bracket and water pump pulley and crankshaft pulley. The procedure concludes with filling the engine cooling system and reconnecting the battery negative cable.


Related Ford Mustang Parts
 Ford Mustang Crankshaft
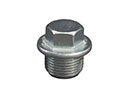 Ford Mustang Oil Drain Plug
 Ford Mustang Oil Pump
 Ford Mustang Crankshaft Pulley
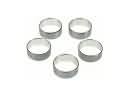 Ford Mustang Camshaft Bearing
 Ford Mustang Cylinder Head
 Ford Mustang Engine Mount Torque Strut
 Ford Mustang Intake Valve
 Ford Mustang Oil Pan Baffle
 Ford Mustang Oil Pan Gasket
 Ford Mustang Piston Ring Set
 Ford Mustang Timing Belt Tensioner