FordParts
My Garage
My Account
Cart
OEM Ford Taurus Door Latch Assembly
Door Latch- Select Vehicle by Model
- Select Vehicle by VIN
Select Vehicle by Model
orMake
Model
Year
Select Vehicle by VIN
For the most accurate results, select vehicle by your VIN (Vehicle Identification Number).
35 Door Latch Assemblys found


Ford Taurus Lock Actuator, Driver Side Part Number: DG1Z-5421813-A
$135.79 MSRP: $197.65You Save: $61.86 (32%)Ships in 1-2 Business Days
Ford Taurus Lock Actuator, Driver Side Part Number: DG1Z-5421813-C
$147.18 MSRP: $227.13You Save: $79.95 (36%)Ships in 1-2 Business Days
Ford Taurus Lock Actuator, Front Driver Side Part Number: DG1Z-5421813-B
$150.77 MSRP: $232.67You Save: $81.90 (36%)Ships in 1 Business Day
Ford Taurus Lock Actuator, Passenger Side Part Number: DG1Z-5421812-C
$151.02 MSRP: $233.05You Save: $82.03 (36%)Ships in 1-3 Business Days


Ford Taurus Latch Assembly, Front Driver Side Part Number: 6C2Z-1521813-A
$132.81 MSRP: $193.32You Save: $60.51 (32%)Ships in 1 Business Day
Ford Taurus Lock Actuator, Front Passenger Side Part Number: DG1Z-5421812-B
$157.22 MSRP: $228.85You Save: $71.63 (32%)Ships in 1-2 Business Days
Ford Taurus Lock Actuator, Front Passenger Side Part Number: DG1Z-5421812-A
$160.65 MSRP: $233.85You Save: $73.20 (32%)Ships in 1-2 Business Days


Ford Taurus Lock Actuator, Rear Passenger Side Part Number: DG1Z-5426412-A
$163.72 MSRP: $238.32You Save: $74.60 (32%)Ships in 1-2 Business Days

Ford Taurus Release Rod Retainer Clip, Front Part Number: XR8Z-65219A24-AA
$14.19 MSRP: $20.13You Save: $5.94 (30%)Ships in 1-2 Business Days


Ford Taurus Lock, Rear Part Number: YF1Z-7443150-AA
$424.47 MSRP: $582.38You Save: $157.91 (28%)
Ford Taurus Lock Actuator, Rear Passenger Side Part Number: 6L2Z-78218A42-B
$10.50 MSRP: $16.93You Save: $6.43 (38%)Ships in 1-3 Business DaysFord Taurus Lock Actuator, Front Driver Side Part Number: 6L2Z-78218A43-B
$12.74 MSRP: $20.55You Save: $7.81 (38%)Ships in 1-2 Business DaysFord Taurus Lock Actuator, Rear Driver Side Part Number: DG1Z-5426413-A
$152.90 MSRP: $235.95You Save: $83.05 (36%)Ships in 1-2 Business Days
Ford Taurus Lock Actuator, Driver Side Part Number: F8DZ-54218A43-A
$18.54 MSRP: $25.66You Save: $7.12 (28%)Ships in 1-2 Business Days
Ford Taurus Lock Actuator, Front Part Number: 5F1Z-14A626-AA
$35.22 MSRP: $48.73You Save: $13.51 (28%)Ships in 1-2 Business Days
Ford Taurus Lock, Passenger Side Part Number: F6DZ-5421812-A
$25.61 MSRP: $34.86You Save: $9.25 (27%)


| Page 1 of 2 |Next >
1-20 of 35 Results
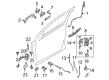
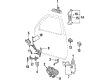
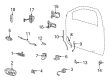
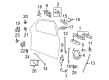
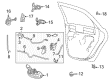
Ford Taurus Door Latch Assembly
OEM Door Latch Assembly boasts unmatched quality. Each part goes through full quality checks. They adhere to Ford's official factory standards. These steps remove flaws and inconsistencies. So you can get Door Latch Assembly with long life and a perfect fit. Come to our website and find genuine Ford Taurus parts. We keep a wide inventory of OEM Taurus parts at the highly affordable prices. It's easy to search, compare, and pick what you need. You'll love the clear info and simple checkout. We offer top-rated customer service, and we reply fast. We also ship promptly to ensure your order arrives on time.
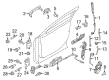
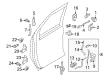
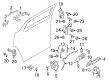
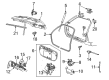
In Ford Taurus cars, the Door Latch Assembly functions of lock the car doors, thus eliminating accessibility to the passenger cabin by unauthorized persons. This assembly is able to work with variety of locking systems which can be either automatic or manual based on the doors and can be designed for one door or all doors at once. And in Ford Taurus over the years, models have been using Door Latch Assembly of various styles, but all have been designed for reliability and the convenience of its consumers. Some of the problems that may cause a need for replacement of the Door Latch Assembly may include problems with the outer door handles, with the stick mechanism or with the door lock button. Maintenance of the assemble guarantees the dependability of the Ford Taurus Door Latch Assembly and adds the necessary safety and reliability to the car.
Ford Taurus Door Latch Assembly Parts and Q&A
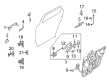
- Q: How to Remove and Install the Front Door Latch Assembly on Ford Taurus?A:Uninstall of the front door latch starts with trimming off the front door panel and removing the bolt before setting the Interior Door Handle aside. You should position the watershield to the side before you disconnect the electrical connectors of the exterior mirror and keyless entry keypad and front door disarm switch. Pass the grommet of wiring harness through the door module before you link the electrical connectors for Window Regulator and window switch and position the front door window to reach the window glass clamp bolts. Remove the electrical connectors of both the window regulator and the window switch while carefully recording how to reach the forward window glass clamp bolt by passing through the wiring harness grommet hole. Move two bolts securing the window glass clamp then increase the window glass to maximum height before securing it with tape. Start by removing the circlip from the door lock cylinder and setting aside the front door lock cylinder rod together with pawl before taking out the front door lock cylinder pawl from the actuating rod. After opening the yellow clip you can disconnect the Exterior Door Handle actuating rod from the front door latch. Proceed to remove the three front door latch bolts and eleven bolts to set the door module aside. Remove the rain hat by pulling out the push pin while you disconnect the door ajar switch along with Door Lock Actuator electrical connectors and the push button rod from the latch of the front door. The interior door handle cable should be released from its position on the latch and the front door latch must be retrieved from its bracket position and any necessary door lock actuator or door ajar switch components need to be removed. The process of installation requires adding the door ajar switch and door lock actuator only if needed. Install the door lock cylinder pawl together with the door disarm switch onto the door lock cylinder and secure it with the circlip. The front door latch requires installation on the bracket then the interior door handle cable gets connected to the latch before the rain hat is installed. On the front door latch install the push button rod before you attach both the electric connectors from the door ajar switch and door lock actuator. Affix the door module afterward tightening the eleven bolts to 8 Nm (71 lb-in) and the three front door latch bolts to 12 Nm (106 lb-in). The installation of exterior door handle and door latch should be completed properly before attaching the exterior door handle actuating rod to the yellow clip which should freely dangle to prevent misadjustment. The front door latch needs the exterior door handle actuating rod connected through the yellow clip which should be closed. Install the two window glass clamp bolts starting with the front door lock cylinder pawl connection for actuating rods and position the window in complete rearward position before tightening to 8 Nm (71 lb-in). After guiding the grommet through the door module push the wiring harness until you connect the exterior mirror electrical connector and keyless entry keypad and front door disarm switch electrical leads if installation requires them. Before putting on the front door trim panel you must install the watershield and set the interior door handle before inserting the bolt to a loose fit. Install the interior door handle bolt through the hole and rotate it until it reaches 7 Nm (62 lb-in).
- Q: How to service and repair the front Door Latch Assembly on Ford Taurus?A:Service or repair of the front door latch requires you to first remove the trim panel and bolt before positioning the Interior Door Handle to one side. Start by placing the watershield to the side then disconnect external mirror power supply in addition to removing keyless entry keypad and front door disarm switch power connections. The door module grommet should be pushed through while connecting Window Regulator and window switch connectors until you can reach the window glass clamp bolts. The window regulator and window switch electrical connectors should be disconnected after marking the forward window glass clamp bolt position since it requires passing through the wiring harness grommet hole. Use pliers to remove two window glass clamp bolts before raising the glass window up to final position with tape as prevention. You must start by taking off the door lock cylinder circlip yet keep the front door lock cylinder rod and pawl off to the side before extracting the front door lock cylinder pawl from its actuating rod. Open the yellow clip to detach the Exterior Door Handle actuating rod from the front door latch and then remove all eleven bolts alongside the three front door latch bolts that will secure the door module in position. Separate the door ajar switch and door lock actuator electrical connectors after disconnecting the push button rod from the front door latch and removing its rain hat using a push pin. The interior door handle cable needs release from the latch before removing the front door latch from its bracket which might require removal of both the door lock actuator and door ajar switch. First position the door lock cylinder pawl along with the door disarm switch following door ajar switch and door lock actuator installation when required. Place the front door latch onto its bracket while joining the interior door handle cable to the latch then position the rain hat onto its designated place on the latch. Affix the push button rod to the front door latch before connecting both the door ajar switch and door lock actuator electrical connection wires. Position the door module before installing eleven bolts secured at 8 Nm (71 lb-in) while the three front door latch bolts should be tight to 12 Nm (9 lb-ft). When the exterior door handle meets specification the technician should install it and tighten the door latch before hanging the exterior door handle rod with the yellow clip to maintain free movement and prevent alignment problems. Install the exterior door handle actuating rod to the front door latch by sealing the yellow clip before following up with the front door lock cylinder actuating rod connection to the front door lock cylinder pawl. Place the two window glass clamp bolts on the window while it stays fully rearward in both clamps so you can tighten them to 8 Nm (71 lb-in). Feeder the wiring harness grommet through the door module and setup the keyless entry keypad along with the front door disarm switch electrical connector if present and also connect the exterior mirror electrical connector in case of equipment. You should first install the watershield followed by positioning the interior door handle before loosely installing the bolt. Prepare the front door trim panel before aligning its interior door handle pins to the front trim and installing the interior handle bolt while tightening it to 7 Nm (62 lb-in).


Related Ford Taurus Parts
 Ford Taurus Window Motor
 Ford Taurus Floor Pan
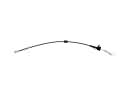 Ford Taurus Door Latch Cable
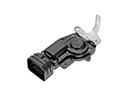 Ford Taurus Door Lock Actuator Motor
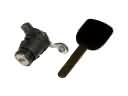 Ford Taurus Door Lock Cylinder
 Ford Taurus Front Door Striker
 Ford Taurus Glove Box
 Ford Taurus Lift Support
 Ford Taurus Seat Switch
 Ford Taurus Shift Indicator
 Ford Taurus Tailgate Lock
 Ford Taurus Window Run
Browse Ford Taurus Door Latch Assembly by Years
2019
2018
2017
2016
2015
2014
2013
2012
2011
2010
2009
2008
2007
2006
2005
2004
2003
2002
2001
2000
1999
1998
1997
1996
1995
1994
1993
1992
1991
1990
1989
1988
1987
1986