FordParts
My Garage
My Account
Cart
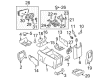
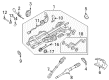
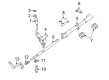
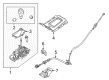
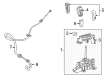
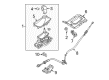
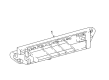
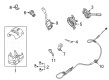
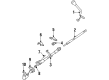
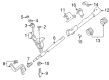
OEM Lincoln Automatic Transmission Shifter
AT Shifter- Select Vehicle by Model
- Select Vehicle by VIN
Select Vehicle by Model
orMake
Model
Year
Select Vehicle by VIN
For the most accurate results, select vehicle by your VIN (Vehicle Identification Number).
66 Automatic Transmission Shifters found


Lincoln Gearshift Housing Part Number: 2L7Z-7210-FC
$972.00 MSRP: $1440.00You Save: $468.00 (33%)Product Specifications- Other Name: Lever - Gear Shift; Shift Lever
- Manufacturer Note: (-D*)
- Replaces: 2L7Z-7210-FB


Lincoln Shift Lever Part Number: 5L1Z-7210-AA
$133.97 MSRP: $195.00You Save: $61.03 (32%)Ships in 1-2 Business DaysProduct Specifications- Other Name: Lever - Transmission Gear Shift; Automatic Transmission Shift Lever; Gear Shift Assembly


Lincoln Shift Lever Part Number: 4L3Z-7210-BAA
$166.25 MSRP: $242.00You Save: $75.75 (32%)Product Specifications- Other Name: Lever - Transmission Gear Shift; Automatic/Manual Control Lever.; Gear Shift Assembly; Gearshift Lever
- Manufacturer Note: Includes overdrive cancel button, wiring, and cap. Graphics: "Overdrive Off".
- Replaces: 1L3Z-7210-CAA, F65Z-7210-AA, YL3Z-7210-BB

Lincoln Shifter Assembly Part Number: GA1Z-7210-AB
$158.76 MSRP: $245.00You Save: $86.24 (36%)Ships in 1-3 Business DaysProduct Specifications- Other Name: Lever - Gear Shift; Gear Shift Assembly
- Replaces: CA1Z-7210-CA, CA1Z-7210-CC, CA1Z-7210-CB, CA1Z-7210-CD, GA1Z-7210-AA
Lincoln Shifter Assembly Part Number: GA1Z-7210-BB
$180.58 MSRP: $278.67You Save: $98.09 (36%)Ships in 1-3 Business DaysProduct Specifications- Other Name: Lever - Gear Shift; Automatic Transmission Selector Handle; Shift Lever; Gear Shift Assembly
- Replaces: DA1Z-7210-AA, DA1Z-7210-AB, DA1Z-7210-AC, GA1Z-7210-BA

Lincoln Shifter Part Number: FL7Z-7210-CA
$551.25 MSRP: $816.67You Save: $265.42 (33%)Ships in 1-3 Business DaysProduct Specifications- Other Name: Lever - Gear Shift; Shift Lever
- Manufacturer Note: Ebony
Lincoln Gearshift Housing, Camel Part Number: 2L7Z-7210-GB
$970.88 MSRP: $1438.33You Save: $467.45 (33%)Ships in 1-3 Business DaysProduct Specifications- Other Name: Lever - Gear Shift; Shift Lever
- Replaces: 2L7Z-7210-GA


Lincoln Shift Knob, Black/Charcoal Part Number: DE9Z-7213-AB
$69.85 MSRP: $101.67You Save: $31.82 (32%)Ships in 1-3 Business DaysProduct Specifications- Other Name: Handle Assembly; Automatic Transmission Selector Handle
- Manufacturer Note: BLACK
- Replaces: DE9Z-7213-AA
Lincoln Shift Knob, Charcoal Part Number: DE9Z-7213-CB
$87.28 MSRP: $127.05You Save: $39.77 (32%)Ships in 1-3 Business DaysProduct Specifications- Other Name: Handle Assembly; Automatic Transmission Selector Handle
- Manufacturer Note: BLACK
- Replaces: DE9Z-7213-CA

Lincoln Shifter Assembly, Black Part Number: GE9Z-7210-AB
$204.75 MSRP: $300.67You Save: $95.92 (32%)Ships in 1-3 Business DaysProduct Specifications- Other Name: Lever - Gear Shift; Automatic Transmission Selector Handle; Shift Lever; Gear Shift Assembly
- Replaces: DE9Z-7210-AB, DE9Z-7210-AE, DE9Z-7210-AC, GE9Z-7210-AA

Lincoln Shifter Assembly, Black Part Number: GA5Z-7210-AB
$204.75 MSRP: $300.67You Save: $95.92 (32%)Ships in 1-3 Business DaysProduct Specifications- Other Name: Lever - Gear Shift; Automatic Transmission Selector Handle; Shift Lever; Gear Shift Assembly
- Replaces: DA5Z-7210-AC, DA5Z-7210-AA, DA5Z-7210-AD, GA5Z-7210-AA

Lincoln Gear Shift Assembly Part Number: NL7Z-7P155-A
$204.96 MSRP: $298.33You Save: $93.37 (32%)Ships in 1-2 Business DaysProduct Specifications- Other Name: Selector Assembly - Transmission; Actuator
- Replaced by: NL7Z-7P155-B


Lincoln Shift Lever, Black/Charcoal Part Number: 8W1Z-7210-AC
Product Specifications- Other Name: Lever; Automatic Transmission Shift Lever; Gear Shift Assembly
- Replaces: 5W1Z-7210-AAK


Lincoln Shifter, Charcoal Part Number: BL7Z-7210-AC
$439.47 MSRP: $645.33You Save: $205.86 (32%)Product Specifications- Other Name: Lever - Gear Shift; Shift Lever


Lincoln Shift Lever Part Number: XW7Z-7210-AA
Product Specifications- Other Name: Lever - Transmission
- Replaces: F8AZ-7210-BA

Lincoln Shift Lever, Camel Part Number: 8W1Z-7210-AB
Product Specifications- Other Name: Lever; Automatic Transmission Shift Lever; Gear Shift Assembly
- Replaces: 5W1Z-7210-AAJ

Lincoln Shift Lever, Graystone Part Number: 8W1Z-7210-AA
Product Specifications- Other Name: Lever; Automatic Transmission Shift Lever; Gear Shift Assembly
- Replaces: 5W1Z-7210-AAL

Lincoln Gearshift Housing Part Number: 5L7Z-7210-AA
Product Specifications- Other Name: Lever - Gear Shift; Shift Lever
- Manufacturer Note: Charcoal Black


Lincoln Shift Lever Part Number: 5L2Z-7210-AA
Product Specifications- Other Name: Lever - Transmission Gear Shift; Automatic Transmission Shift Lever; Gear Shift Assembly
- Replaces: 1L2Z-7210-AD
Lincoln Shifter Part Number: FL7Z-7210-DA
Product Specifications- Other Name: Lever - Gear Shift; Shift Lever
- Manufacturer Note: Coffee
| Page 1 of 4 |Next >
1-20 of 66 Results
Lincoln Automatic Transmission Shifter
If you own Lincoln and want to keep it in top shape, choosing OEM Automatic Transmission Shifter is a smart move. They are precisely engineered and follow strict factory standards. They are made in advanced facilities that use cutting edge technology. Each part goes through thorough testing to confirm strength and safety, so you can trust it. FordPartsDeal.com gives you genuine Lincoln Automatic Transmission Shifter at some of the affordable online prices without cutting quality. Every OEM Lincoln part includes the manufacturer's warranty, easy returns, and super-fast delivery. So why wait? Shop now and get your vehicle back to peak condition.
Lincoln Automatic Transmission Shifter allows motorists to flick between gears without lagging and without loss of attention. Lincoln has been championing quiet cabins ever since 1917; the brand is now coating all its sedans and SUVs in dense insulation and active noise cancellation to ensure that no-noise conversations are crystal clear and fatigue is eliminated during extended journeys. Lincoln combines light touchpoints, large digital dials, and Co-Pilot360 apps, where young or experienced drivers receive straightening of the lanes, blind-spot notifications, auto high-beam, and parking assistance before issues become more complicated. Lincoln continues updating such features as the ActiveGlide enabling driving without hands on the wheel on the tracked highways and tracking the eyes and steering routes to maintain confidence. Lincoln is flexible since feedback from owners directly translates into future plans, ensuring that shoppers are not overwhelmed with hype and jargon. In the new Automatic Transmission Shifter, the heavy linkages are replaced by a shift-by-wire system, and the cabin designers have the freedom of placing neat rotary knobs or sharp buttons right where the hands would fall. Misplaced gear selection is also blocked by Automatic Transmission Shifter logic, which prevents accidents when drivers are in a hurry to take a three-point turn. The internals are heat-treated to allow the Automatic Transmission Shifter to endure the pain of daily stop-and-go punishment without wobbling as its smart park program holds the vehicle in place when the belts are unbuckled. Despite these smarts, the Automatic Transmission Shifter remains easy to use: twist or tap, can hear the click, drive away.
Lincoln Automatic Transmission Shifter Parts and Q&A
- Q: How to service and repair the automatic transmission shifter on Lincoln Navigator?A:You should start maintenance or repair tasks on an automatic transmission shifter by taking out both the ignition switch lock cylinder and upper steering column shroud. Separate the electrical cable then take off the gearshift control by getting rid of the necessary gearshift lever pin. During gearshift lever installation replace the gearshift lever pin because it requires new replacement whenever removal occurs. The correct reverse procedure must be followed for successful assembly.
- Q: How to service and repair the Automatic Transmission Shifter on Lincoln Town Car?A:Servicing the automatic transmission selector lever requires a safety procedure first involving power supply depletion for air bag protection and battery cable detachment followed by one-minute waiting time and additional battery power disconnect if present. The procedure starts with removing the screw holding the lower steering column opening finish panel before placing the parking brake release handle to the side to release two retaining clips. The lower steering column opening finish panel reinforcement needs five screws to be removed prior to unscrewing the four screws holding the lower steering column shroud in place. As next step you must detach both the upper steering column shroud and unscrew the transmission control (TC) switch harness connector. Unplug the TC switch harness so that it can be separated from its wiring locations. Afterward disconnect the gearshift lever cover from the column where it rests. The gearshift lever requires new replacement along with both its components and its pin to be taken out. Complete the installation by following the reversal steps of removal while discarding and avoiding the reuse of the original gearshift lever pin.


Related Lincoln Parts
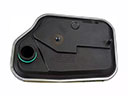 Lincoln Automatic Transmission Filter
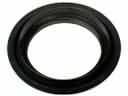 Lincoln Automatic Transmission Seal
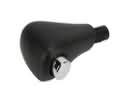 Lincoln Automatic Transmission Shift Levers
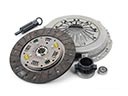 Lincoln Clutch Disc
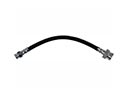 Lincoln Clutch Hose
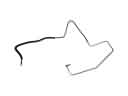 Lincoln Clutch Hydraulic Lines
 Lincoln Clutch Master Cylinder
 Lincoln Dipstick Tube
 Lincoln Flywheel
 Lincoln Pushrod
 Lincoln Shift Cable
 Lincoln Transmission Fluid Temperature Sensor