FordParts
My Garage
My Account
Cart
OEM Lincoln MKZ Headlight Bulb
Headlamp Bulb- Select Vehicle by Model
- Select Vehicle by VIN
Select Vehicle by Model
orMake
Model
Year
Select Vehicle by VIN
For the most accurate results, select vehicle by your VIN (Vehicle Identification Number).
7 Headlight Bulbs found


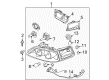
Lincoln MKZ Hid Bulb, Front Part Number: 7L7Z-13N021-A
$169.07 MSRP: $255.00You Save: $85.93 (34%)Ships in 1 Business Day

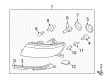
Lincoln MKZ Backup Lamp Bulb Part Number: 8L2Z-13466-A
$27.48 MSRP: $40.00You Save: $12.52 (32%)

Lincoln MKZ High Mount Bulb, Rear Part Number: F5RZ-13466-C
$1.42 MSRP: $2.02You Save: $0.60 (30%)Ships in 1-3 Business Days

Lincoln MKZ Signal Lamp Bulb, Front Part Number: E35Y-13466-B
$2.03 MSRP: $2.88You Save: $0.85 (30%)Ships in 1-3 Business Days
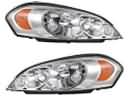
Lincoln MKZ Headlamp Bulb, Front Part Number: 93BZ-13466-A
$27.48 MSRP: $40.00You Save: $12.52 (32%)Ships in 1-2 Business Days
Lincoln MKZ Tail Lamp Bulb, Front Part Number: YR3Z-13466-AD
$2.82 MSRP: $4.00You Save: $1.18 (30%)

Lincoln MKZ Hid Bulb Part Number: 2U5Z-13N021-AA
Lincoln MKZ Headlight Bulb
OEM Headlight Bulb boasts unmatched quality. Each part goes through full quality checks. They adhere to Lincoln's official factory standards. These steps remove flaws and inconsistencies. So you can get Headlight Bulb with long life and a perfect fit. Come to our website and find genuine Lincoln MKZ parts. We keep a wide inventory of OEM MKZ parts at the highly affordable prices. It's easy to search, compare, and pick what you need. You'll love the clear info and simple checkout. We offer top-rated customer service, and we reply fast. We also ship promptly to ensure your order arrives on time.
Lincoln MKZ Headlight Bulb is one of the vital components of the Lincoln MKZ vehicles that improves both, functioning and safety in case of night or other low visibility situations. As expected of the MKZ Headlight Bulb, this product is highly regarded for its quality and dependability, and the Halogen, HID, and LED types are available. Halogen bulbs are bright and perform well, but are known to fade gradually and require replacement at times hence the name 'dimming halogen bulbs,' while HID bulbs produce bright white light, but the light color as well as the intensity is not constant and may shift from time to time. More remarkable though is the LED headlight bulb which not only provides better and whiter light, motor2 but comes with new generation cooling mechanics that would easily increase its life time over traditional ones. This makes the Lincoln MKZ Headlight Bulb a necessity if one wants to get a car that has an improved efficiency and safety. Fitting on different MKZ models, the headlight bulb serves a significant function of lighting up the road to enhance conditions that are appropriate for driving devoid of probable accidents. This luxury sedan model, which made its debut in 2007, boasts of its first-rate components and stylish designs and it underlines to us why good quality headlight bulbs are considered in the Lincoln MKZ. This Lincoln MKZ Headlight Bulb is a clear testament to this committed excellence, giving it the image that it holds in the automotive market - an image of performance and safety that is creations such as the Lincoln MKZ are proud to back up.
Lincoln MKZ Headlight Bulb Parts and Q&A
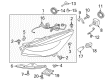
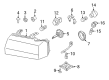
- Q: How to Service the LH Headlight Bulb on Lincoln MKZ?A:The first requirement to service the left headlamp bulb is to switch off both the headlamp switch and ignition switch. The first step requires you to disconnect the air cleaner intake component. The next step involves removing the protective cover of the headlamp bulb followed by disconnecting its electrical connector to extract the headlamp bulb. Finger the bulb base to keep away from the glass envelope because pressure-filled gas inside makes the bulb break if you touch it and causes possible harm. Safety requires users to not take out the bulb for long durations due to potential contamination threats which could degrade headlamp functionality. Installation of the new bulb requires following the removal procedure in reverse order by completely sealing the protective cover.
- Q: How to Service the RH Headlight Bulb on Lincoln MKZ?A:The first step to servicing right headlamp bulbs requires both the headlamp and ignition switches to be located in off position. Handle the headlamp bulb by its base because its gas under pressure can lead to personal injuries. Leave the bulb untouched until the moment of replacement due to contaminant risks that cause performance deterioration. The hoisting procedure begins by detaching the fender splash shield access cover through its screw when the vehicle remains in neutral position. Before this installation proceed for 3.5L engine vehicles with anti-lock brake system (ABS) operators need to remove their engine appearance cover followed by the bolt that secures the windshield washer reservoir filler tube. Disconnection of the windshield washer reservoir filler tube remains the only needed step for vehicles that lack anti-lock brake system (ABS). Detach the electrical connector before removing the headlamp bulb protective cover and the headlamp bulb. Install the bulb by proceeding with the opposite steps of removal while ensuring the headlamp bulb protective cover remains entirely sealed.


Related Lincoln MKZ Parts
 Lincoln MKZ Headlight
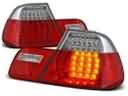 Lincoln MKZ Tail Light
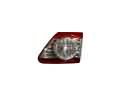 Lincoln MKZ Back Up Light
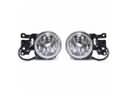 Lincoln MKZ Fog Light
 Lincoln MKZ Fog Light Bulb
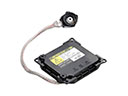 Lincoln MKZ Hid Bulb Ballast
 Lincoln MKZ Instrument Panel Light Bulb
 Lincoln MKZ Interior Light Bulb
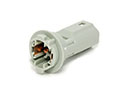 Lincoln MKZ Light Socket
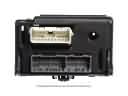 Lincoln MKZ Lighting Control Module
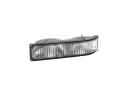 Lincoln MKZ Side Marker Light
Browse Lincoln MKZ Headlight Bulb by Years
2012
2011
2010
2009
2008
2007