FordParts
My Garage
My Account
Cart
OEM Mercury Milan Control Arm
Suspension Arm- Select Vehicle by Model
- Select Vehicle by VIN
Select Vehicle by Model
orMake
Model
Year
Select Vehicle by VIN
For the most accurate results, select vehicle by your VIN (Vehicle Identification Number).
12 Control Arms found


Mercury Milan Front Lower Control Arm Part Number: AE5Z-3078-A
$67.41 MSRP: $110.91You Save: $43.50 (40%)Ships in 1-2 Business Days

Mercury Milan Rear Lower Control Arm, Front Passenger Side Part Number: BE5Z-3078-B
$103.87 MSRP: $170.91You Save: $67.04 (40%)Ships in 1-2 Business Days


Mercury Milan Rear Lower Control Arm, Front Driver Side Part Number: BE5Z-3079-A
$100.11 MSRP: $164.73You Save: $64.62 (40%)Ships in 1-2 Business Days


Mercury Milan Upper Control Arm, Front Driver Side Part Number: AE5Z-3085-A
$130.39 MSRP: $232.73You Save: $102.34 (44%)Ships in 1-2 Business Days


Mercury Milan Upper Control Arm, Front Passenger Side Part Number: AE5Z-3084-A
$135.92 MSRP: $223.64You Save: $87.72 (40%)Ships in 1-2 Business Days
Mercury Milan Upper Control Arm, Front Passenger Side Part Number: 7E5Z-3084-R
$61.14 MSRP: $84.58You Save: $23.44 (28%)Ships in 1-2 Business Days


Mercury Milan Front Lower Control Arm Part Number: 6M8Z-3078-A


Mercury Milan Control Arm
OEM Control Arm boasts unmatched quality. Each part goes through full quality checks. They adhere to Mercury's official factory standards. These steps remove flaws and inconsistencies. So you can get Control Arm with long life and a perfect fit. Come to our website and find genuine Mercury Milan parts. We keep a wide inventory of OEM Milan parts at the highly affordable prices. It's easy to search, compare, and pick what you need. You'll love the clear info and simple checkout. We offer top-rated customer service, and we reply fast. We also ship promptly to ensure your order arrives on time.
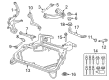
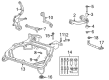
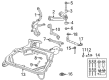
The Mercury Milan Control Arm is a key part that plays enormous role towards the reliability and performance of the Mercury Milan cars. The Control Arm is a major connecting point for the frame of a vehicle and wheels as it helps the suspension system work and provide for as much vertical movement of the wheels as needed based on the type of surfaces encountered. This feature is crucial to make the Mercury Milan maintain the needed parameter of energy efficiency and security to respond to any driving conditions effectively. Applicable for most Mercury Milan models, which were manufactured from 2006 to 2011, the Control Arm is available in upper and lower variants, depending on performance requirements. The design of these Control Arms is quite different: a traditional stamped steel is available as well as more progressive cast steel or aluminum - such materials give the necessary density while diminishing weight. For instance, as performance-oriented Mercury Milan Control Arms, DOM tubular steel or aluminium is used since it has higher stress and better handling ability. Moreover, it must be noted that it is possible to install more sophisticated bushings and ball joints into the Control Arm, which would improve the value of the steering response and alignment. Four of these features include: The Mercury Milan enjoys these features and thus the Control Arm can be considered unique in the market. In summary, the Mercury Milan Control Arm is one of the hallmarks of this brand, that ensures its customers of a vehicle that is dependable and efficient when on the road.
Mercury Milan Control Arm Parts and Q&A
- Q: How to service and repair the upper control arm on Mercury Milan?A:Service and repair of the upper control arm begins with removing and discarding three Shock Absorber upper mount nuts followed by tire and wheel removal. The procedure starts with removing the wheel speed sensor bolt along with the wheel speed sensor harness bolt before moving the wheel speed sensor to a safe place. The upper ball joint requires a Steering Arm Remover tool combined with discarding the nut before you remove the wheel knuckle from the joint. When you push the shock absorber and spring assembly toward the wheel knuckle you will reach the upper arm-to-body bolts to extract them together with the upper arm so discard the bolts afterward. The first step when installing the upper arm consists of placing it in position before adding two new upper arm-to-body bolts. Insert the 6.35 mm (0.25 in) drill bit through the upper arm hole to match it with the body bracket hole before using a torque wrench to apply 55 Nm (41 lb-ft) and remove the drill bit. The shock and spring assembly should be moved into place before securing three shock upper mount nuts with a torque of 30 Nm (22 lb-ft). Place the upper ball joint into position before adding a new nut which should be tightened to 48 Nm (35 lb-ft). Toronto the wheel speed sensor harness bolt with 23 Nm torque (17 lb-ft) and then secure the wheel speed sensor bolt with the same 23 Nm (17 lb-ft) torque. Reinstall the wheel while also checking the front end alignment before possible corrections.

Related Mercury Milan Parts
 Mercury Milan Coil Springs
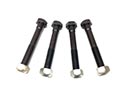 Mercury Milan Control Arm Bolt
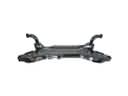 Mercury Milan Front Cross-Member
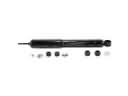 Mercury Milan Shock Absorber
 Mercury Milan Steering Knuckle
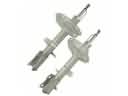 Mercury Milan Strut Housing
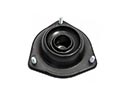 Mercury Milan Strut Mounts
 Mercury Milan Sway Bar Bracket
 Mercury Milan Sway Bar Link
 Mercury Milan Sway Bars
 Mercury Milan Torsion Bar
 Mercury Milan Wheel Hub
Browse Mercury Milan Control Arm by Years
2011
2010
2009
2008
2007
2006