
Popular OEM Ford E-150 Econoline Parts
- Body & Hardware Parts View More >
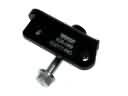
- Electrical Parts View More >
- Interior & Exterior Trim Parts View More >
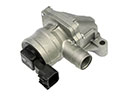
- Air & Fuel Delivery Parts View More >
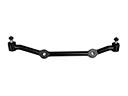
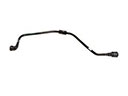
- Steering Parts View More >
- Emission Control & Exhaust Parts View More >
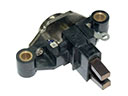
- Charging & Starting Parts View More >
- Engine Parts View More >
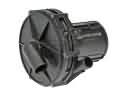
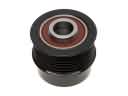
- Belts & Cooling Parts View More >
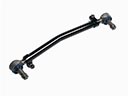
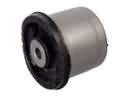
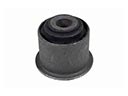
- Suspension Parts View More >
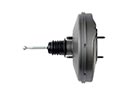
- Brakes Parts View More >
- A/C & Heating Parts View More >


Why Buy Genuine Ford E-150 Econoline Parts From FordPartsDeal.com
FordPartsDeal.com offers a smart and convenient way to buy genuine parts online. We sell new OEM Ford E-150 Econoline parts, including Headlights & Lighting. Authorized dealers directly provide all the Ford E-150 Econoline parts and assemblies to ensure the optimal quality and fit. We also provide all properly fitting Ford E-150 Econoline parts, such as Transmission, Driveline & Axles specific to your model. When you shop here, you get real Ford value at highly competitive prices. All our products come with the same Ford warranty available at other dealerships. Our easy-to-use catalog helps you quickly identify the right part for your car. You'll receive fast shipping from our warehouse network, keeping your Ford E-150 Econoline running smoothly. Our staff consists of Ford professionals who are ready to assist you. We aim to treat each customer as if they were stepping out of a Ford showroom. VIN verification and our live support ensure that the part you order is the right Ford E-150 Econoline part for your vehicle.
For forty-six years the Ford E-150 Econoline evolved through four developmental phases that improved both design possibilities and engineering reliability. Buyers who purchased the initial six-cylinder engine model of the Ford E-150 Econoline could upgrade to the V8 optional engine for better performance at a later stage. At its launch the new Ford E-150 Econoline presented a front-engine rear-wheel-drive platform design because this approach enhanced both weight distribution and driving experience. The E-150 Econoline possesses a solid 90-inch wheelbase that creates stability for transporting cargo and passengers while providing passengers with 200 cubic feet within its cabin. A redesign occurred in 1968 with manufacturers uniting F-Series pickup elements into the vehicle frame to achieve increased durability. The 1975 redesigned Ford E-150 Econoline introduced a brand new platform through reengineering to enable multiple customizable options that successfully made it suitable for ambulance and bus applications. The E-150 Econoline received transmission upgrades throughout its life cycle with manual and automatic transmission options that enhanced each driving aspect as well as efficiency levels. Using original Ford E-150 Econoline equipment benefits Ford owners because it helps preserve factory standards and maintains reliable operation performance throughout the lifespan. The precision-designed and extensively tested original equipment manufacturer parts deliver assurance to people who wish to retain their Ford E-150 Econoline at its superior performance levels.
Ford E-150 Econoline problems are organized according to the drivetrain, fuel and HVAC systems, and there are easy solutions. The problem is that the E-150 Econoline rear drivetrain vibrates when under load because of differential wear. During towing or when the vehicle is accelerating, noise, shudder, or loss of drive usually ensues. To ensure the fault, you should take a look at driveshaft angles, inspect the axle fluid and backlash. Bearing replacement, proper preload, and torque (on fasteners) are part of the service. A weak fuel pump may be a stumbling block in fuel delivery on the E-150 Econoline. The manifestations are: hard start, sputters on hills, and finding immediate stalls at stops. Confirm pressure on rails, current draw and filter restriction prior to change pumps. The E-150 Econoline may experience faded HVAC when the AC compressor desiccant slips or fails. Warm stiff air, a clicking clutch, and irregular cooling at the idle are to be expected. Test refrigerant, clutch gap and electrical feeds and install a new AC compressor as necessary due to seizure. Repair and road test the E-150 Econoline and recheck leaks or codes. Wire and follow Ford pressure specs, wiring diagrams, and torque values on all procedures. Ensure that fluids recommended by Ford are applied and ensure that modules are updated where they are. The E-150 Econoline is reliable for carrying out duties and traveling due to routine examination. Record findings in Ford servicing intervals.
Ford E-150 Econoline Parts and Q&A
- Q: How to service the air filter element on Ford E-150 Econoline?A:In order to service the air filter element, you first need to lift and remove the air cleaner inlet tube. Next, unlock the clamp and remove the air cleaner tray, and the Air Cleaner (ACL) element. Installation is a reverse process.
- Q: How to service and repair the differential case and ring gear for the 70 Limited Slip on Ford E-150 Econoline?A:To correct the Model 70 Limited Slip differential, match-mark parts, bring off the ring gear (where necessary) and hang an axle shaft on the part. Break parts apart, check over and immerse clutch packs in friction modifier. Refit with great caution with great attention to alignment and torque requirements to achieve maximum service.
- Q: How to service and repair the water pump on Ford E-150 Econoline?A:To maintain the water pump, drain the cooling system, and take away the fan, accessory drive belt, and the lower radiator hose. Disconnect the engine harness and the A/C support bracket. Uninstall the water pump bolts and bypass tube, wash gasket surfaces and install the new pump by inverting the process.


