My Garage
Cart
Make sure this part fits

Ford 2L1Z-6675-BA
Oil Pan

2002-2008 Ford 2L1Z6675BA

Customer Questions & Expert Answers (17)
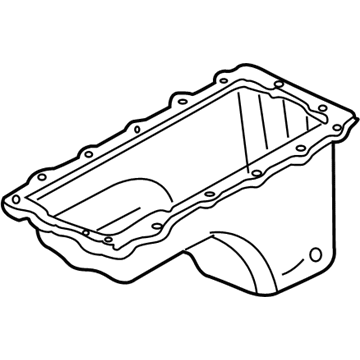
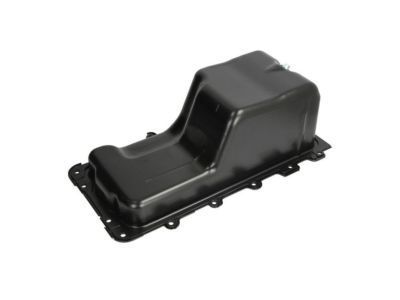
Ford 2L1Z-6675-BA Oil Pan
  • Part Description
    Pan Assembly - Engine Oil; Engine Oil Pan
  • Base No.
    6675
  • Replaces
    2L1Z-6675-AA
  • Manufacturer
    Ford
  • Manufacturer's Notes
    This part is discontinued.
Make sure this part fits
  • Related Parts
  • Product Specifications
  • Vehicle Fitment
  • Customer Questions & Expert Answers
  • Product Specifications

    BrandGenuine Ford
    Base No.6675
    Manufacturer Part Number2L1Z-6675-BA
    Part DescriptionPan Assembly - Engine Oil; Engine Oil Pan
    Manufacturer NoteLess oil temp sensor provision
    Item Dimensions8.5 x 23.4 x 12.7 inches
    Item Weight10.20 Pounds
    ConditionNew
    Fitment TypeDirect Replacement
    Replaces2L1Z-6675-AA
    ManufacturerFord
    SKU2L1Z-6675-BA
    WarrantyThis genuine Ford part is guaranteed by Ford's factory warranty.
    Shipping & ReturnShipping Policy Return Policy
    Warning: California's Proposition 65
  • Vehicle Fitment

    Year Make Model Trim Engine
    2007-2008, 2002-2004 Ford ExpeditionEddie Bauer, EL Eddie Bauer, EL King Ranch, EL Limited, EL XLT, Funkmaster Flex Edition, King Ranch, Limited, NBX, XLS, XLT, XLT Sport8 Cyl 4.6 L GAS, 8 Cyl 5.4 L GAS
    2004-2008 Ford F-150FX2, FX4, Harley-Davidson Edition, King Ranch, Lariat, Limited, STX, THE 60TH ANNIVERSARY EDITION, XL, XLT8 Cyl 4.6 L GAS, 8 Cyl 5.4 L FLEX, 8 Cyl 5.4 L GAS
    2004 Ford F-150 HeritageXL, XLT8 Cyl 4.6 L GAS
    2006-2008 Lincoln Mark LTBase8 Cyl 5.4 L GAS
    2002-2008 Lincoln NavigatorBase, L, L Luxury, L Ultimate, Luxury, Ultimate8 Cyl 5.4 L GAS
  • Customer Questions & Expert Answers

    Q:
    Can you verify if 2L1Z-6675-BA is the right one for my car? Posted by FordPartsDeal Specialist
    A:
    Select Your Vehicle model to verify if part number 2L1Z-6675-BA fits your car.
    Posted by FordPartsDeal Specialist
    Q:
    How to service and repair the oil pan on Lincoln Mark LT? Posted by Customer
    A:
    Service and repair of the oil pan begins with placing the vehicle in NEUTRAL position on a hoist while draining the engine oil. Seamlessly disconnect the support bracket of starter wiring harness by removing the 4 bolts securing the frame crossmember. Hydraulic jacks should go under front axle sections of 4WD vehicles while using secure strap attachments. First torque the steering column to achieve space for the isolator bolt followed by bolt removal of the upper front axle carrier mounting bushing bolt and lower front axle carrier mounting bushing bolt and axle shaft housing carrier bushing bolt in succession. Lower the front axle housing tactfully to prevent breaking vacuum connections leading to the axle solenoid while making room for oil pan installation. Use care to check the oil pan gasket for damage while you remove the 16 bolts and oil pan with the gaskets. If the oil pan gasket shows signs of deterioration discard both it and the oil pan-to-oil pump gaskets. Installation should not involve metal scrapers or abrasive tools since they can produce leak paths on the sealing surfaces. A plastic scraping tool should be used to prepare the mating surface while cleaning it with silicone gasket remover and metal surface prep according to the drying time indicated on the label. Insulate both cranking rear seal retainer plate-to-cylinder block surfaces and engine front cover-to-cylinder block joints with silicone sealant. Secure the 16 oil pan bolts loosely and tighten them in three distinct stages using (2 Nm, 20 Nm and another 60 degree additional twist). When working on 4WD vehicles, install the front axle housing bolts loosely followed by tightening all mounting bolts at the front axle housing RH and LH front and LH rear to 89 Nm (66 ft. lbs.). Install the frame crossmember while tightening its four bolts to 102 Nm (75 ft. lbs.). Reinstall the starter wiring harness support bracket before filling the crankcase with clean engine oil.
    Posted by FordPartsDeal Specialist
    Q:
    How to service and repair the oil pan on a 4x2 on Ford Expedition? Posted by Customer
    A:
    Before performing maintenance on the 4x2 oil pan it is necessary to turn off the air suspension switch because this action will stop the air springs from inflating or deflating unexpectedly. Position the vehicle on a hoist and pull all engine oil into drained components. Use caution during frame crossmember and oil pan bolt removal to prevent damage to seal contact areas by minimizing both metal scraper and abrasive tool usage since such contact can cause leaks. Silicone gasket remover and metal surface prep solution should be used to clean sealing surfaces before discarding the old oil pan gasket. To install the new oil pan you should use silicone gasket and sealant between the engine front cover and cylinder block mating surface and between the rear oil seal retainer and cylinder block sealing surface and after four minutes the sealant must be removed for cleaning the area before reinstalling it. First attach the new oil pan gasket together with the oil pan after that install the mounting bolts slightly until you reach 2 Nm (18 inch lbs.) and continue tightening to 20 Nm (15 ft. lbs.) before achieving an additional 60 degrees of torque. After installing the drain plug and new oil filter proceed to reposition the frame crossmember before installing its bolts. The procedure requires lowering the vehicle before adding clean engine oil then starting the engine to look for any fluid leakage. Activate the air suspension switch if the system is present.
    Posted by FordPartsDeal Specialist
    Q:
    How to service and repair the oil pan on a 4x2 on Lincoln Navigator? Posted by Customer
    A:
    You can start servicing and repairing a 4x2 oil pan after hoisting your vehicle and draining its engine oil. First detach the frame crossmember securing nuts and bolts and then proceed with removing the oil pan holding bolts. Use a plastic scraper to clean sealing surfaces because metal scrapers together with wire brushes and abrasive tools should be strictly avoided during this process. Replace the old gasket of the oil pan followed by a sealing surface cleaning with metal surface cleaner then leave both surfaces to dry for four minutes before a complete dry state becomes visible. The sealant operation must stop because the cleaning process needs to start over if the oil pan cannot be secured within four minutes. Both engine front cover-to-cylinder block and rear seal retainer-to-cylinder block sealing surfaces require application of silicone gasket and sealant. Install the new oil pan gasket together with the pan before installing the bolts in a loose manner. The bolt tightening process should begin with a application force of 2 Nm (18 inch lbs.) before increasing to 20 Nm (15 ft. lbs.) and finishing with one more 60-degree turn. Drain plug and frame crossmember should be put back in place along with engine oil filling and vehicle lowering for leak detection while starting the engine.
    Posted by FordPartsDeal Specialist
    Q:
    How to Properly Maintain and Fix the Oil Pan on a 4x2 and What Steps Are Involved for a Lincoln Navigator? Posted by Customer
    A:
    Service and repair of an oil pan on a 4x2 vehicle begins with hoisting the vehicle and draining engine oil before beginning the steps. Start by removing the bolts which maintain the crossmember of the frame while you detach the wire harness bracket through its bolt removal. You must disassemble the oil pan by removing its bolting hardware before handling it with care. Clean the sealing surfaces with a plastic scraper because metal scrapers along with wire brushes and abrasive tools can create scratches which produce leaks. The old oil pan gasket requires immediate disposal and the sealing surfaces must be cleaned with metal surface prep coupled with silicone gasket remover before drying for four minutes or until the surfaces reach complete dryness The cleaning process must start again if the oil pan remains unsecured past four minutes because the sealant substance needs removal. Silicone gasket and sealant should be applied on each mating surface between engine front cover and cylinder block and rear seal retainer and cylinder block. Place the new oil pan gasket followed by the oil pan and install the bolts without tightness. The bolt installation process should start with 2 Nm (18 inch lbs.) and then move to 20 Nm (15 ft. lbs.) before completing the process with a 60-degree bolt torque. Screw in the drain plug before placing the wire harness bracket and fastening its bolt. After installation of the frame crossmember lower the vehicle fill the engine with clean engine oil and start the motor to search for any fluid leakage.
    Posted by FordPartsDeal Specialist
    Q:
    How should the new oil pan gasket and oil pan be installed for the 2004 Ford Expedition? Posted by Customer
    A:
    Position the new oil pan gasket and oil pan, loosely install the bolts, and then tighten them in three stages.
    Posted by FordPartsDeal Specialist
    See expert answers on similar Oil Pan
    Q:
    What is the final step after reinstalling the oil pan for the 2005 Ford F-150? Posted by Customer
    A:
    Position the crossmember and install the 4 bolts, tightening them to 90 Nm (66 ft. lbs.).
    Posted by FordPartsDeal Specialist
    See expert answers on similar Oil Pan
    Q:
    What should be done with the frame crossmember for the 2007 Ford Expedition? Posted by Customer
    A:
    Reposition the frame crossmember and tighten the 4 bolts to 102 Nm (75 ft. lbs.).
    Posted by FordPartsDeal Specialist
    See expert answers on similar Oil Pan
    Q:
    What tools should be avoided when cleaning sealing surfaces for the 2006 Ford F-150? Posted by Customer
    A:
    Avoid using metal scrapers or abrasive tools.
    Posted by FordPartsDeal Specialist
    See expert answers on similar Oil Pan
    Q:
    What is the final step for the front drive axle assembly installation for the 2004 Ford F-150? Posted by Customer
    A:
    Position the front axle, install the upper front axle carrier mounting bushing bolt, the axle shaft housing carrier bushing nut and bolt, and the lower front axle carrier mounting bushing bolt.
    Posted by FordPartsDeal Specialist
    See expert answers on similar Oil Pan
    Q:
    How should the be positioned for the repair for the 2007 Ford F-150? Posted by Customer
    A:
    Position the vehicle on a hoist in NEUTRAL.
    Posted by FordPartsDeal Specialist
    See expert answers on similar Oil Pan
    Q:
    What must be done if the oil pan is not secured within 4 minutes for the 2008 Ford F-150? Posted by Customer
    A:
    The sealant must be removed, and the sealing areas cleaned again to prevent future oil leakage.
    Posted by FordPartsDeal Specialist
    See expert answers on similar Oil Pan
    Q:
    What additional step is required for four-wheel drive (4WD) for the 2008 Lincoln Mark LT? Posted by Customer
    A:
    Position a hydraulic jack under the front axle and securely strap it.
    Posted by FordPartsDeal Specialist
    See expert answers on similar Oil Pan
    Q:
    What must be done carefully when lowering the front axle housing for the 2007 Lincoln Mark LT? Posted by Customer
    A:
    Avoid disconnecting or damaging the vacuum lines to the axle solenoid.
    Posted by FordPartsDeal Specialist
    See expert answers on similar Oil Pan
    Q:
    What special consideration is needed for four-wheel drive for the 2008 Lincoln Navigator? Posted by Customer
    A:
    Support the front axle housing with a jackstand and mark the bolts and brackets for alignment during reinstallation.
    Posted by FordPartsDeal Specialist
    See expert answers on similar Oil Pan
    Q:
    How should the front axle housing be reinstalled for 4WD for the 2005 Lincoln Navigator? Posted by Customer
    A:
    Position the front axle housing, aligning it with the marked locations, and install the three bolts, tightening each to 89 Nm (66 ft. lbs.).
    Posted by FordPartsDeal Specialist
    See expert answers on similar Oil Pan
    Q:
    What should be done with the wire harness bracket for the 2006 Lincoln Navigator? Posted by Customer
    A:
    Reinstall the wire harness bracket with its bolt tightened to 10 Nm (89 inch lbs.).
    Posted by FordPartsDeal Specialist
    See expert answers on similar Oil Pan
    If you have any questions about this product, please don't hesitate to ask us. We will be happy to help you!

OEM Ford 2L1Z-6675-BA, Excellent Performance and Perfect Fitment

To ensure reliability, purchase Ford part # 2L1Z-6675-BA Oil Pan. It is sometimes referred to as Ford Oil Pan. For those Ford owners who aspire to maintain their vehicles in optimal shape, opting for OEM parts is a wise choice. Precisely engineered, these components adhere to stringent factory guidelines and are produced in state-of-the-art facilities using cutting-edge technologies. Moreover, they are subjected to thorough testing to certify their resilience and safety, thereby making them a dependable option for Ford owners.

FordPartsDeal.com is a leading supplier of genuine Ford parts such as Ford 2L1Z6675BA Oil Pan. A vast selection of genuine Ford parts is available on our website, all offered at discounted prices. Every OEM Ford part is covered by the manufacturer's warranty, which also applies to our hassle-free return policy. Enjoy fast delivery service, ensuring you get your parts when you need them. Your shopping experience here is guaranteed to be pleasurable. For detailed Ford parts information, click here.
Choose FordPartsDeal for discounted prices, exceptional service and fast delivery